5 easy steps to setup a home network. How to setup a home network to connect all your computers (desktops & laptops) so that you can share files between them.
Once you have home networking setup, you’ll be able to access files and folders that are stored on one computer from a different machine. You can browse your files, work on them and move them between computers.
Windows doesn’t make it easy to setup a home computer network, but if you follow these 5 steps in order, you’ll find that getting your Windows 10 & Windows 11 PCs connected works every time.
Step 1. Name All The Computers On Your Home Network.
The first step in setting up a home network is to give each computer a “proper” name. A name with which you’ll easily be able to identify each PC on your home network.
Try to use names that are easy to type because you may need to search your home network for a particular PC.
By default every computer will already have a name. Windows 11 usually encourages you to name your PC during the initial setup phase, but Windows 10 doesn’t do that.
How To Find The Name Of Your Computers.
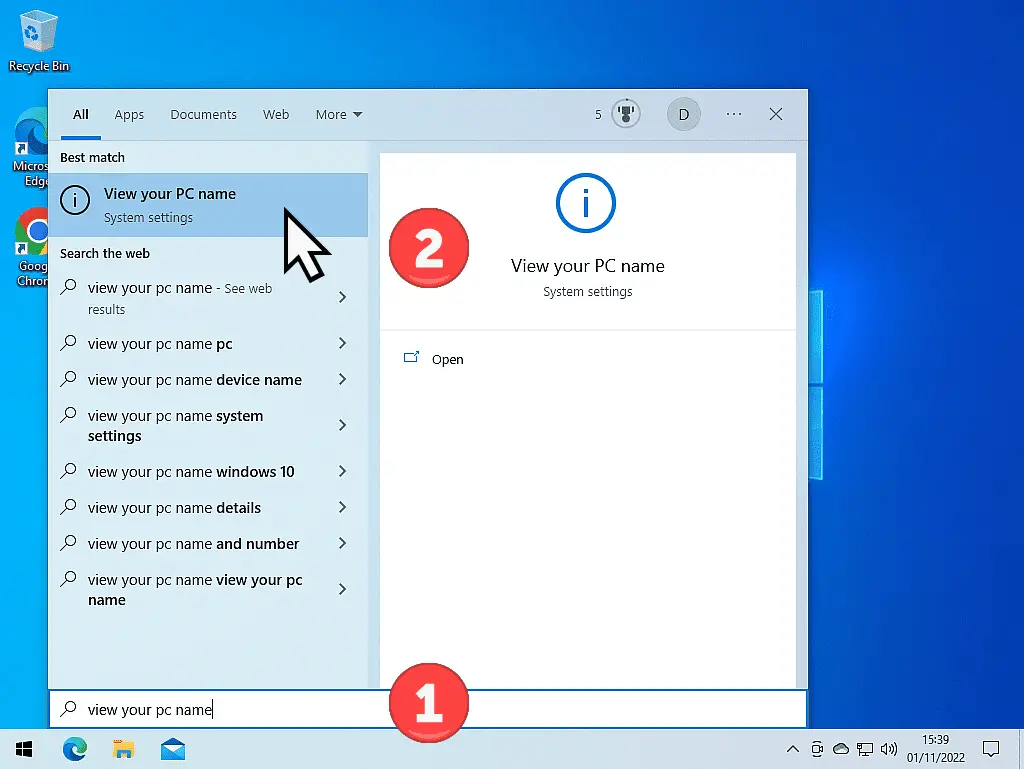
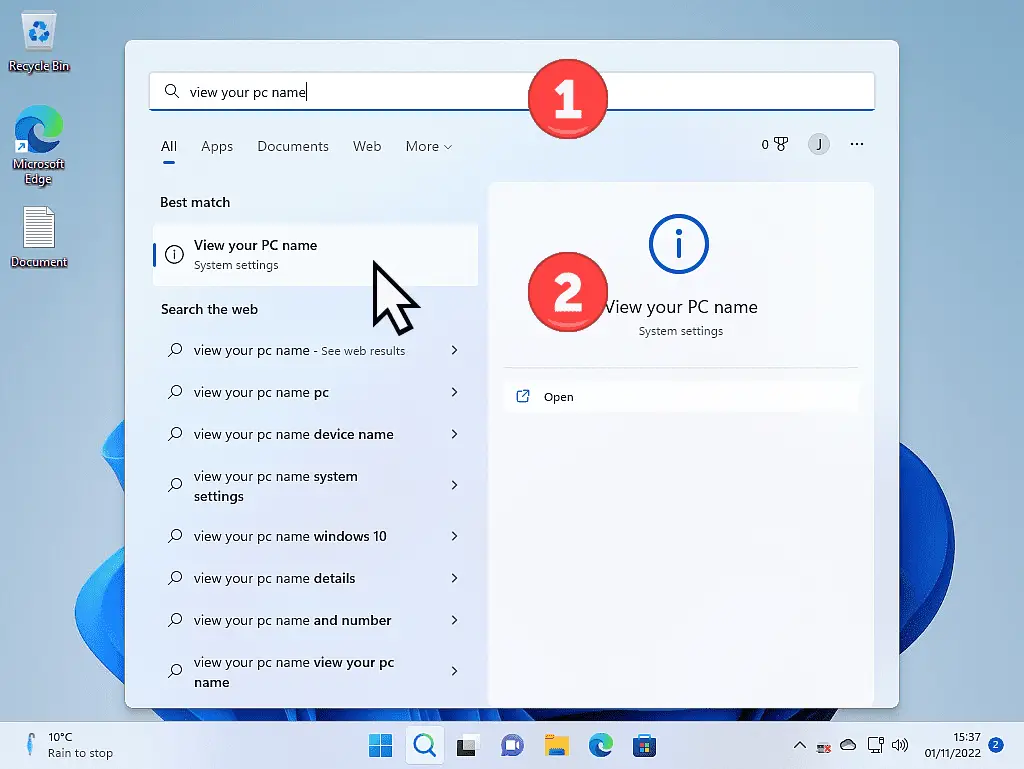
To find out what the name of your computer is at the moment, left click the Start button and then type “view your PC name“.
Click on View your PC name (System Settings).
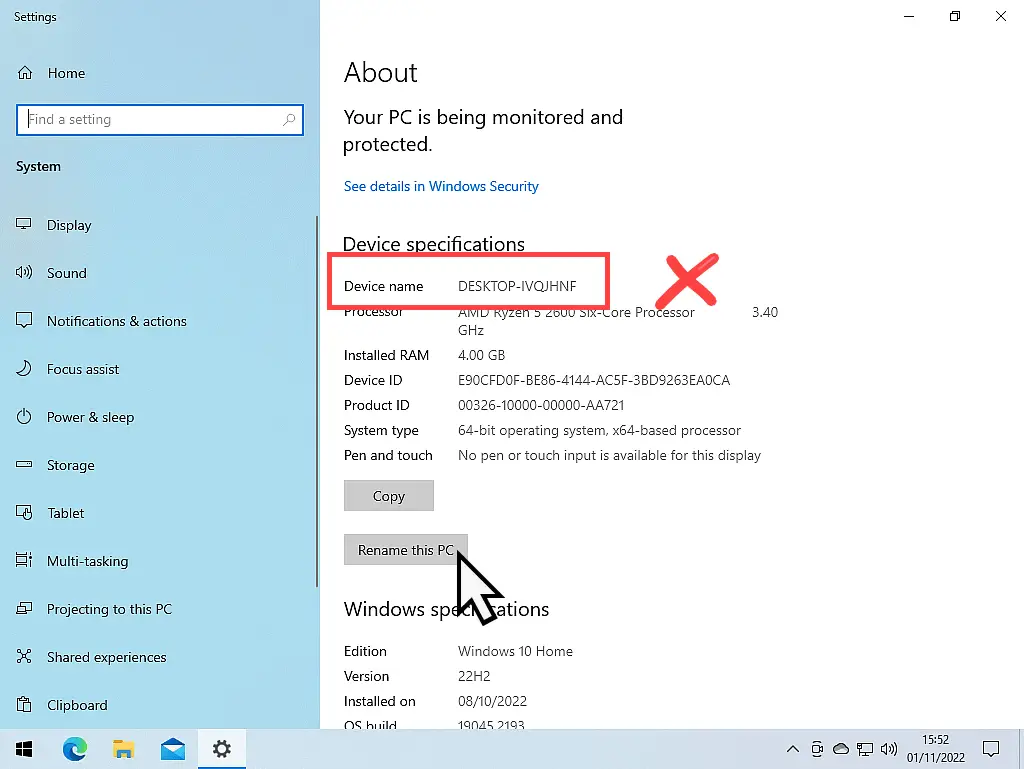
After clicking “View your PC name”, the System About page will open. Here you’ll be able to see what the current name of your computer is.
If your computer has an easy, memorable name, then it’ll be easy to find on your home network. Simply make a note of it and then close the window.
But if your computer has a difficult name to remember, then click the RENAME THIS PC button.
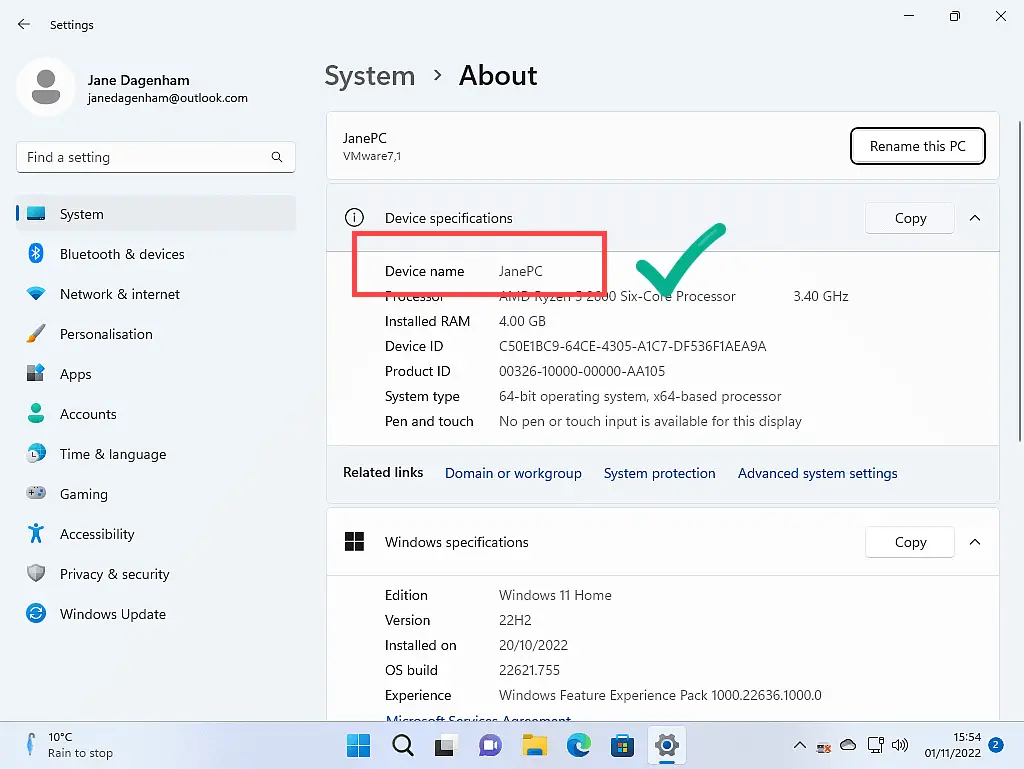
Check The Names Of All Your Computers That You Want To Network.
Check the names of all the computers that you want to connect to your home network. Do it now, don’t skip it. Do each PC in turn and rename any that you’ll find hard to remember or difficult to type.
How To Rename A Windows PC.
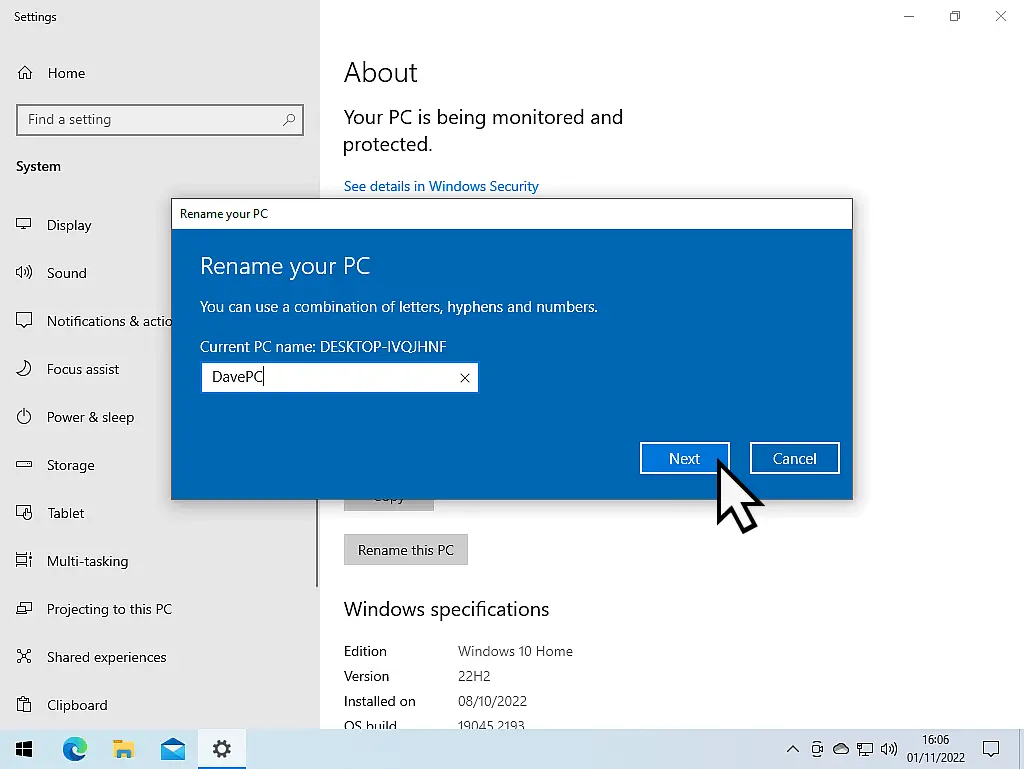
Type in a new name for your computer.
Note that you can only use letters, numbers and hyphens.
You can’t use spaces, commas, dots, question marks, slashes etc.
When you’re done, click the NEXT button.
After clicking the NEXT button, you’ll need to restart your computer.
Step 2. Check Your Computer Network Status.
When you setup your Internet (you entered the Wi-Fi password or plugged in the ethernet cable) on your computer, Windows will have “Identified” the network as either a Public network or a Private network.
Public networks are those such as coffee shops or Internet cafes etc. The sort of networks that anyone can connect to. As such, Windows doesn’t allow much in the way of file sharing for obvious reasons.
Even though you’re actually connected using your own router, Windows will probably have classified your home network as being a Public network. It’s pretty much the default action.
To setup a home network, every computer must identify it as a Private network. You’ll need to check each and everyone of the computers that you intend to add to your home network.
How To Check Your Network Status In Windows 10.
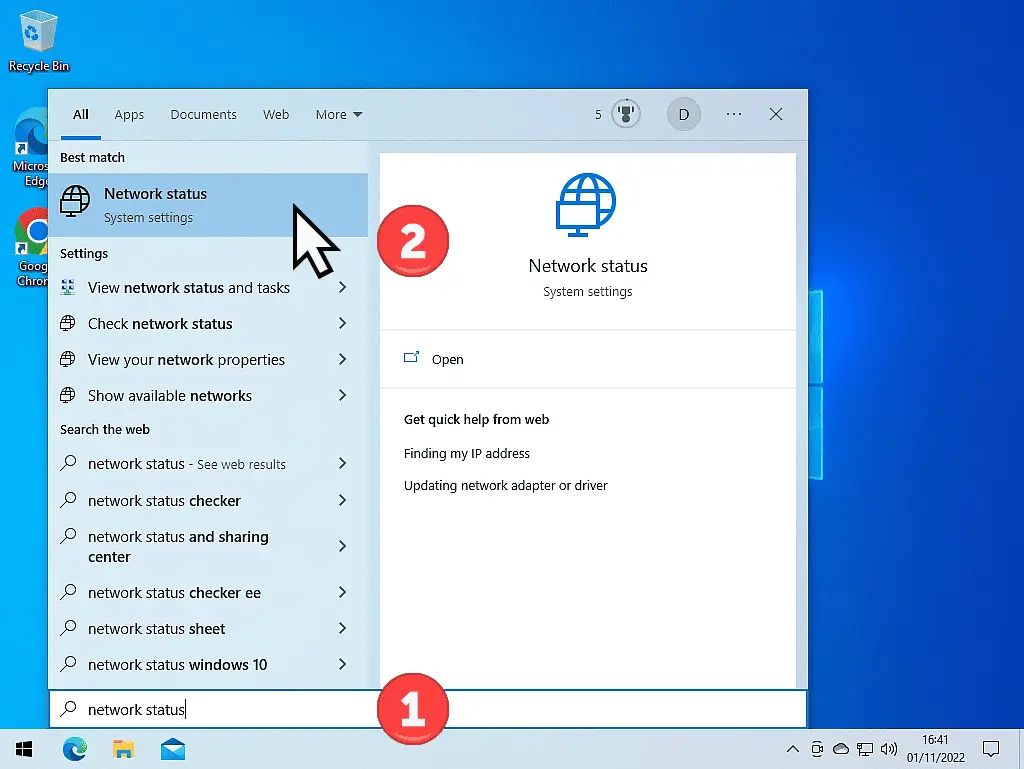
To check your network status in Windows 10, click the Start button and then type “network status“
Click Network Status (System Settings) on the search results.
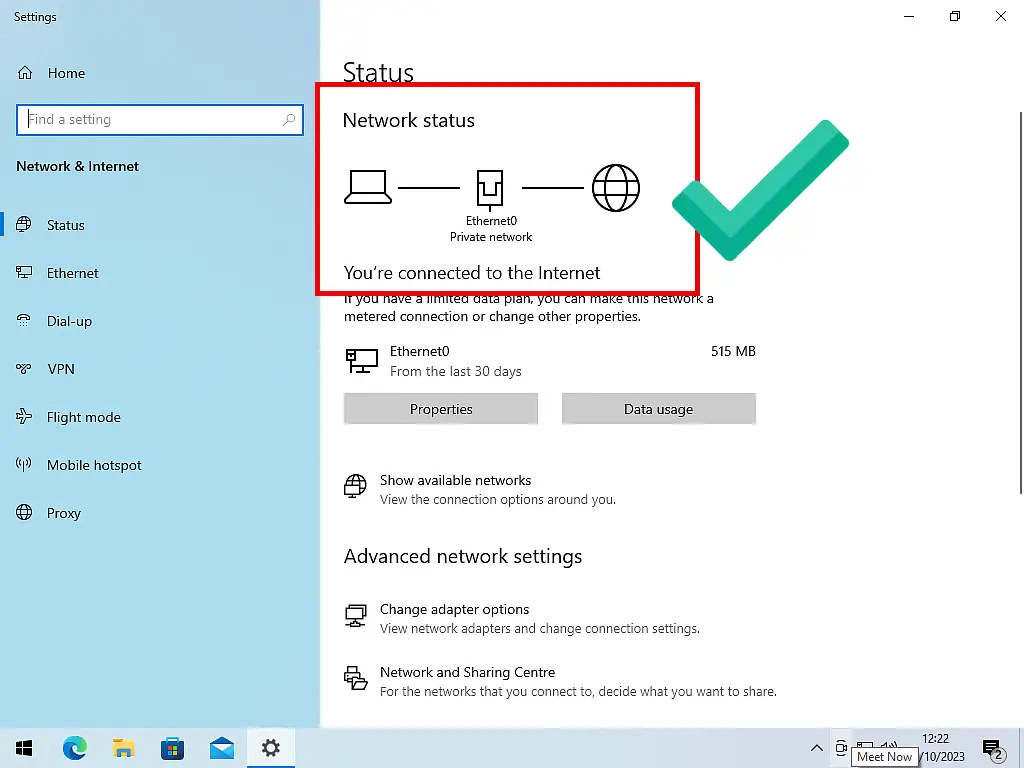
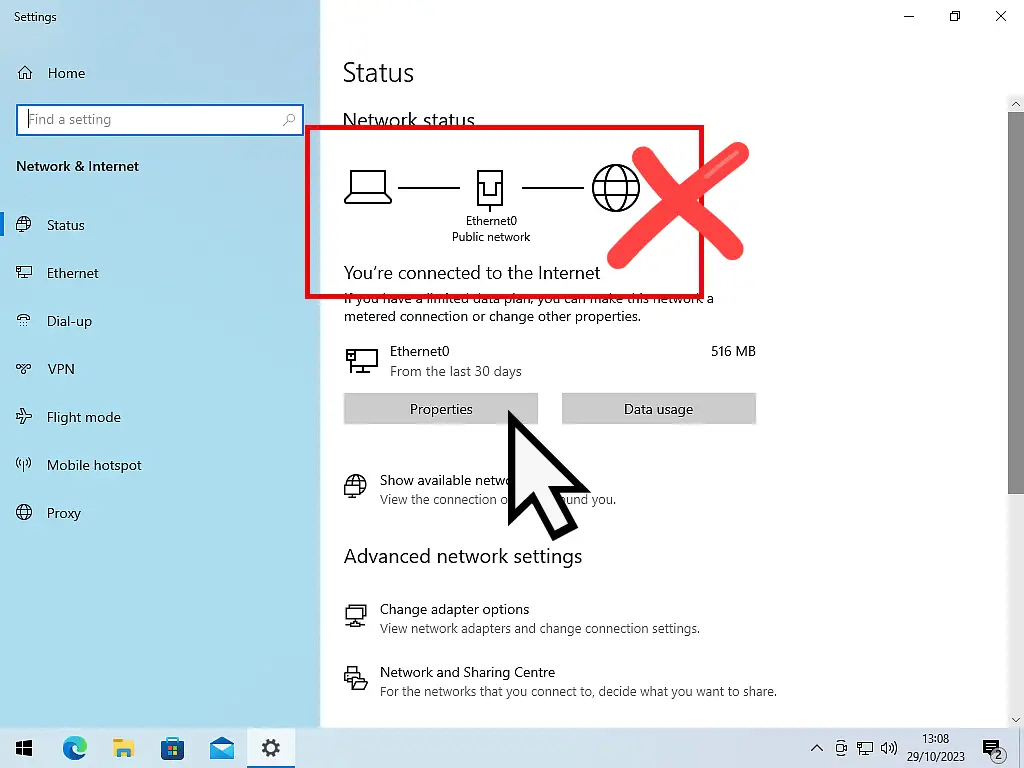
On the Network Status page, check that you’re on a Private network. If it says you’re on a Public network, click the PROPERTIES button.
Changing To A Private Network In Windows 10.
To successfully setup your home network, you need all your computers to be on a Private network. If one or more are identifying as being on a Public network, click the Properties button.
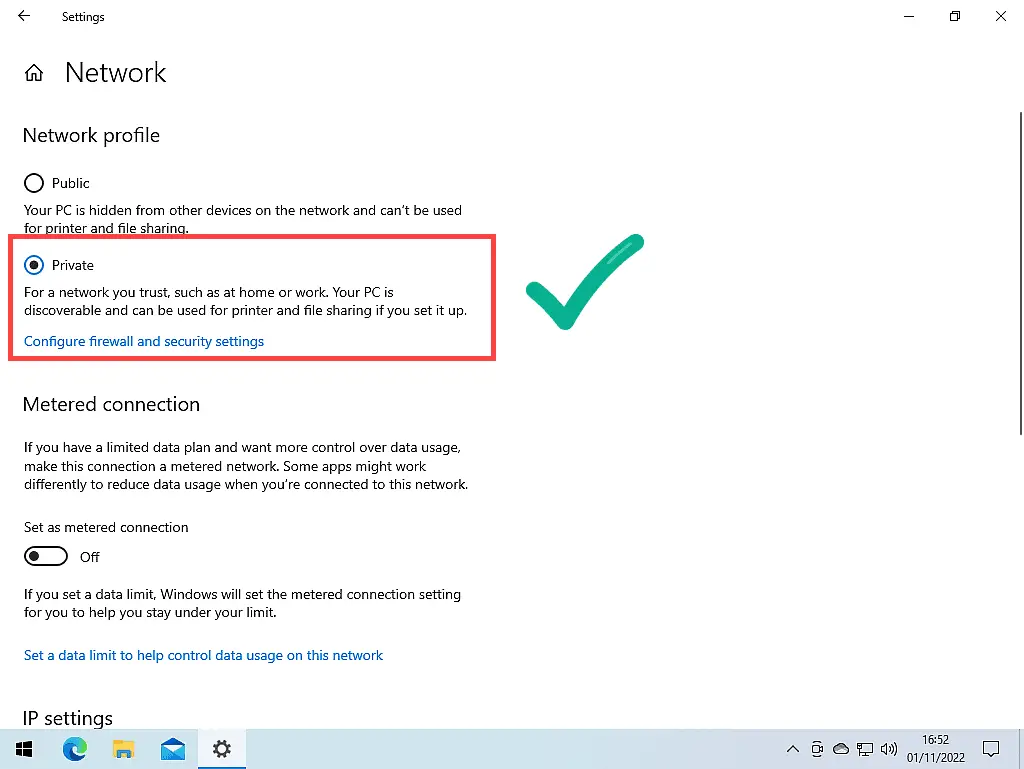
Then on the Network Profile page, select Private by clicking the radio button.
After changing the network to Private I find it’s best to restart your computer.
Checking Your Network Status In Windows 11.
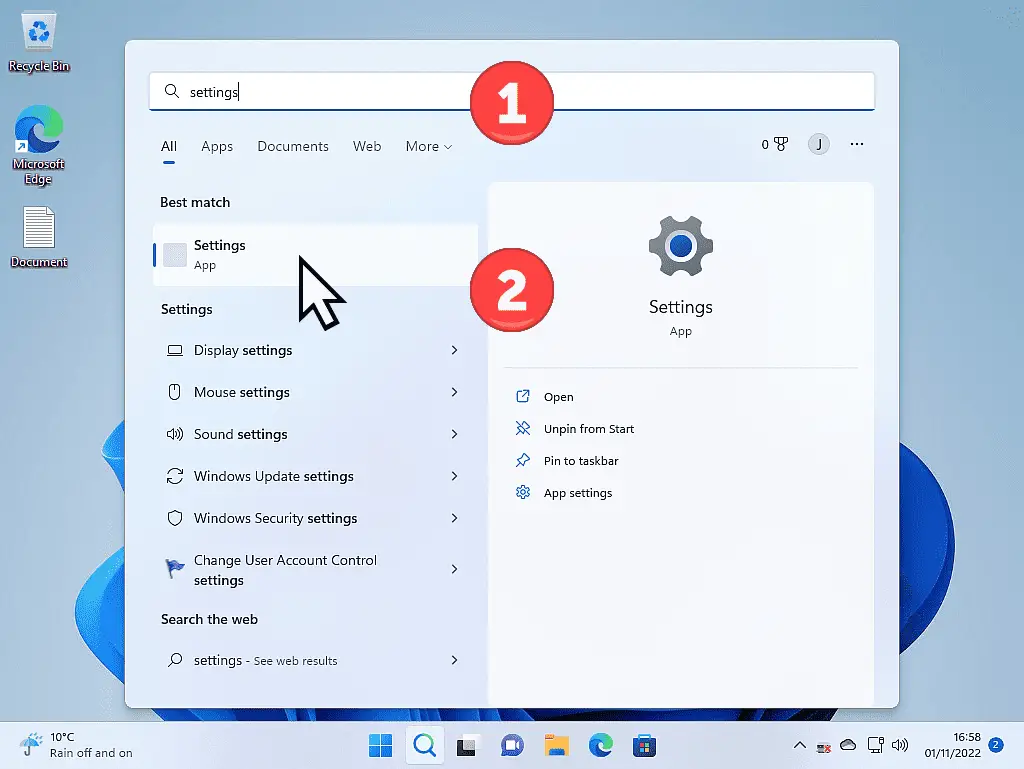
To check the network status in Windows 11, click the Start button and then type “settings“
- Click Settings (App) at the top of the search results.
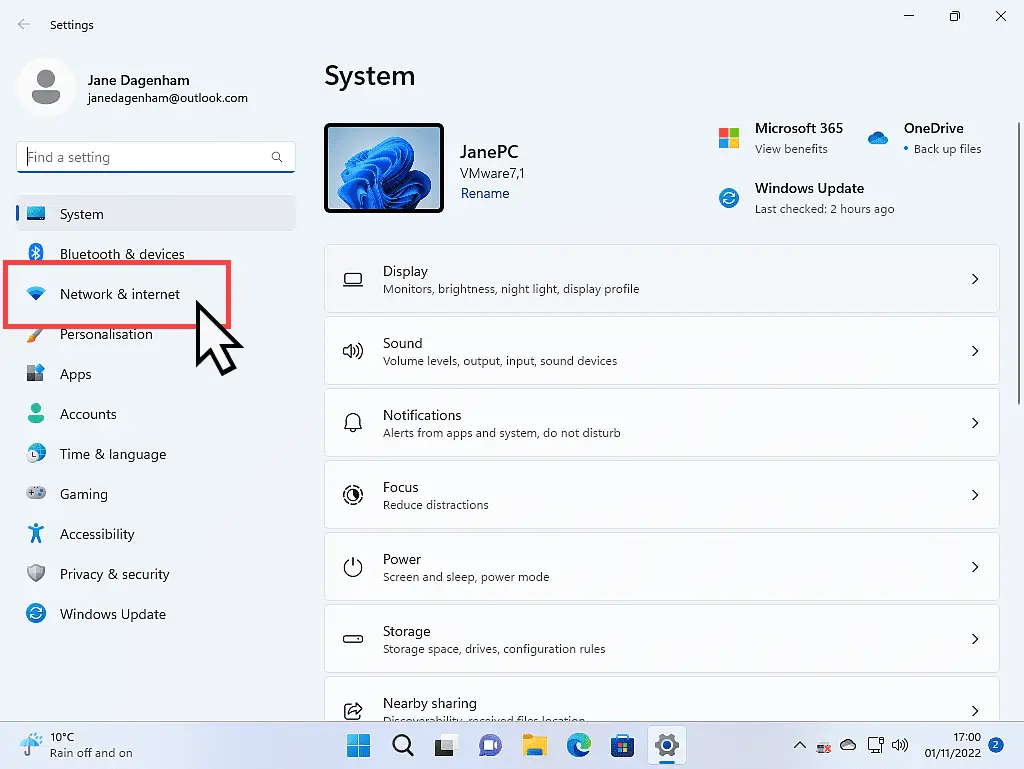
- When the Settings app opens, click Network and Internet in the left-hand panel.
- On the Network and Internet page, it will tell you whether you’re using a Private network or a Public network. If you’re on a Private network, simply close the window
1
2
3
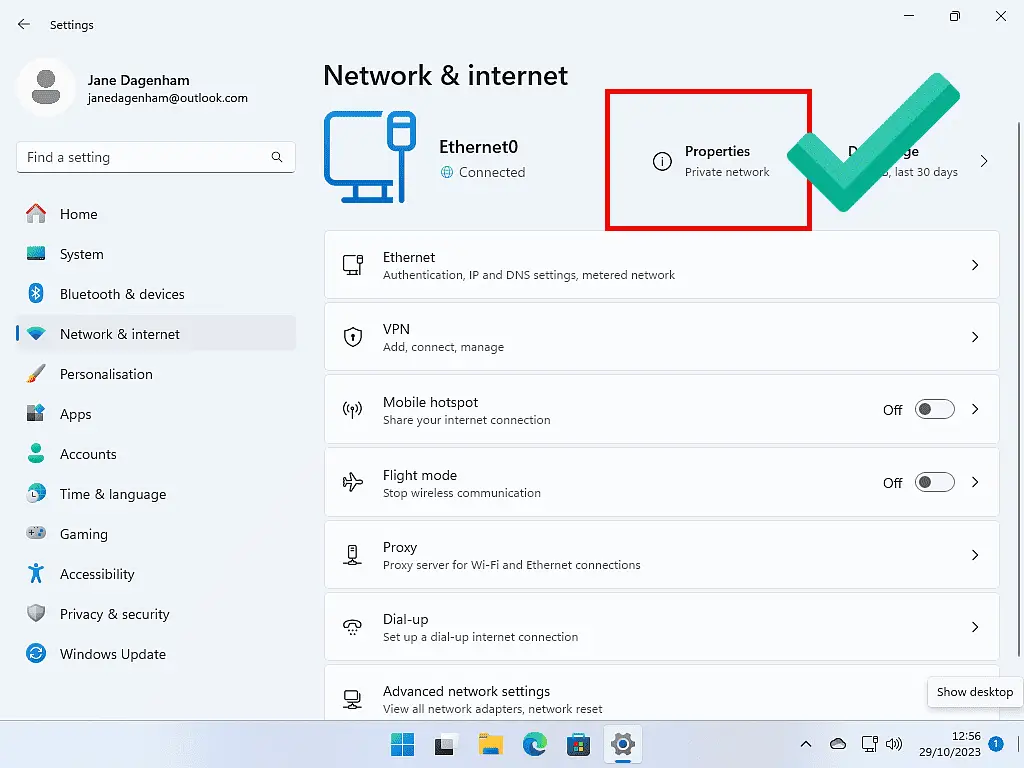
Changing To A Private Network In Windows 11.
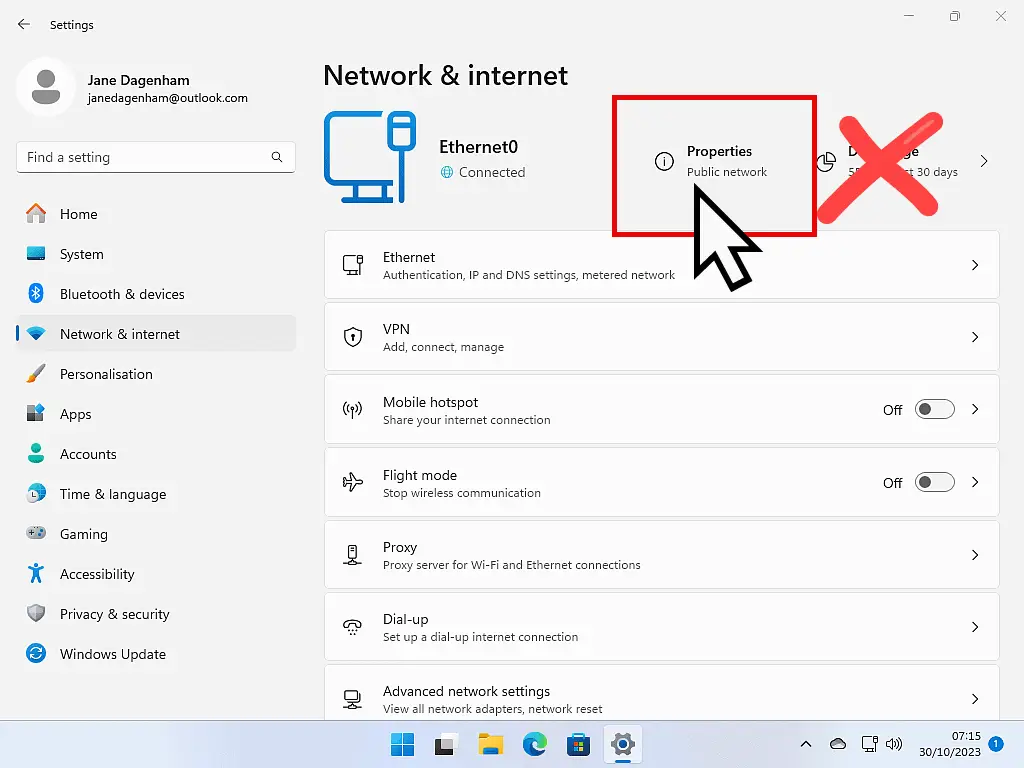
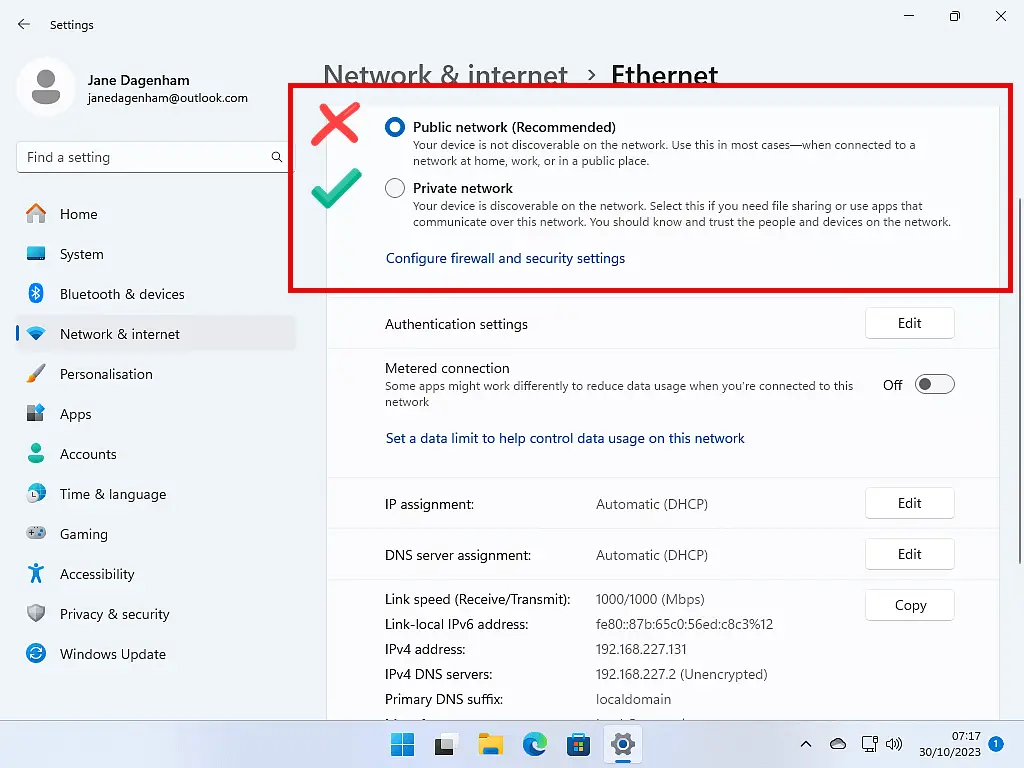
If your Windows 11 computer has identified your home network as a Public network, you’ll need to change it to a Private network.
Click on Properties and then change the network status by selecting Private network. Restart your computer.
Step 3. Set Up File Sharing.
Now that all your computers have recognisable names and are all on the same private network, it’s time to set up file sharing on each machine that you intend to add to the home network.
Windows 10 and Windows 11 won’t allow you to access the files and folders stored on them from a different computer unless you specifically allow it.
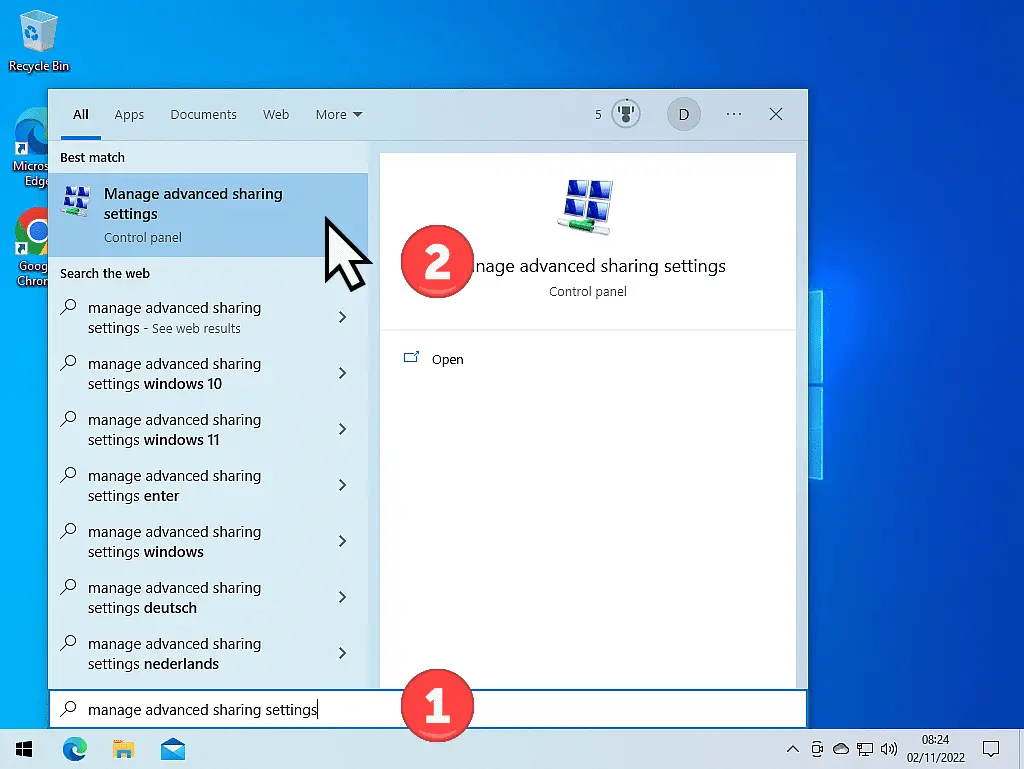
To set up file sharing, click the Start button and then type “manage advanced sharing settings“
For Windows 10, click Manage Advanced Sharing Settings (Control Panel). And for Windows 11, click Manage Advanced Sharing Settings (System Settings).
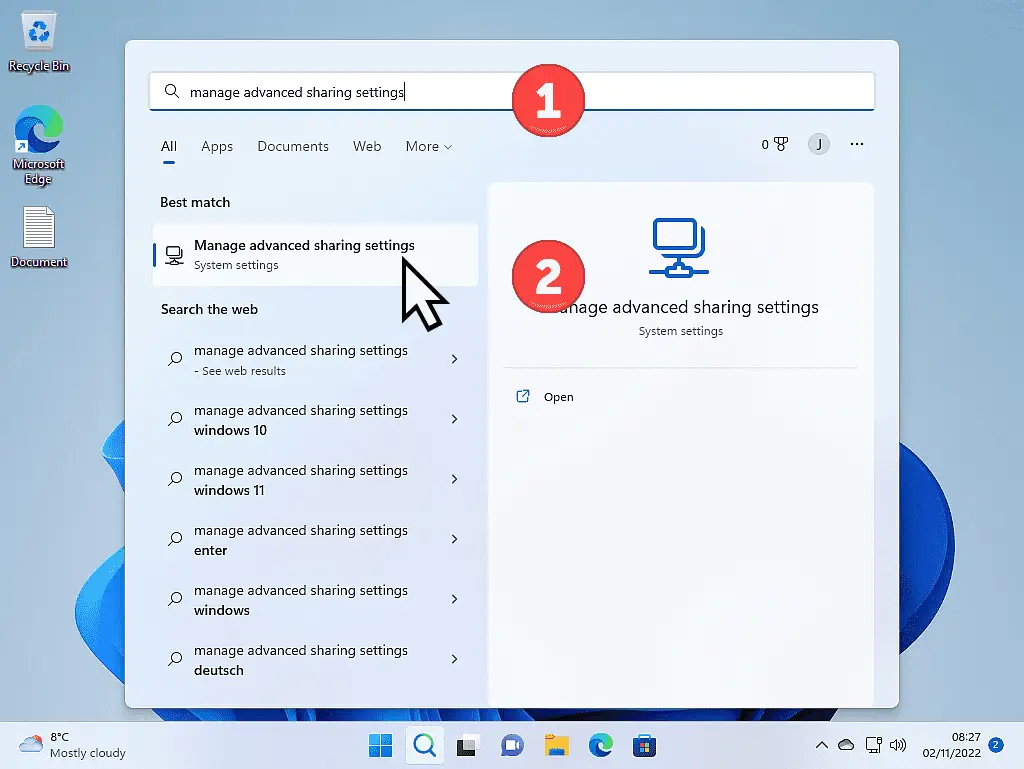
Advanced Sharing Settings.
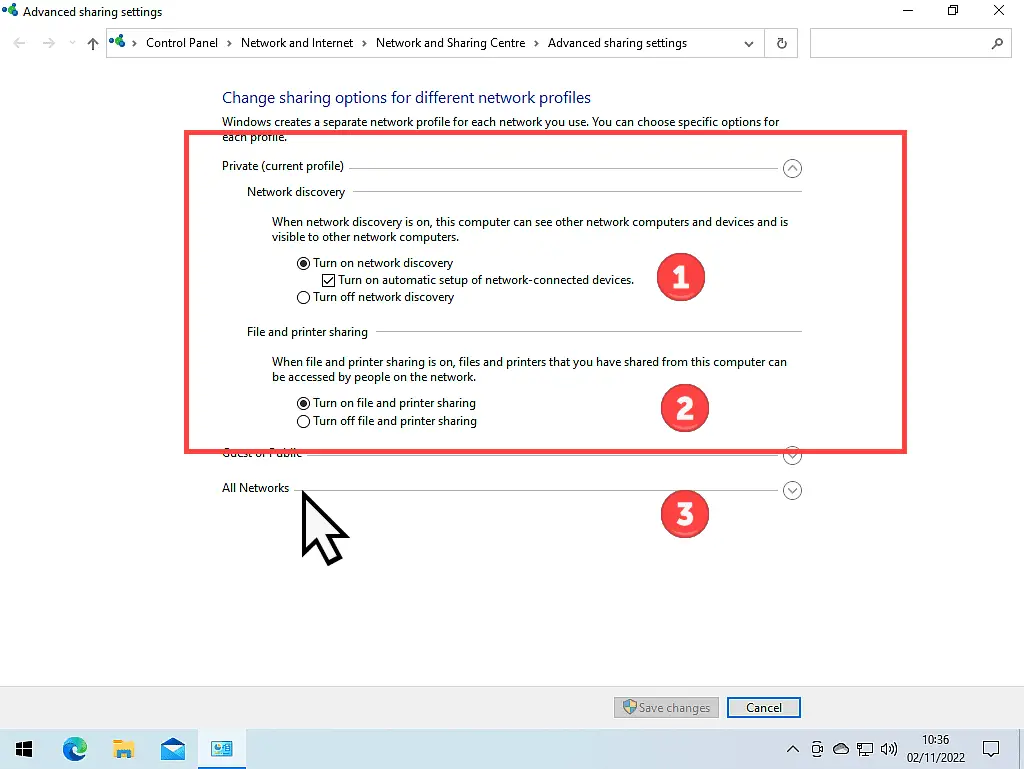
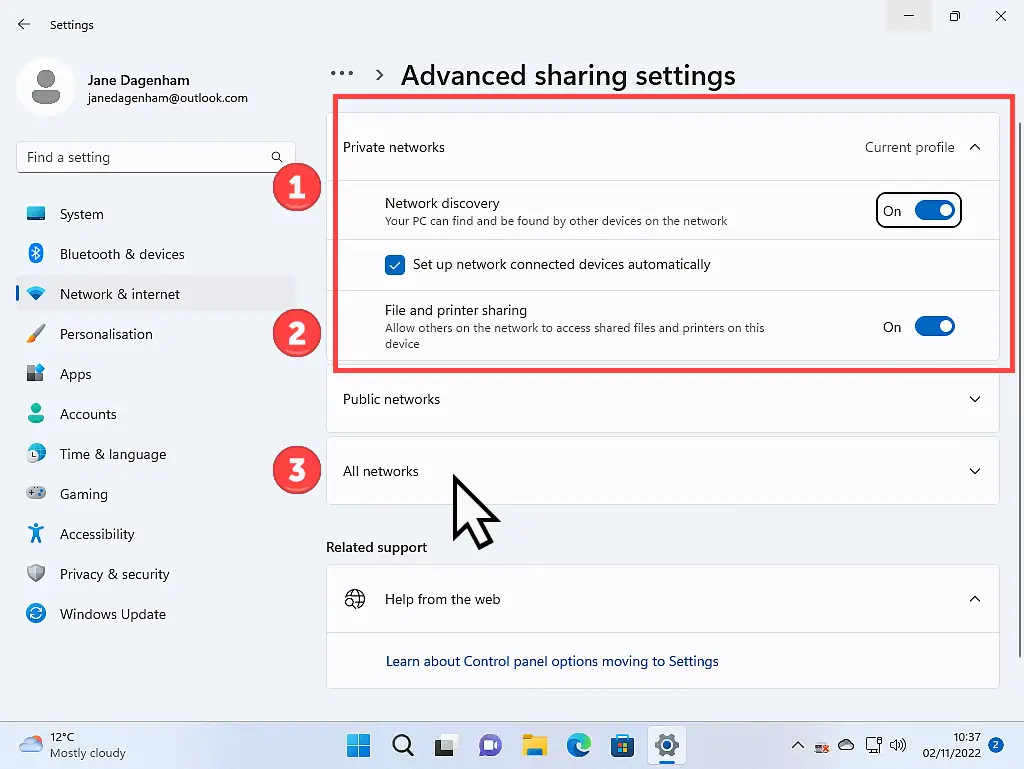
Expand the Private Networks section on the Advanced Sharing Settings page (if it isn’t already).
Click the relevant boxes to turn on network discovery
For Windows 10, you must select “Turn on network discovery” and “Turn on automatic setup of network-connected devices”. Next, ensure that “Turn on file and printer sharing” is also selected. Finally, click on All Networks.
For Windows 11, you need to turn on “Network Discovery” and ensure that “Set up network connected devices automatically” is selected. Then turn on “File and printer sharing”. Finally, click All Networks.
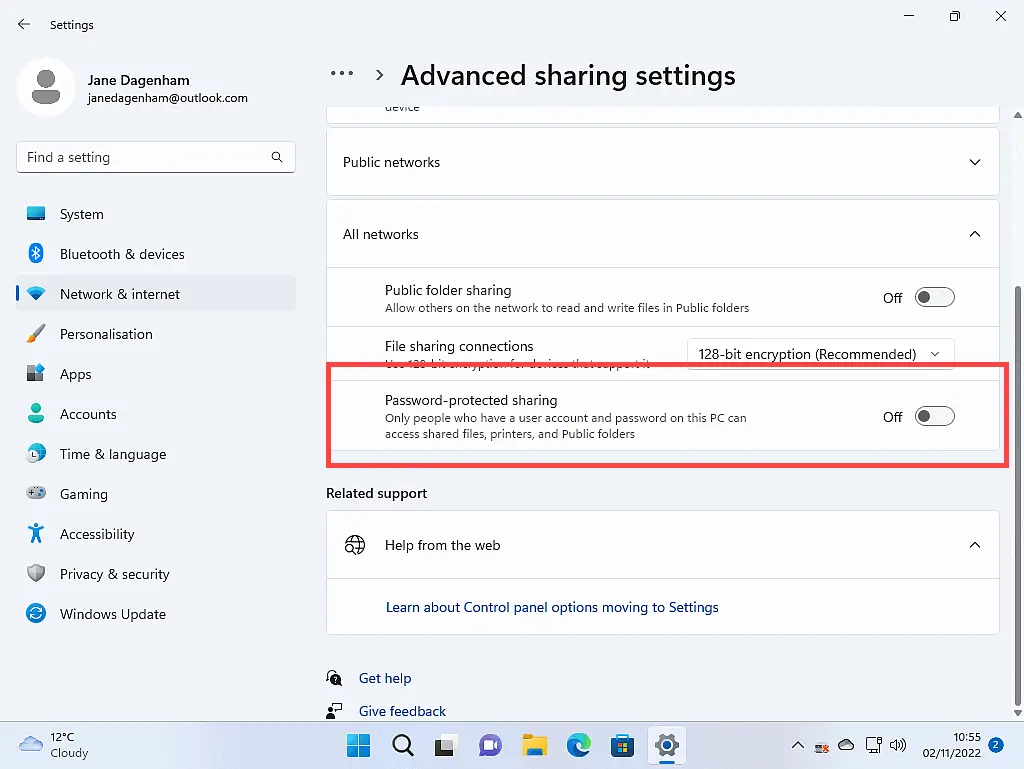
Turn Off Password Protected Sharing.
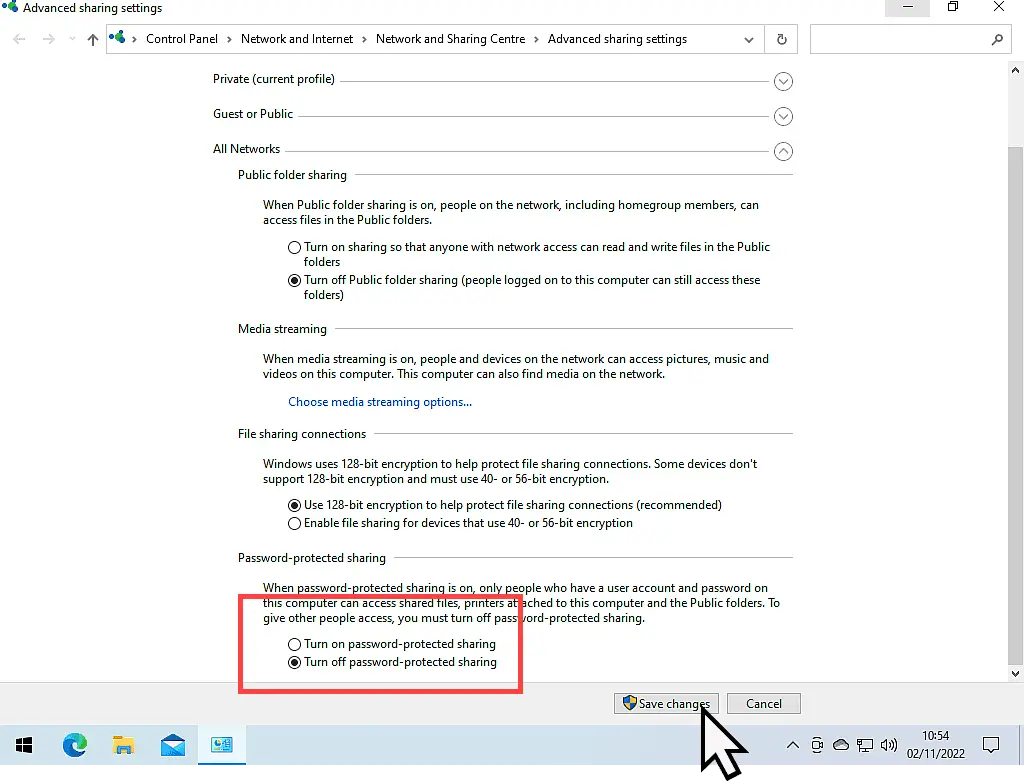
When you’re setting up a home computer network it’s probably best to start with password protected sharing turned of.
In the All Networks section, select “Turn off password protected sharing”. In a business environment, you may need this left on, but for most of us, on our home networks, it just adds another layer of unnecessary complication.
Once that’s been done, in Windows 10, you’ll need to click the SAVE CHANGES button, then close the window and restart your computer. For Windows 11, you can simply close the window and restart.
Step 4. Home Network File And Folder Sharing.
To be able to access other computers (and the files and folders on those computers) over your home network, you need to “share” those files/folders on each machine.
Although you could allow sharing of individual files rather than folders, on a home network, it makes more sense to stick with sharing folders.
In the example below, I’ll set up sharing of my Desktop folders, but the process is exactly the same for any other folder.
How To Share A Folder Over A Home Computer Network.
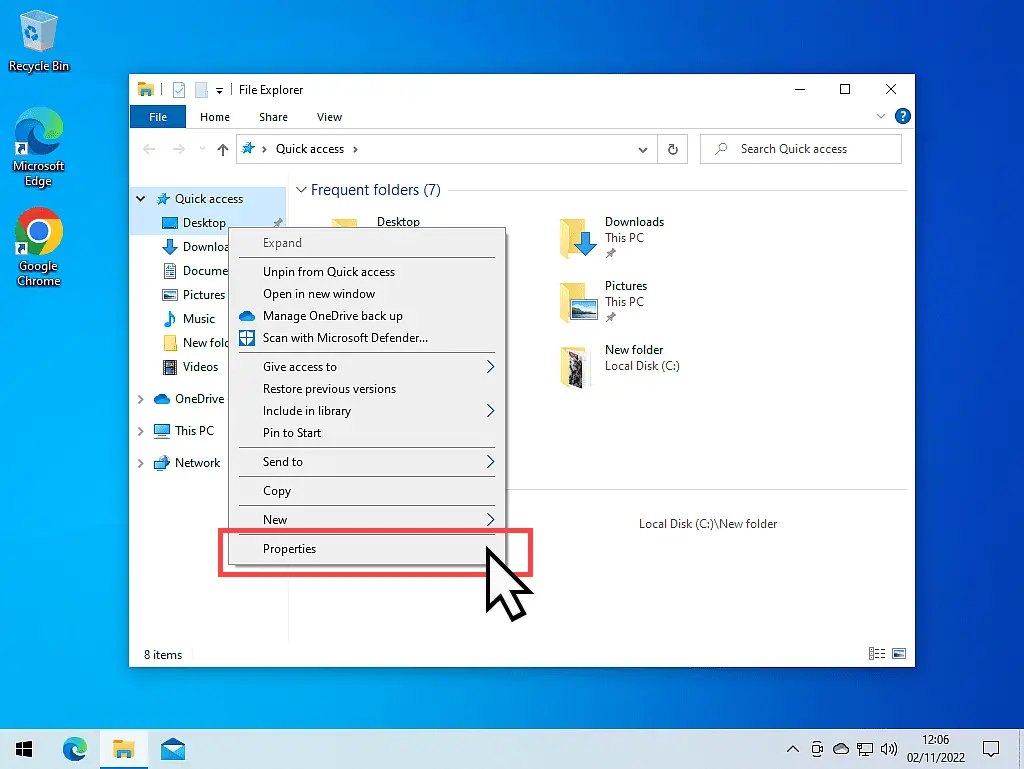
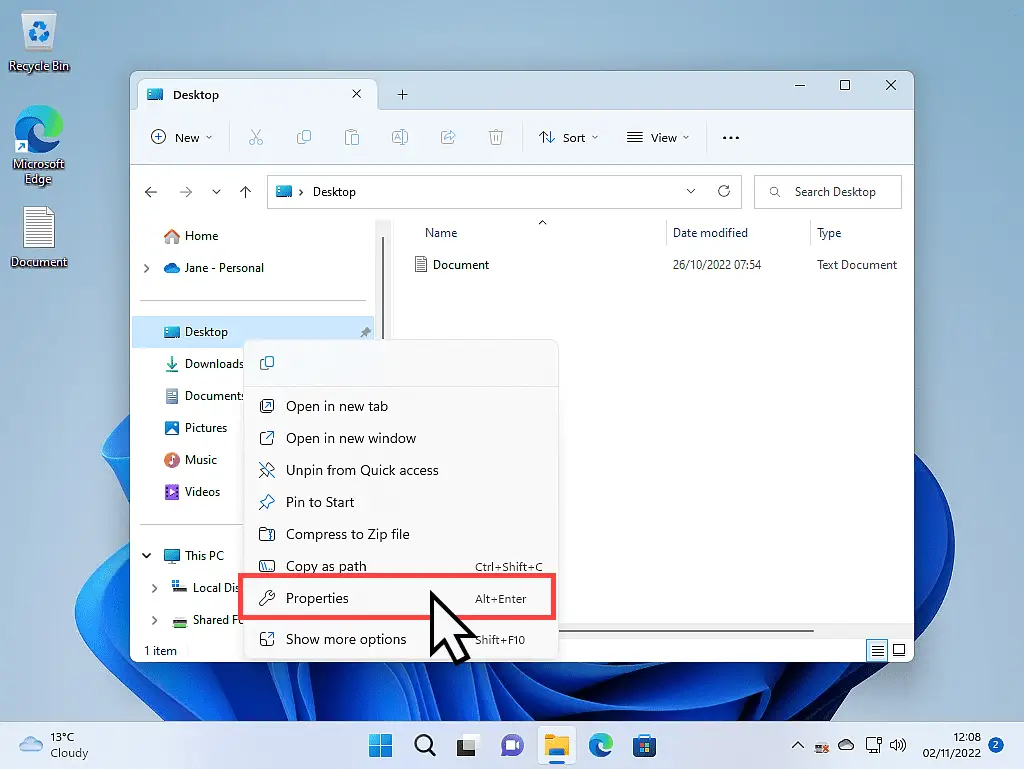
To share a folder, open File Explorer (press the Windows key and the letter E at the same time on your keyboard). Navigate to the folder you’re going to share and then right-click on it.
The options menu will open. On the options menu, left-click PROPERTIES.
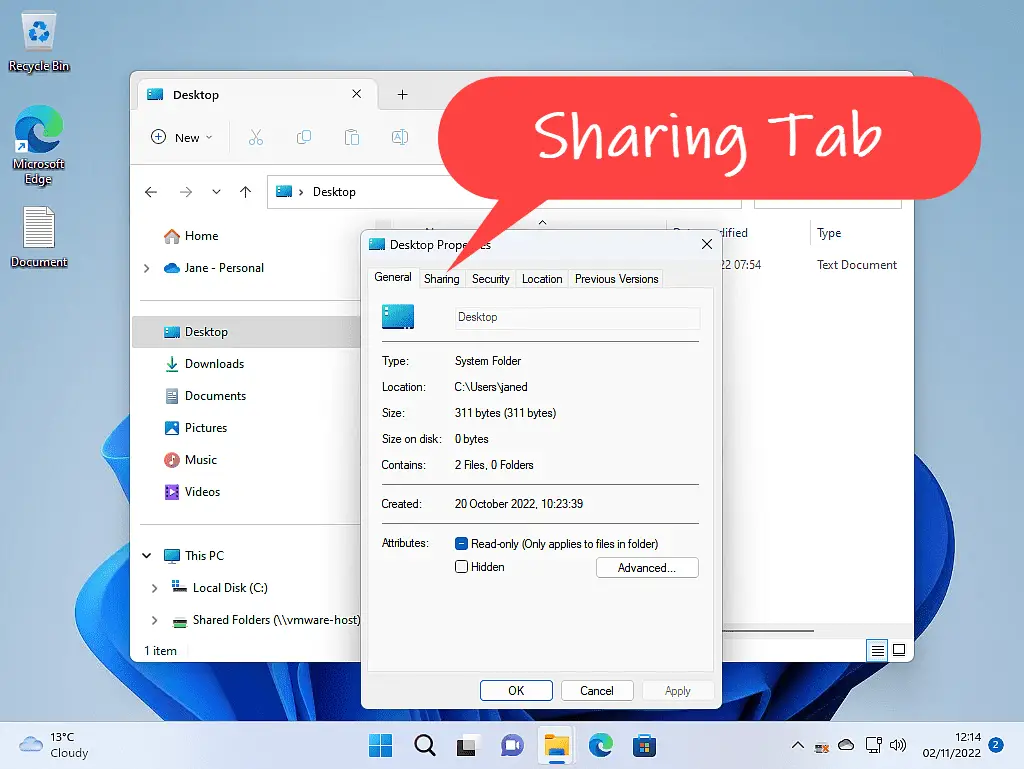
The Folder Properties box will open. Click the SHARING tab. Then on the Sharing tab, click the SHARE button.
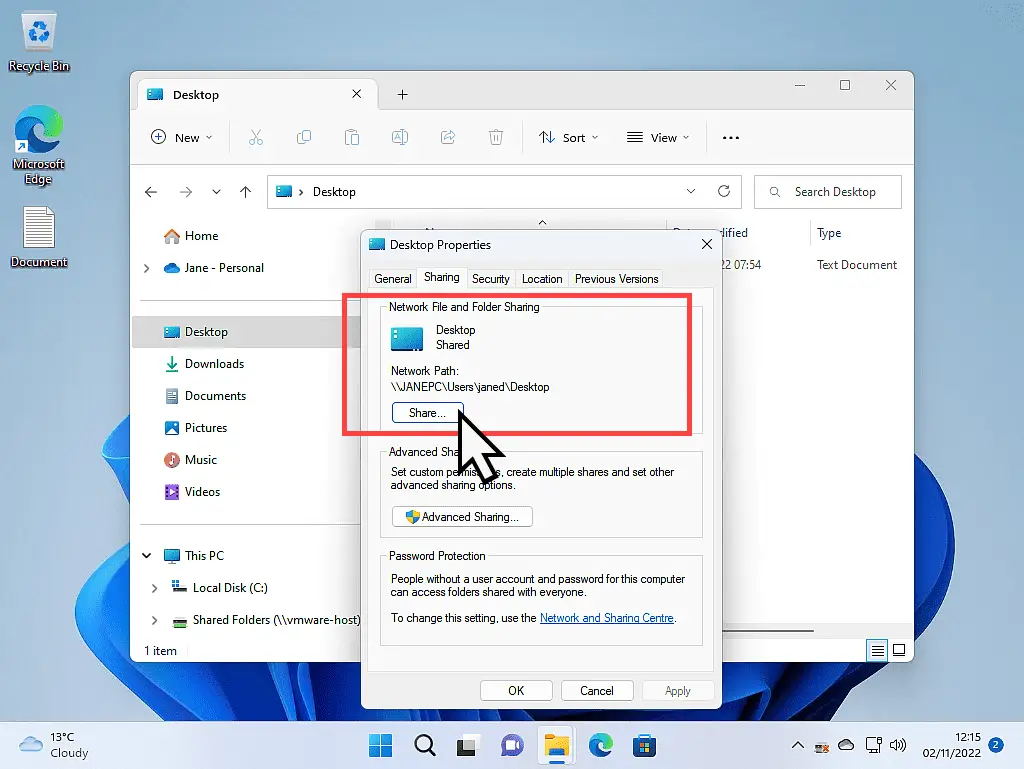
Choose People To Share With Over Your Home Network.
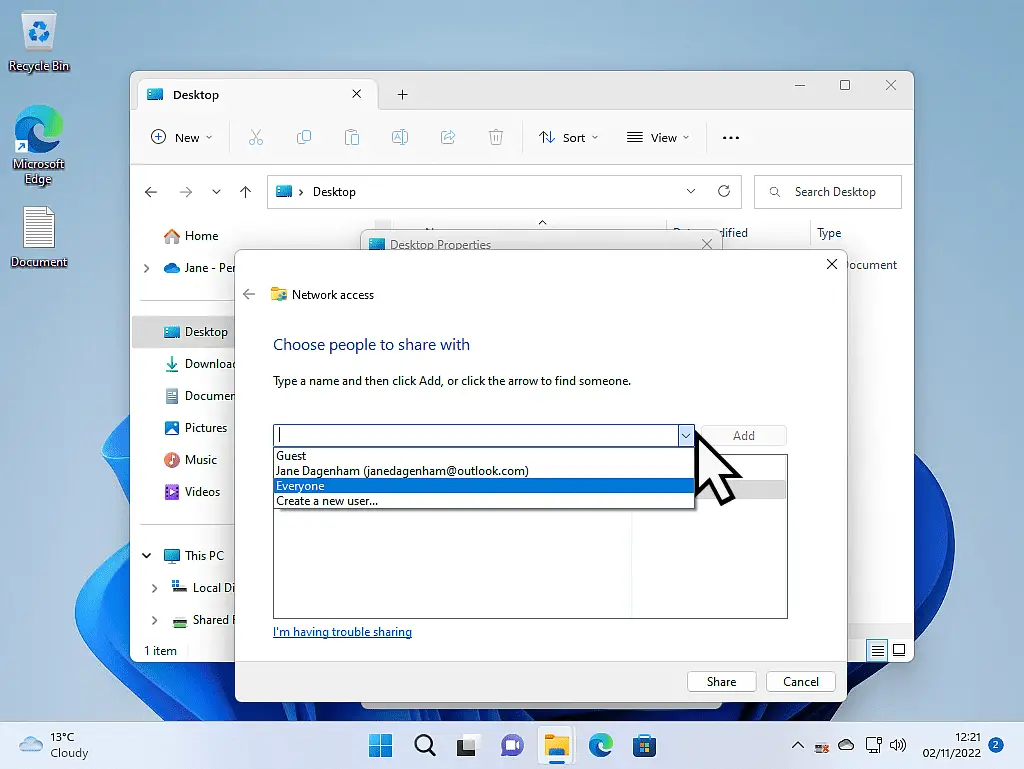
After clicking the SHARE button, the Network Access window will open. It’s here that you’ll give permission for other users on your home network to access the folder.
Click the drop-down arrowhead and select “Everyone”. Then click the ADD button.
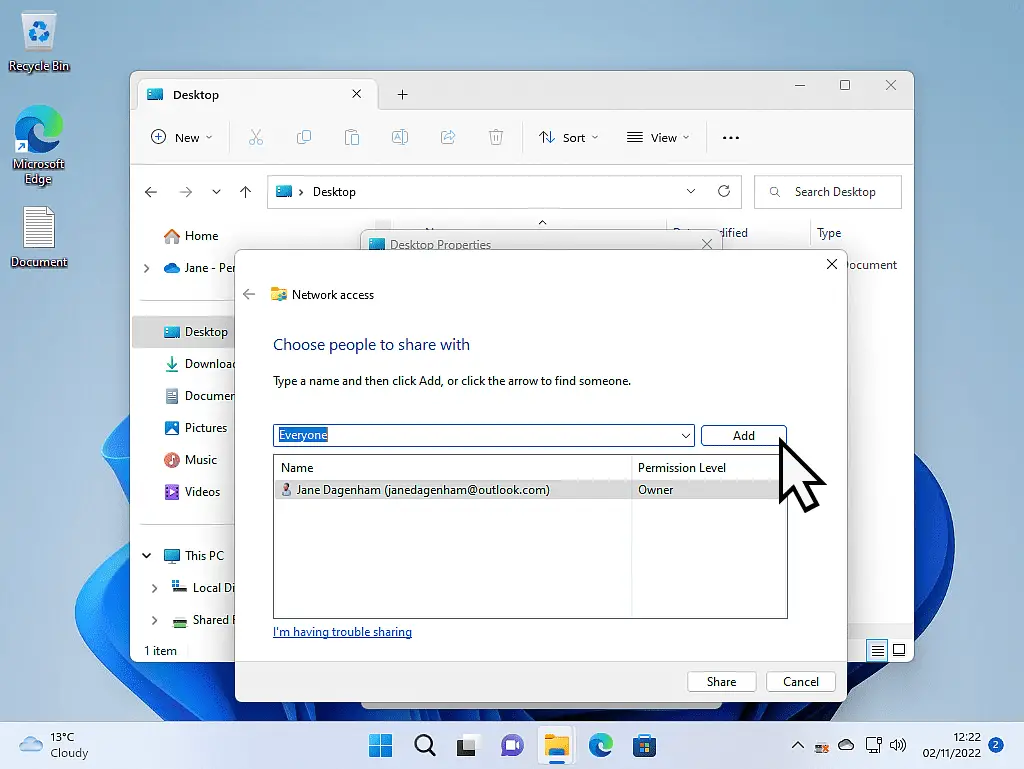
Don’t Forget To Click The ADD Button.
When you select the “Everyone” option, you must click the ADD button or file sharing over your network won’t work.
Set The Permission Level.
After clicking the ADD button, you’ll see Everyone will appear in the box below. By default, Windows restricts what you can do with files and folders that are shared over your home network. Read is the default option.
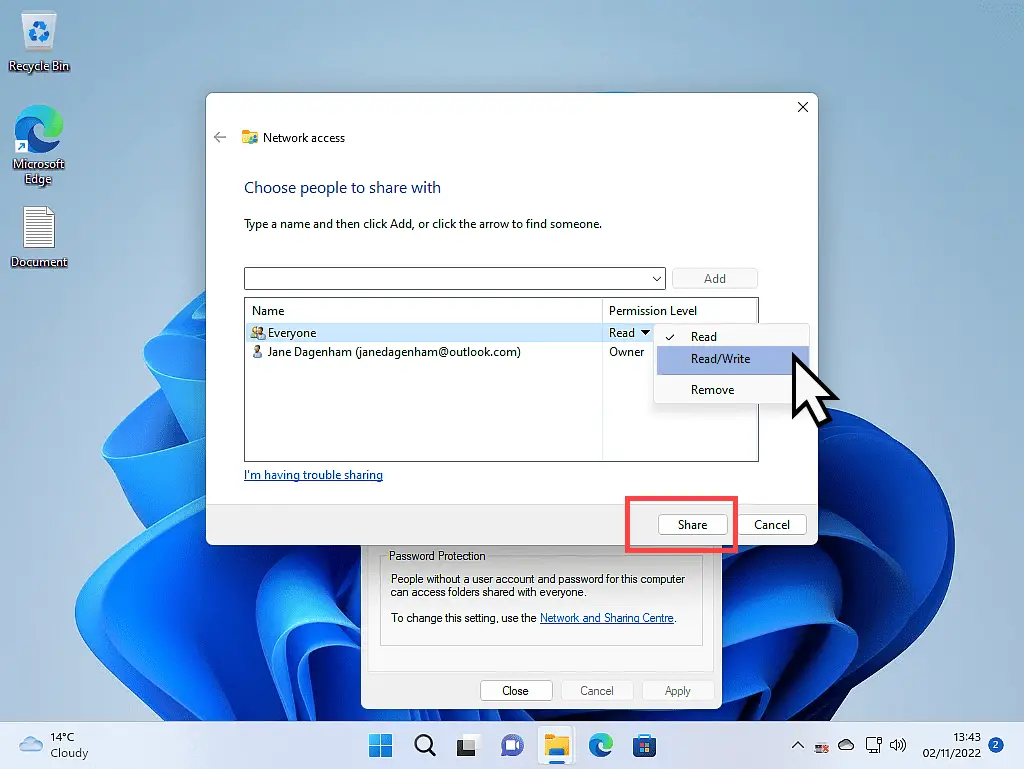
As a general rule, I’d change that to Read/Write. With Read/Write permissions you’ll be able to edit, delete, move, copy and paste. All the usual things you’d expect to be able to do.
To set the permission level to Read/Write, click the drop-down arrowhead beside Everyone.
On the menu that opens, click Read/Write.
When that’s been done, click the SHARE button.
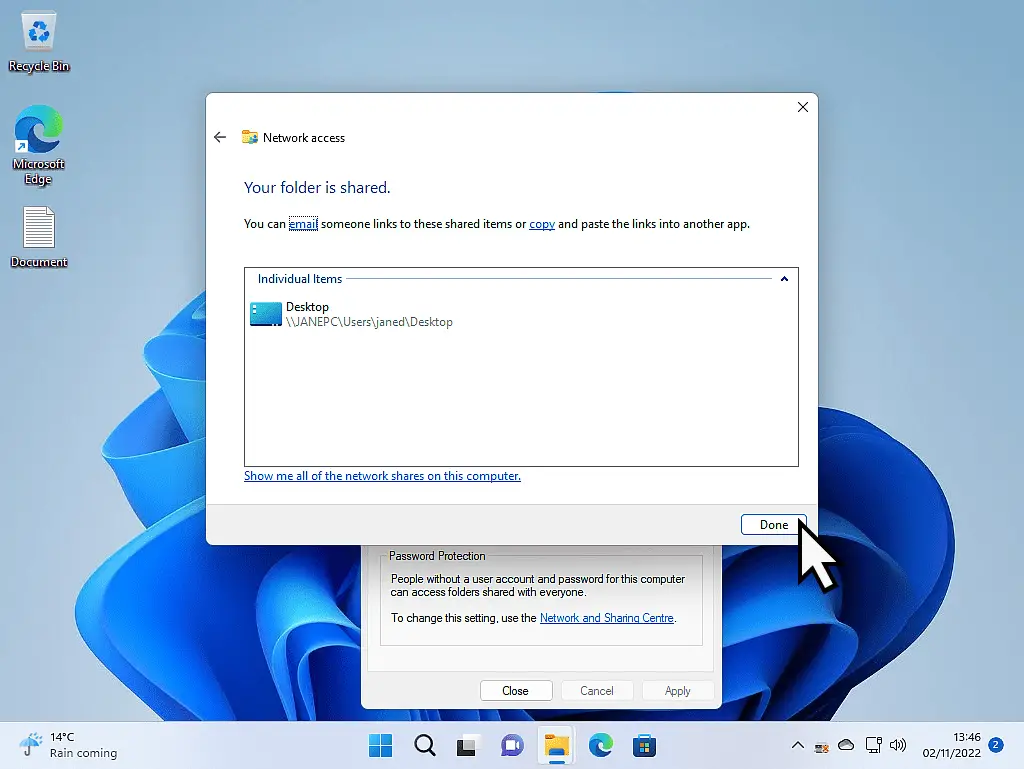
Your Folder Is Shared.
Depending on how much data you’ve got inside the folder, it might take a while for the settings to be applied, but eventually, the “Your folder is shared” window will open.
Click the DONE button.
If you want to share other folders over your home network, it’s the same procedure.
When you’ve finished sharing folders, you can close all the open windows.
Note About Sharing Folders Over Your Home Network.
You’ll need to share the folders on each computer on your home network in the same way. You don’t have to share the same folders, they can be different, for example, you might share your Desktop folder on one computer and your Documents folder on another machine.
Which folders are shared is completely up to you, but they have to be shared before you can access them over your network.
Step 5. Accessing Shared File/Folders Over Your Home Network.
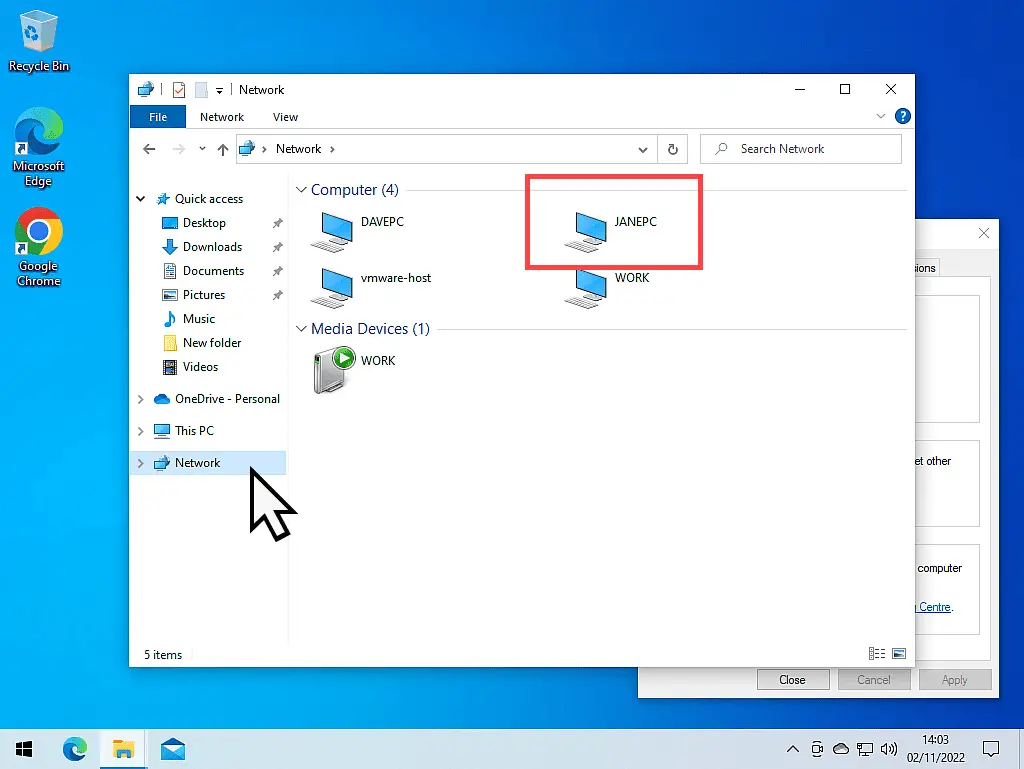
To access the file and folders that you’ve shared, open File Explorer and then click on Network in the navigation panel.
All the connected computers will be shown. Simply double-left-click on the computer that you want to access.
Setting Up File Sharing Over A Home Network – Summary.
Once your home network is set up you can easily view or edit files that are stored on other computers around your home. You can even transfer them from one machine to another by simply using copy and paste. How To Copy And Paste In Windows


