The Windows Mail app is an easy to use email client that’s already installed on Windows 10 and 11 computers. Once it’s set up you can send & receive all your emails from a single program rather than having to log in to email accounts over the ‘net.
If you haven’t set Windows Mail up yet, then click here How To Set Up The Windows Mail App.
In this guide, we’ll go through the basics of how to use the Mail app.
- Windows Mail App Basics.
- Sending Emails With Windows Mail.
- How To Add An Attachment To An Email In Windows Mail.
- How To Add Pictures, Links And Smileys To Emails In Windows Mail App.
- Folders In Windows Mail App.
- Moving Emails Into Folders.
- Favourite Folders.
- Using Multiple Email Accounts With Windows Mail.
Windows Mail App Basics.
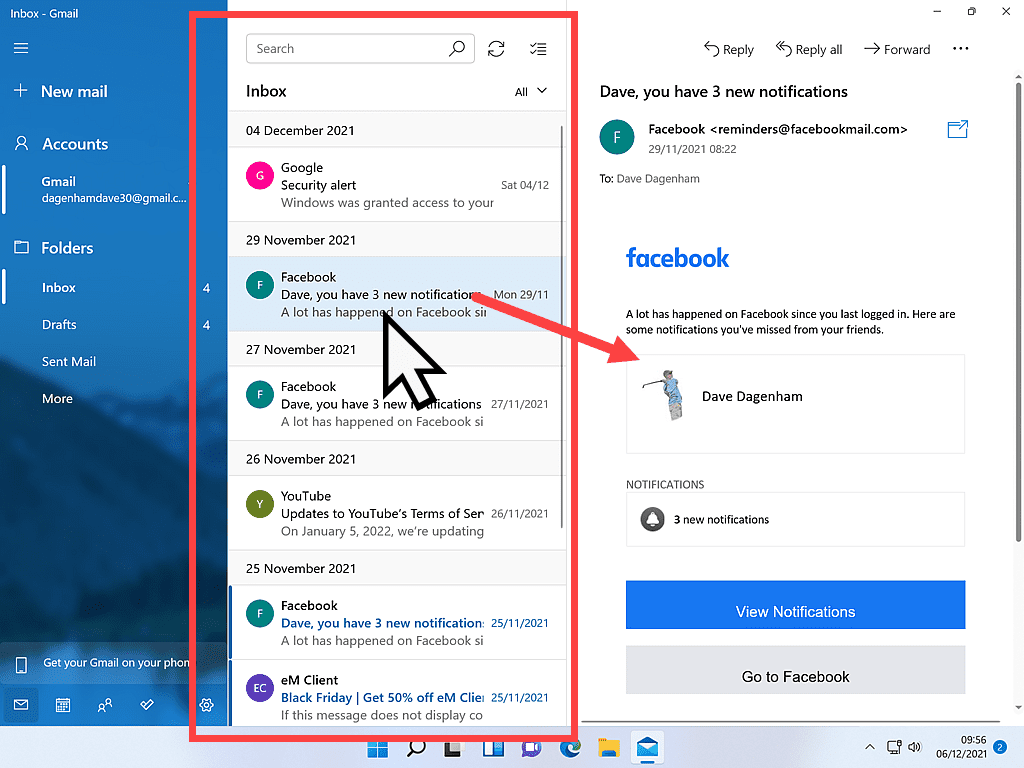
Your emails are displayed in the centre panel of the Mail app.
They are shown in order of date received, with the latest at the top of the list.
To read an email, left-click on it and the message will appear in the right-hand panel.
Once you’ve finished with the email, there are various ways to delete it.
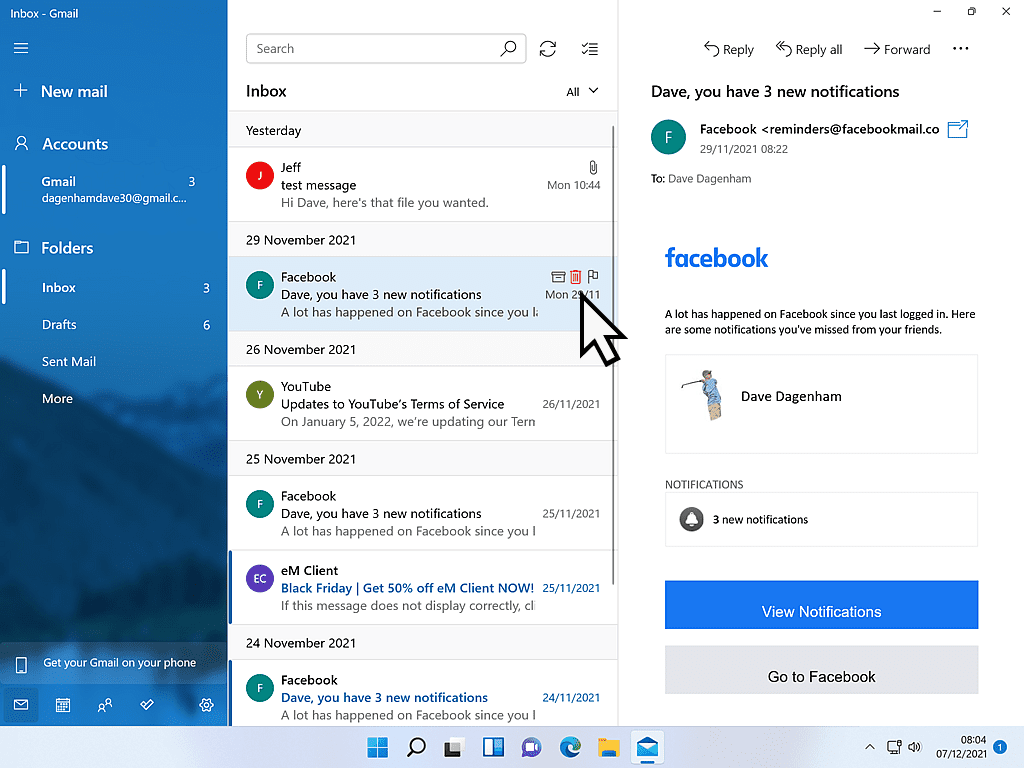
To delete the message, hover your mouse pointer over the email.
Three icons will appear in the right-hand corner.
Left-click the trash can.
Reading Attachments.
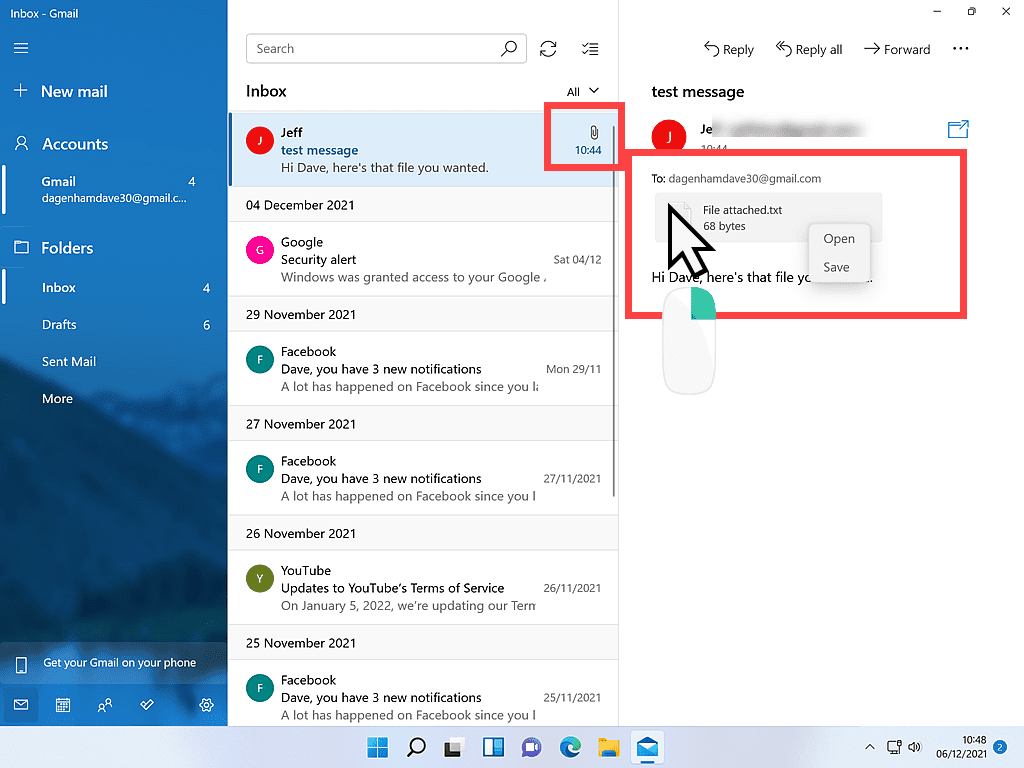
Emails with attachments are shown in the centre panel with a paper clip icon.
When you open the email the attachment is shown at the top of the message.
To read or save the attachment, right click on it and then left click either OPEN or SAVE.
Reply, Forward, Delete & Print Emails.
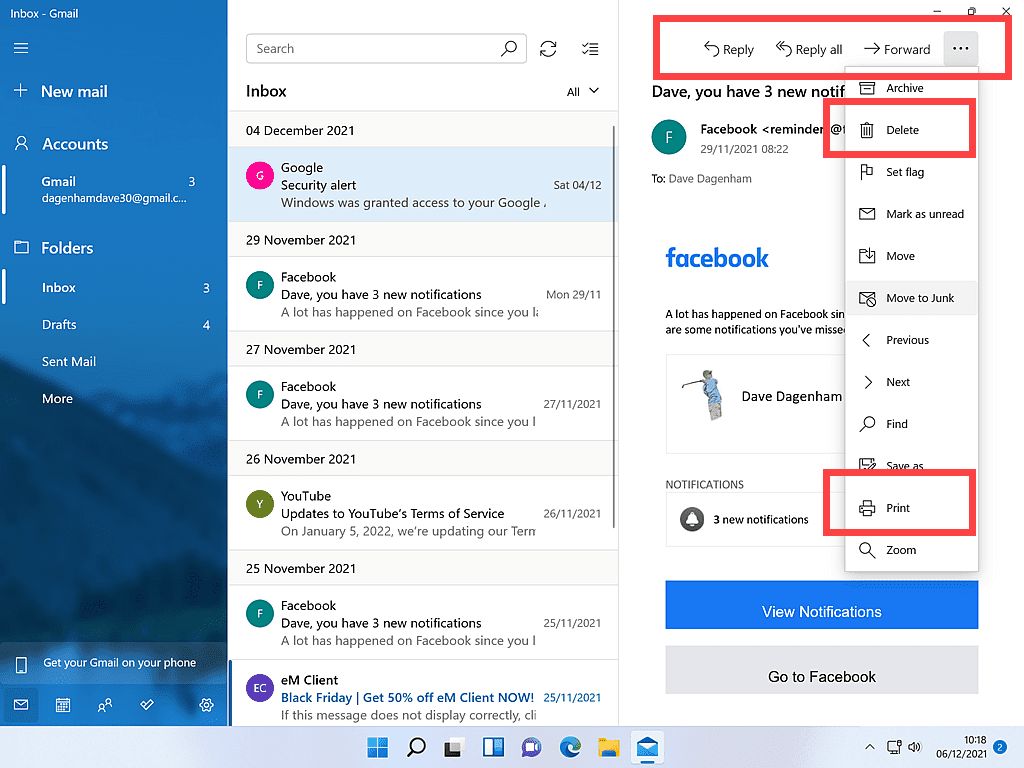
Replying, forwarding, deleting & printing emails are the four main functions that most of us require after we’ve read through an email. In Mail, these functions are right at the very top of the open message.
The reply and forward buttons are in plain view across the top of the open email.
To delete or print an email, left-click the 3 horizontal dots (the ACTIONS button).
Delete and Print are on the menu that appears.
Sending Emails With Windows Mail.
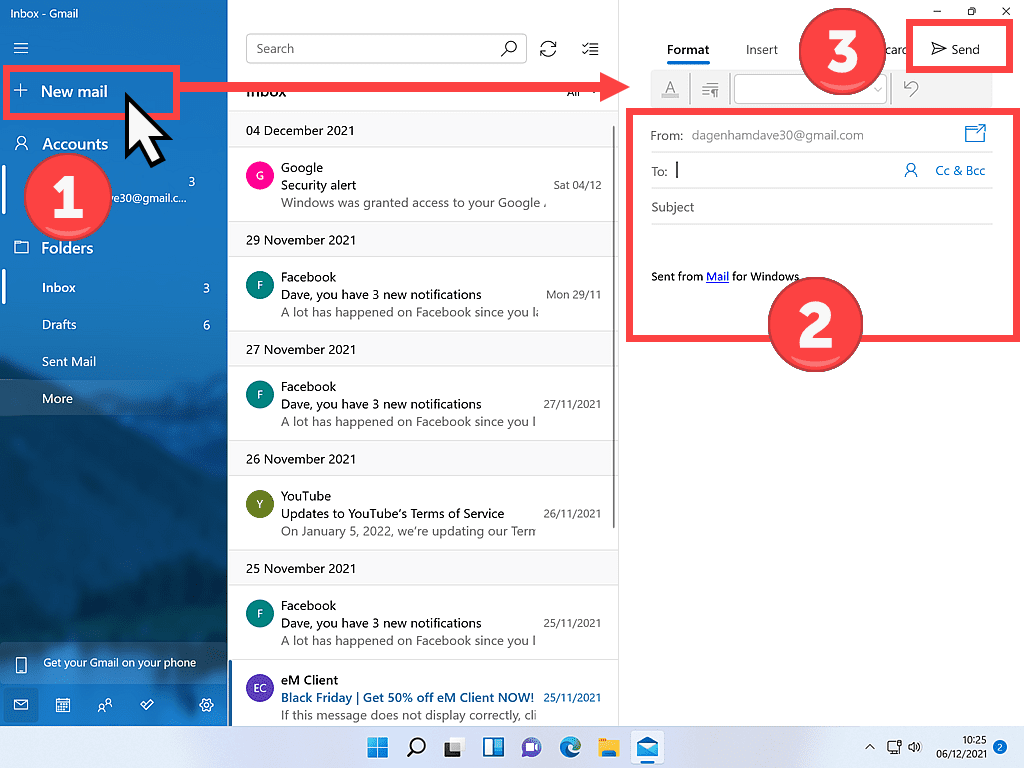
To send an email, click the NEW MAIL button in the left-hand panel.
The new message window opens in the right-hand panel.
The SEND button is at the top right of the new email.
How To Add An Attachment To An Email In Windows Mail.
To attach a file to an email in the Windows Mail app, start a new message (by clicking NEW EMAIL) and fill in the address and subject lines as usual.
Add a short message into the body.
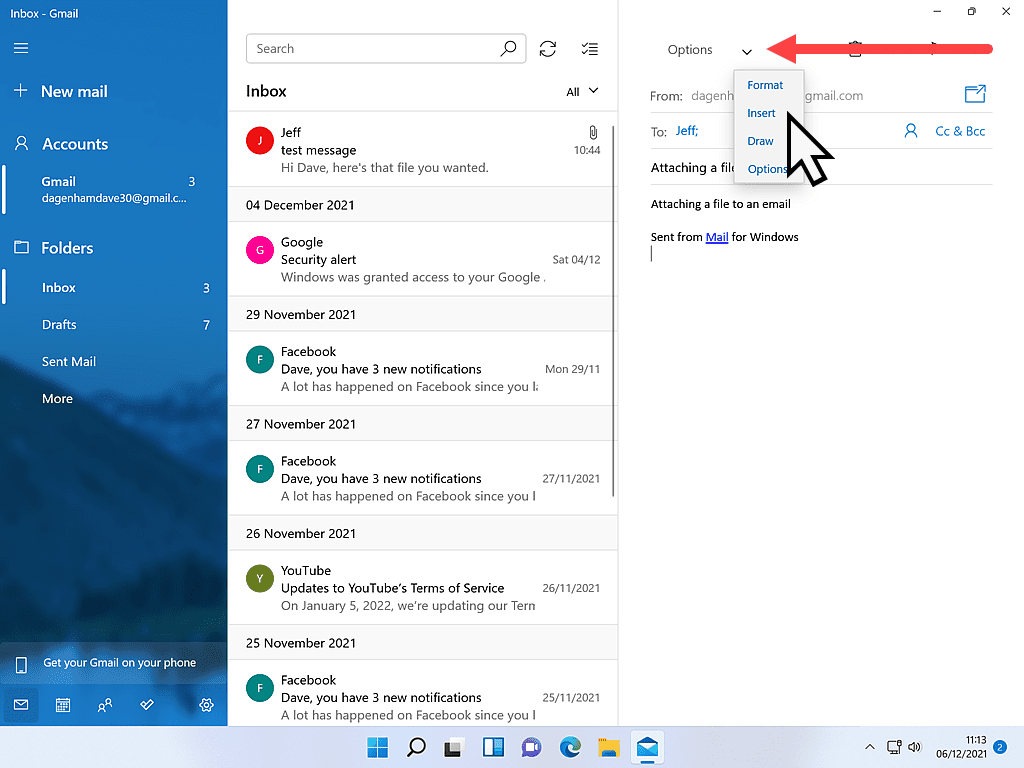
When you’re ready to attach the file, click the drop-down arrowhead beside OPTIONS.
Then click INSERT on the small menu that appears.
Now you can click the Attach Files button (the paperclip icon).
A File Explorer window will open allowing you to navigate to the file that you want to attach to the email.
If you’re not so good at using File Explorer, then click here How To Use Windows File Explorer
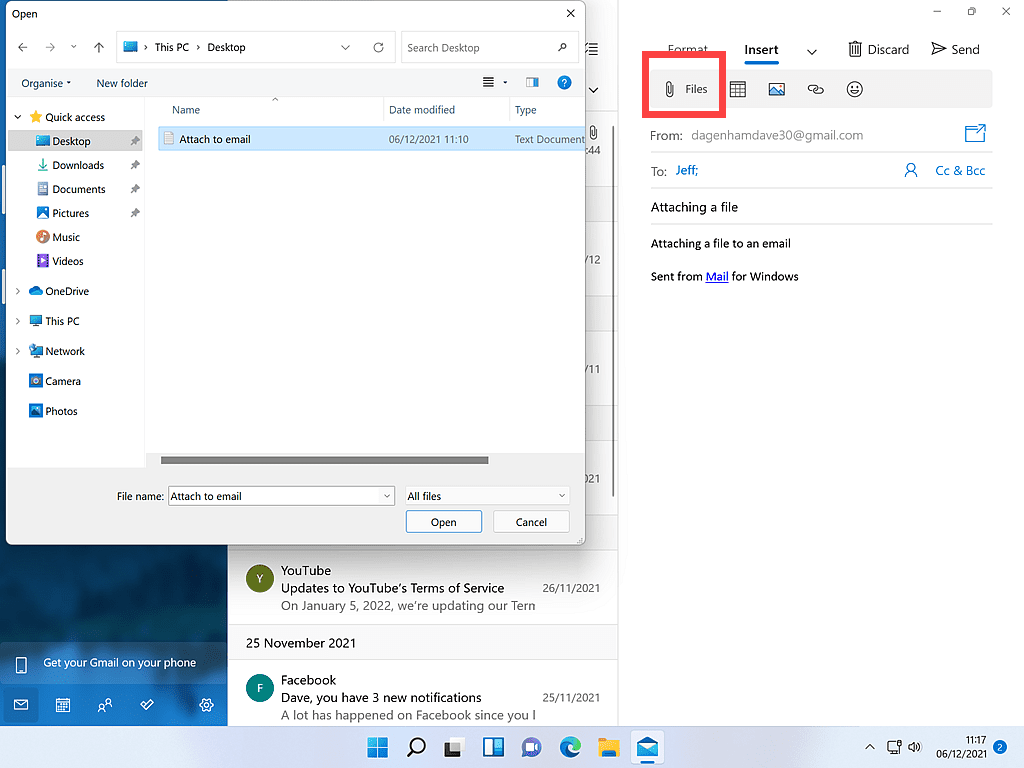
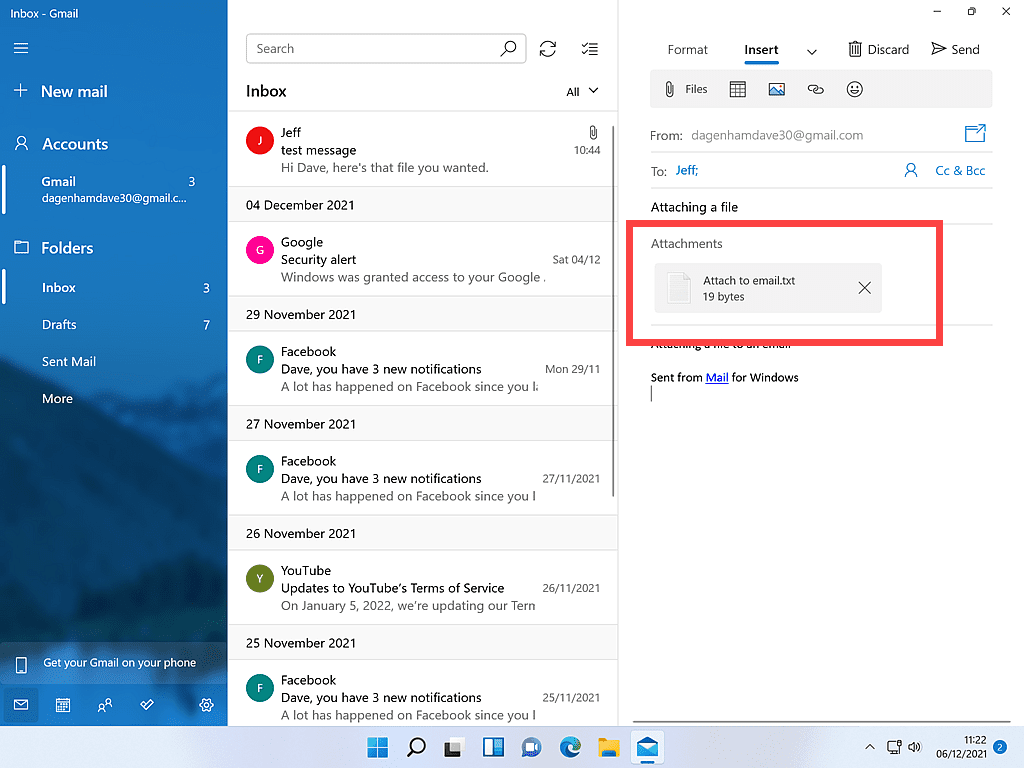
The file will appear at the top of your message as an attachment.
You can continue adding further attachments in the same way.
If you want to delete an attachment, click the X to the right of the attachment.
When your email is all done, click the SEND button in the top right corner.
How To Add Pictures, Links And Smileys To Emails In Windows Mail App.
As well as attaching files to your emails, you can insert pictures directly into the body of the message as well as adding links and the occasional smiley.
To add pictures, links or smileys, it’s very similar to attaching a file.
Open a new email message and click OPTIONS and then INSERT.

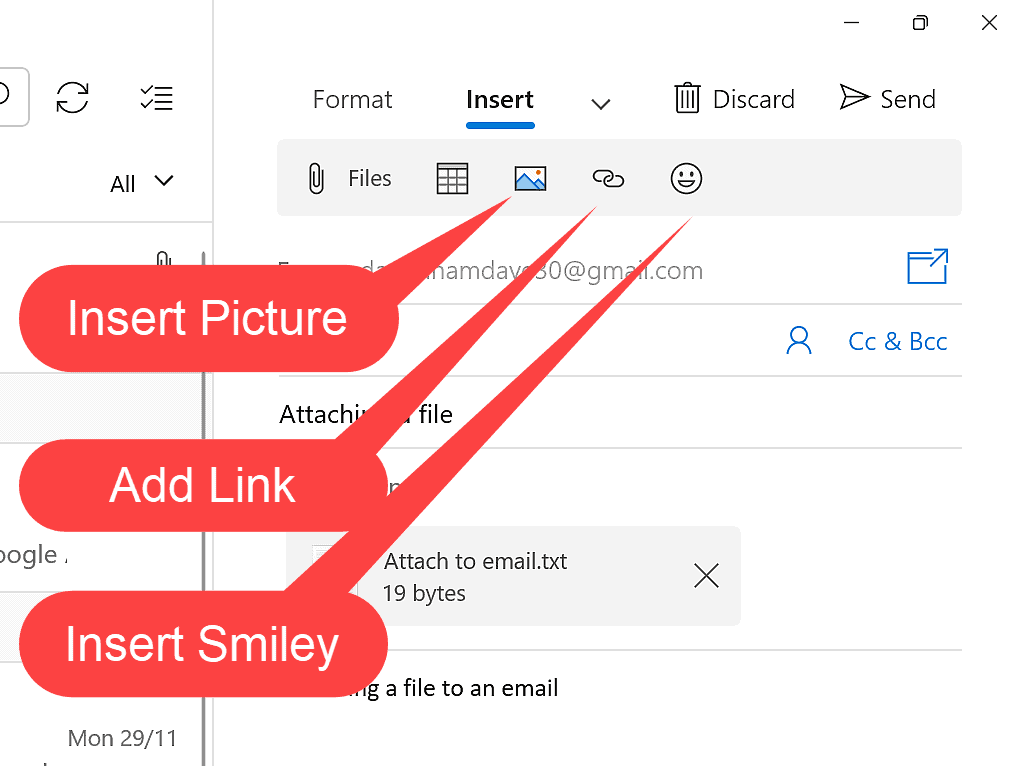
To the right of the ADD ATTACHMENT button, you’ll see the Insert Picture, Add Link and Insert Smiley buttons.
Inserting A Picture.
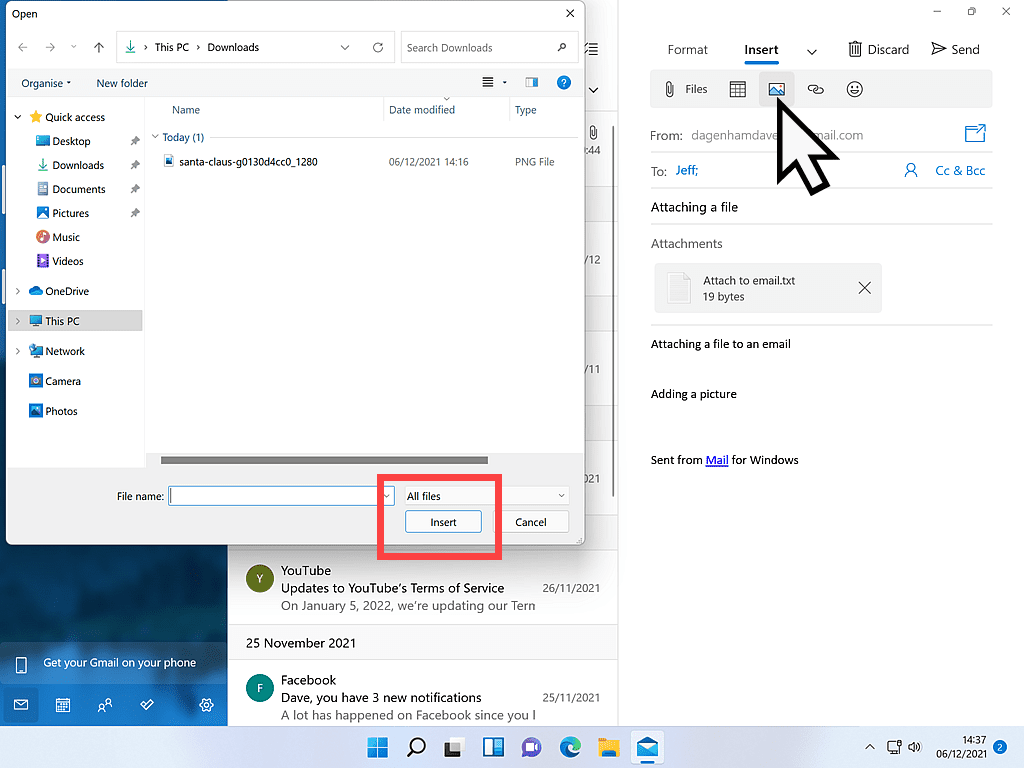
Position the cursor on the email message body where you want the picture to be inserted. Then click the Insert Picture button.
Use the File Explorer window to find the picture that you want to use. When you’ve found it, left-click it once to select it and then click the INSERT button.
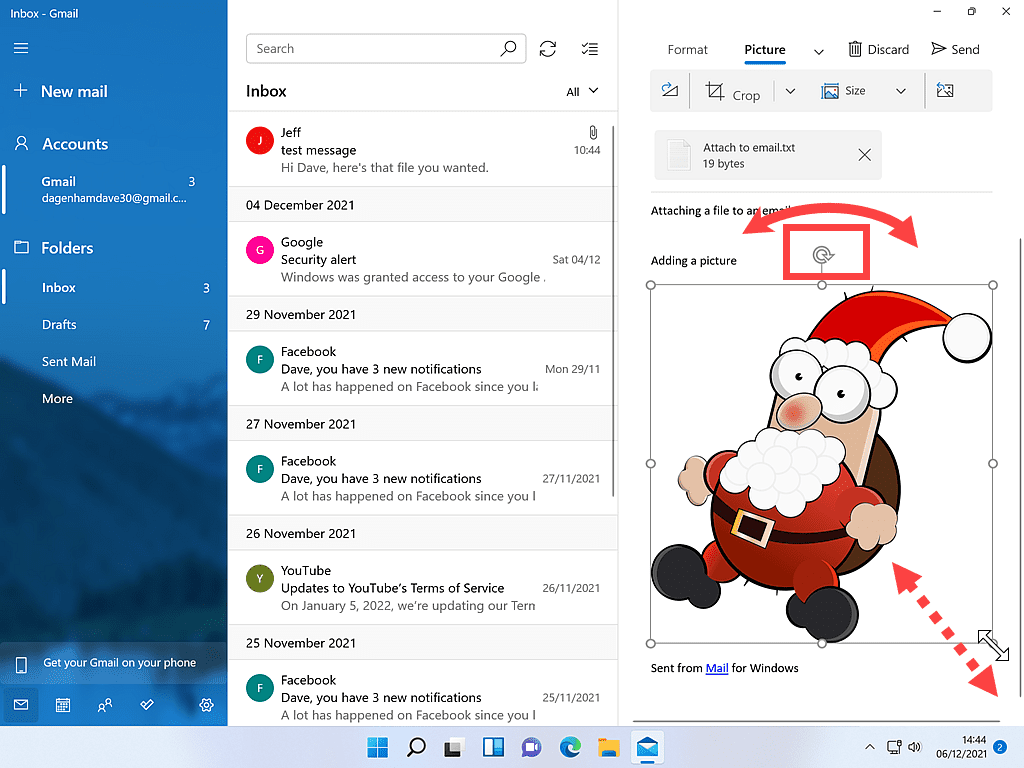
When the picture appears in your email, you can resize it or rotate it using the control handles.
Adding A Link
You can insert a link to a website or webpage into an email that you’re sending using the Windows Mail app.
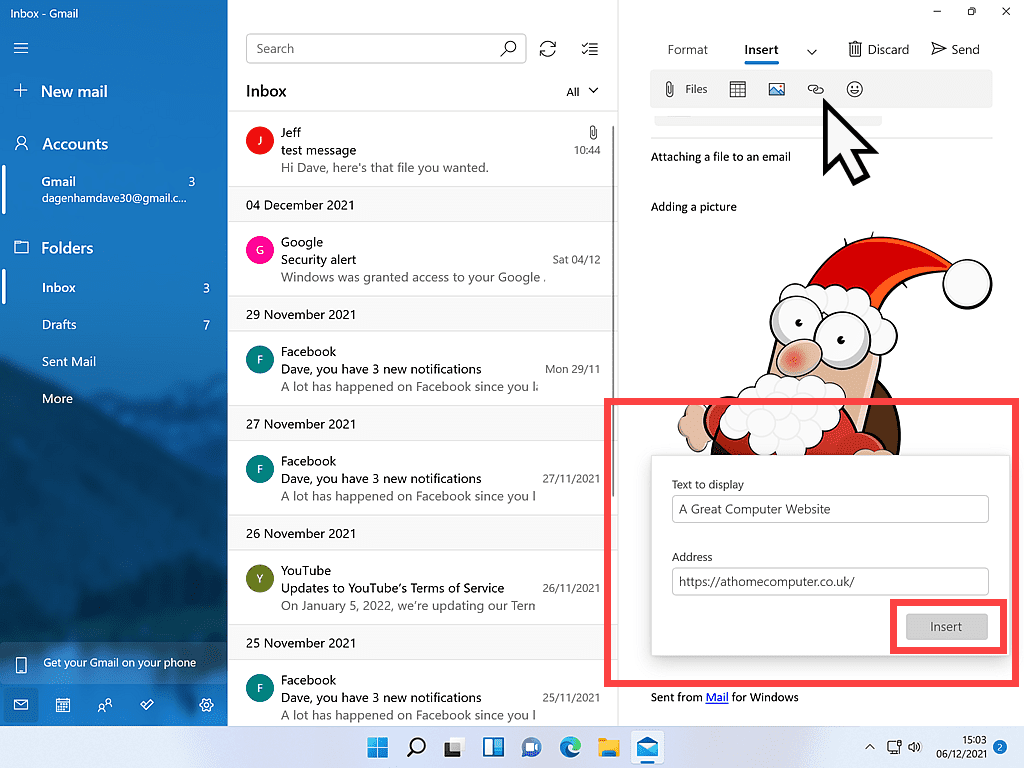
To add a link, position your cursor where you want the link to appear, then click the ADD LINK button. A small pop up window appears.
The top box, labelled Text To Display, is what will appear in the email for your recipient to click on. You can leave this blank if you prefer.
The bottom box, labelled Address, is the web address (URL) of the web page you’re linking to.
When you’re done, click the INSERT button.
Inserting A Smiley
And finally, you can add a smiley into your emails. Well, why not.
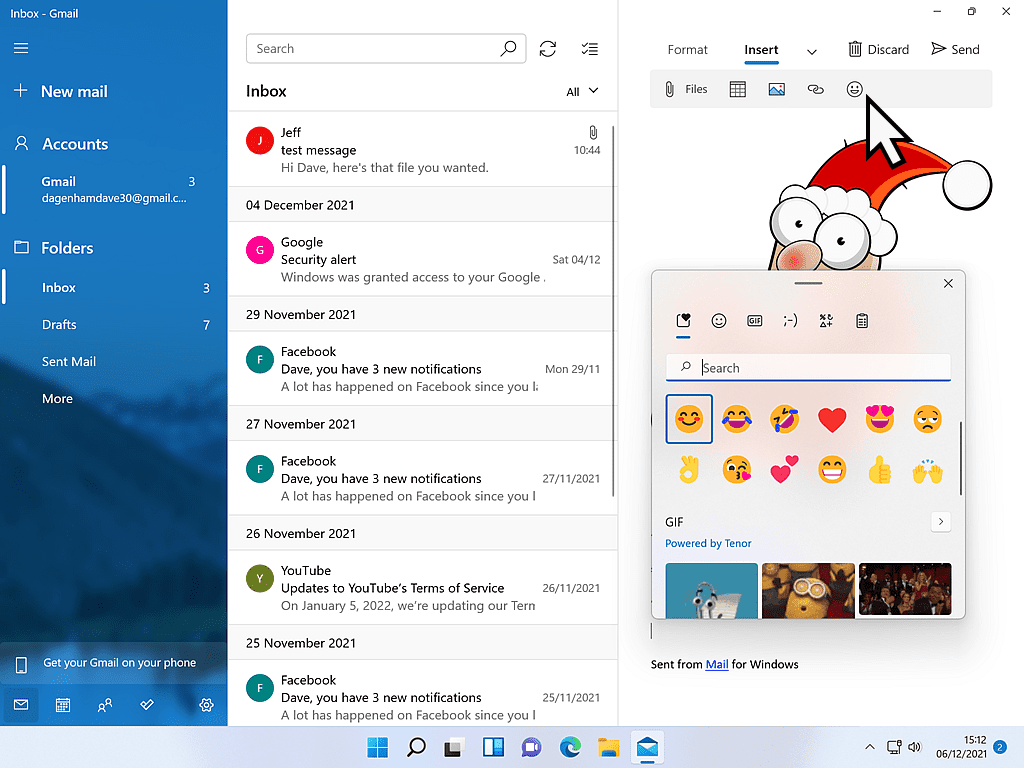
Position your cursor where you’d like the smiley to go. Then click the Insert Smiley button.
The smiley menu will appear. Search through them and when you find just the right one, left-click it to insert it.
Folders In Windows Mail App.
A great feature of any email client is the ability to create folders to store your saved emails in. You can have folders for just about anything you like, holidays, family, bills and receipts etc.
Folders in the Windows Mail app work just like the folders on your computer.
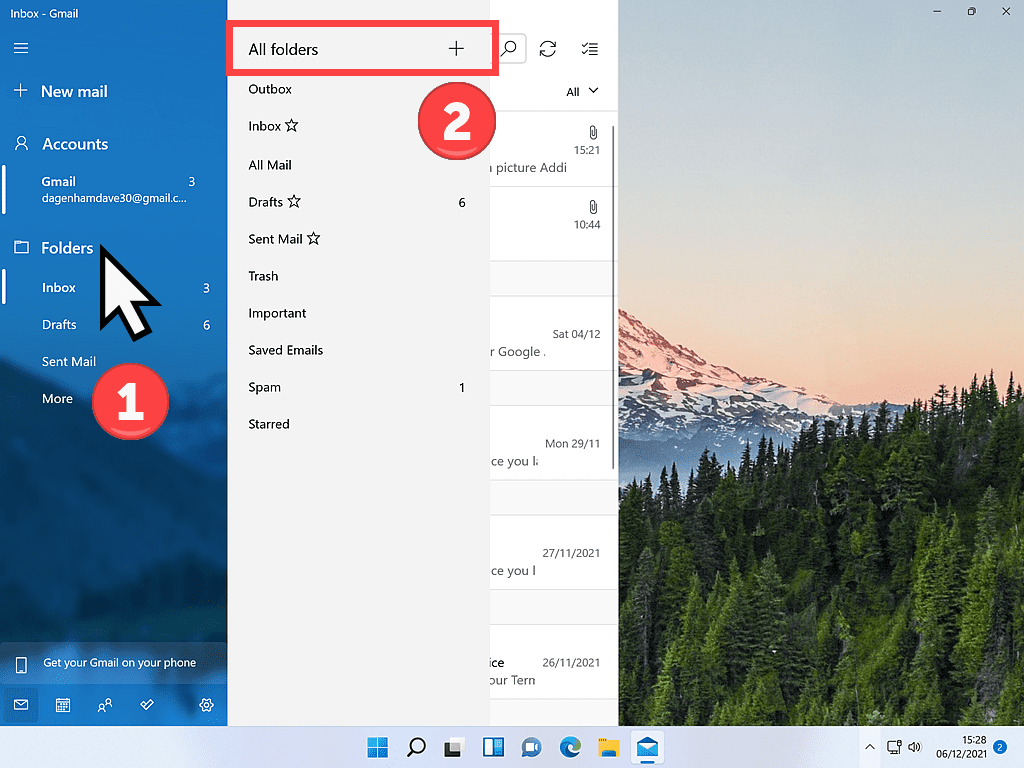
To create a folder, left-click once on FOLDERS in the left-hand panel.
A menu will appear.
Left-click the plus (+) sign at the very top of the menu.
A text box appears where you can name your folder.
You can call the folder anything you like, the more descriptive the better.
Once you’ve given your new folder a name, press the ENTER key on your keyboard.
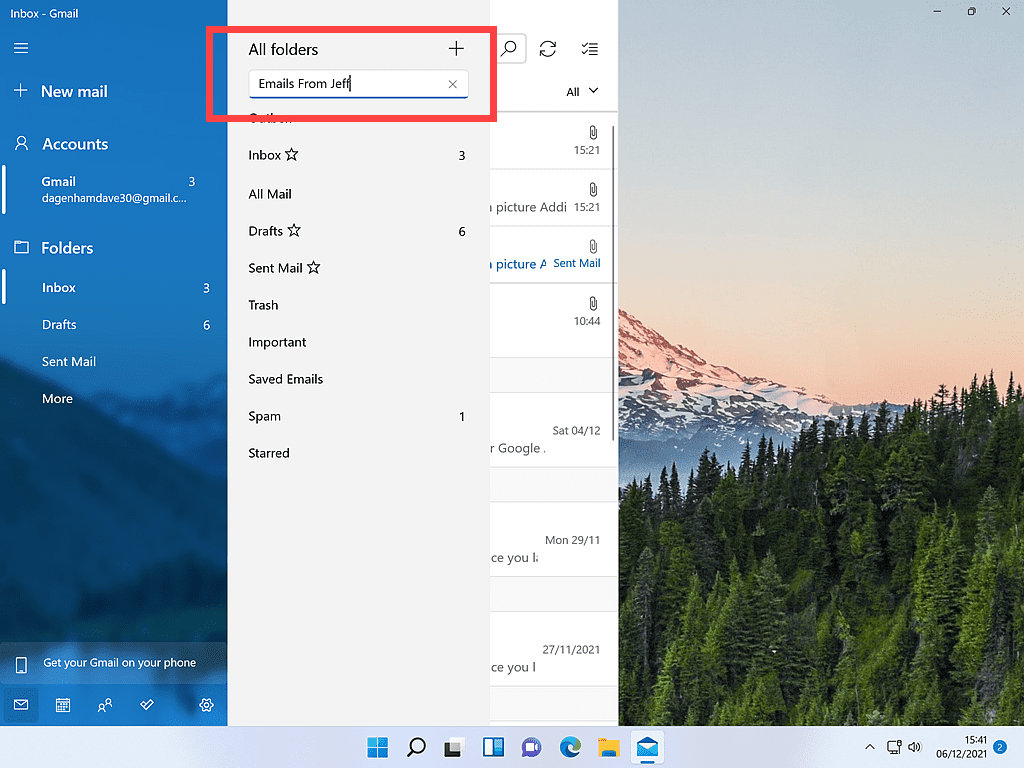
To find the folder that you’ve just created, left click MORE on the left-hand panel.
The new folder will appear on the menu that opens.
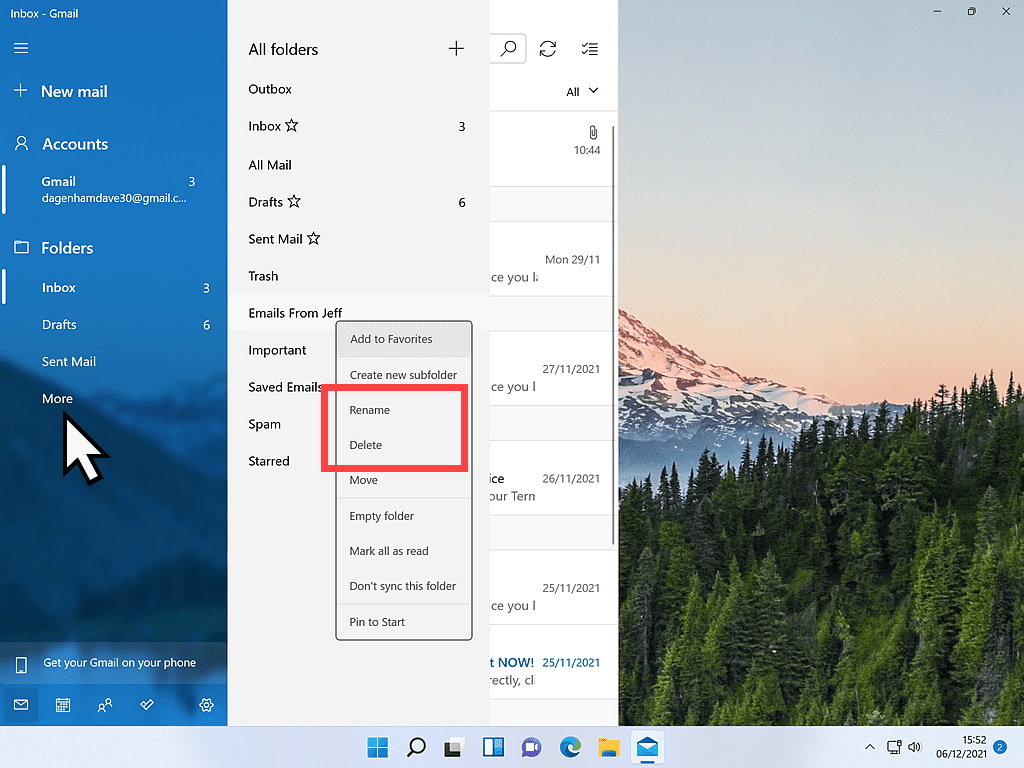
Incidentally, if you decide that you don’t want the folder anymore, or you want to change the name of it, you can, right-click on the folder and then left-click either RENAME or DELETE on the options menu.
Please note that if you delete a folder, all the emails inside it will also be deleted. Just saying.
Moving Emails Into Folders.
Once you’ve created your folders, you’ll want to start moving emails into them. There are two ways of doing it.
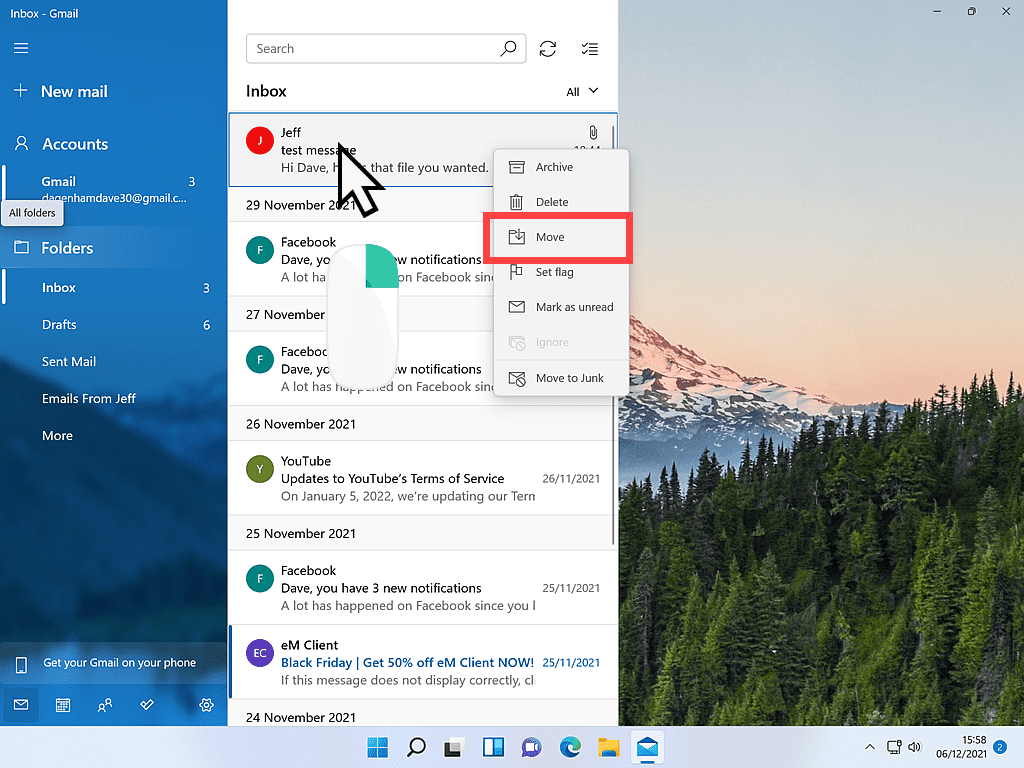
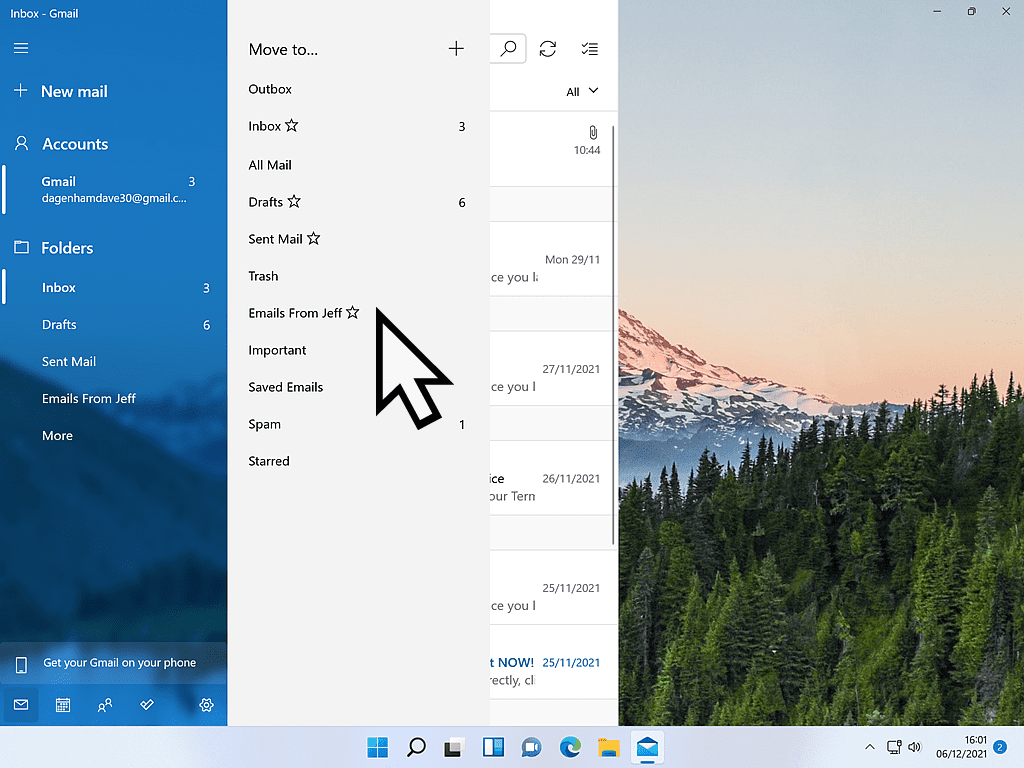
The first way to store emails into a folder is to right-click on the email and then left-click MOVE on the menu that appears. The folders menu opens.
Simply left-click on the folder that you’d like the email to be moved into.
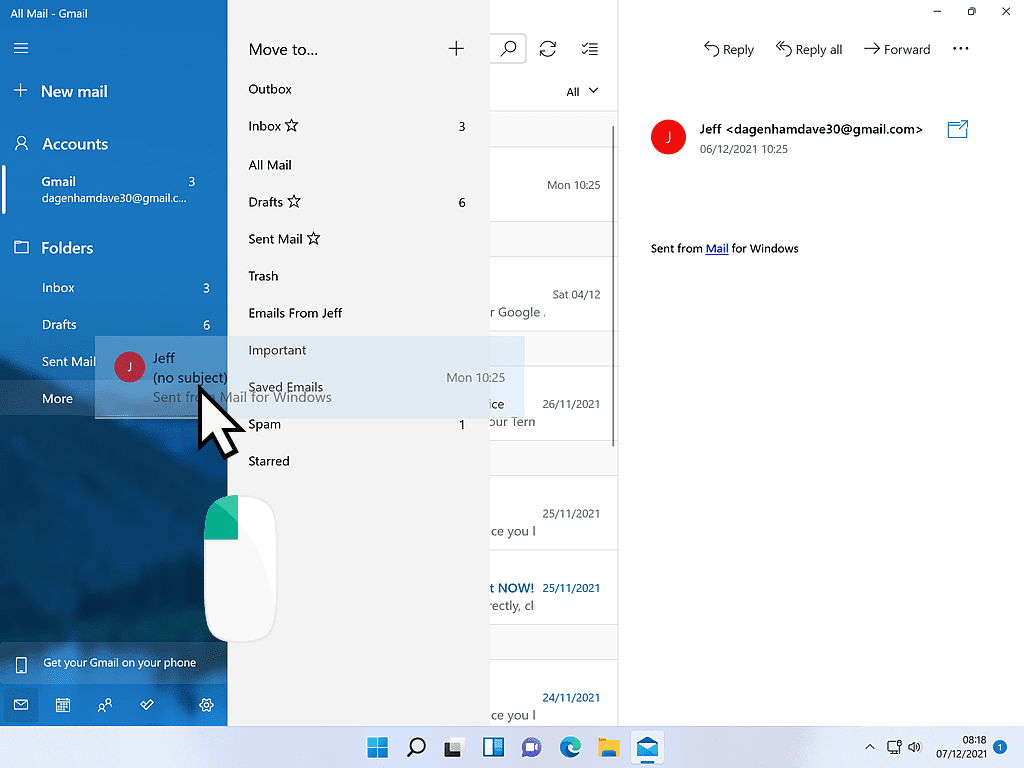
The second way to move an email into a folder is to use drag and drop.
Put your pointer onto the email you want to move, then hold down the left-hand mouse button.
Keeping the mouse button depressed, move your mouse over the word MORE in the left-hand panel. You’ll see that the email moves with your mouse pointer.
The folders menu will appear.
Still keeping the mouse button pressed down, move your pointer over the folder where the email is to go, then release the mouse button.
Favourite Folders.
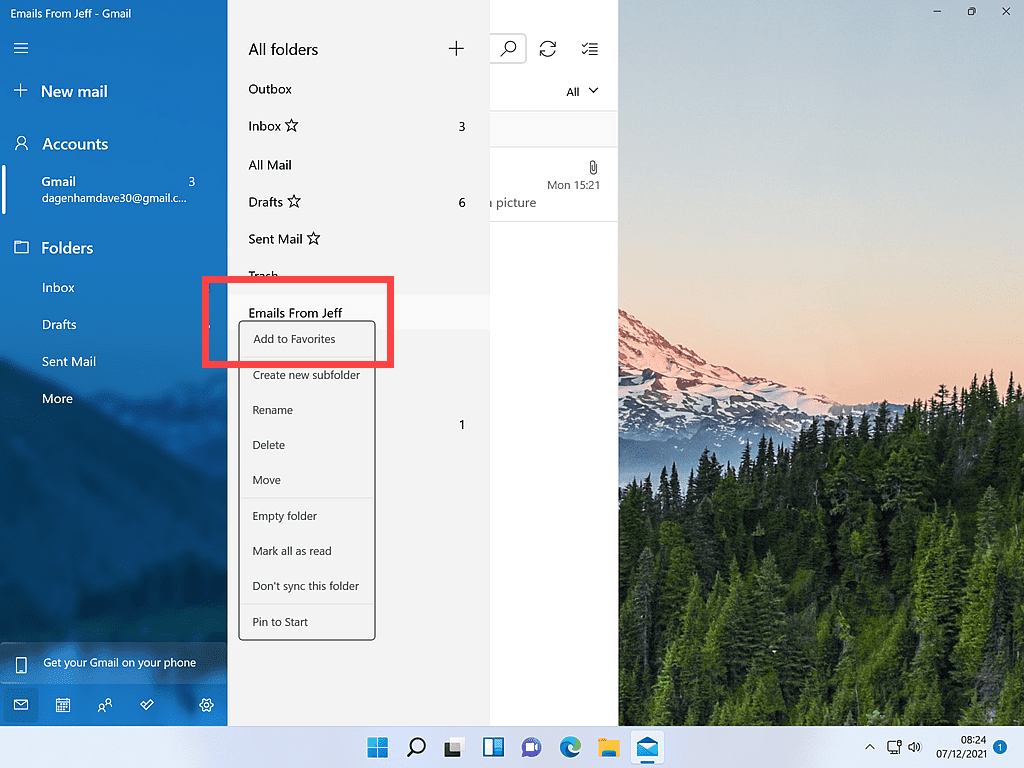
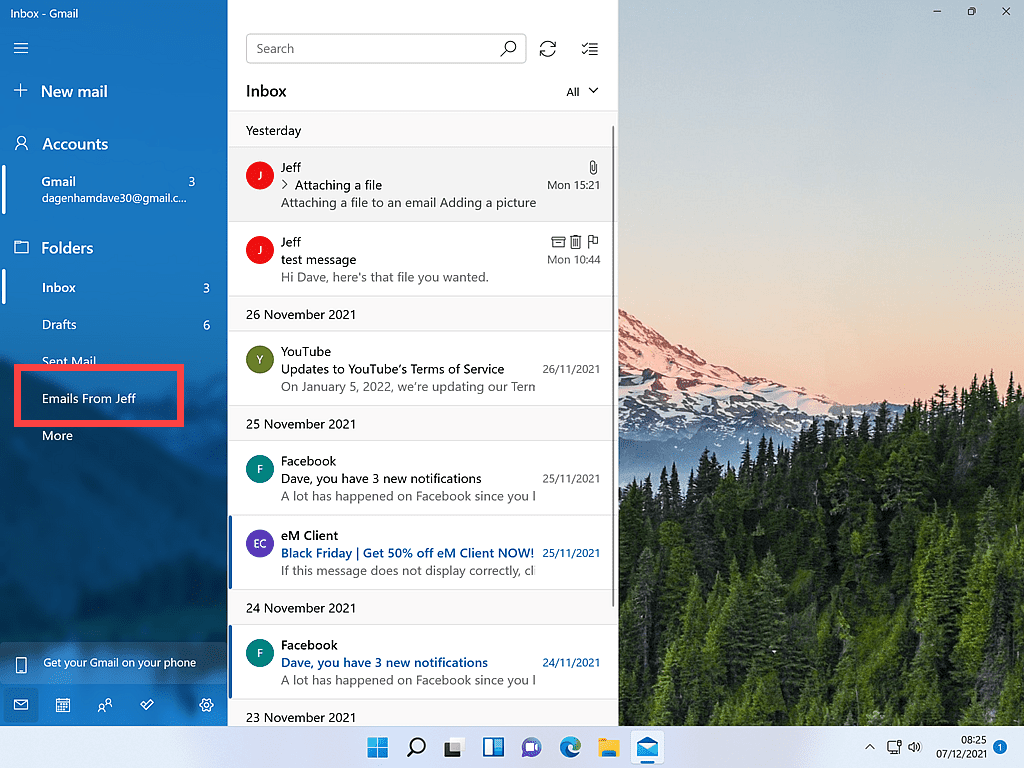
If you find yourself using a few folders more often, you can mark them as Favourites. As such, they’ll appear directly on the left-hand panel, without the need to hit the MORE option.
To add a folder to your Favourites, simply right click on it, then on the menu that opens, left-click ADD TO FAVOURITES.
Using Multiple Email Accounts With Windows Mail.
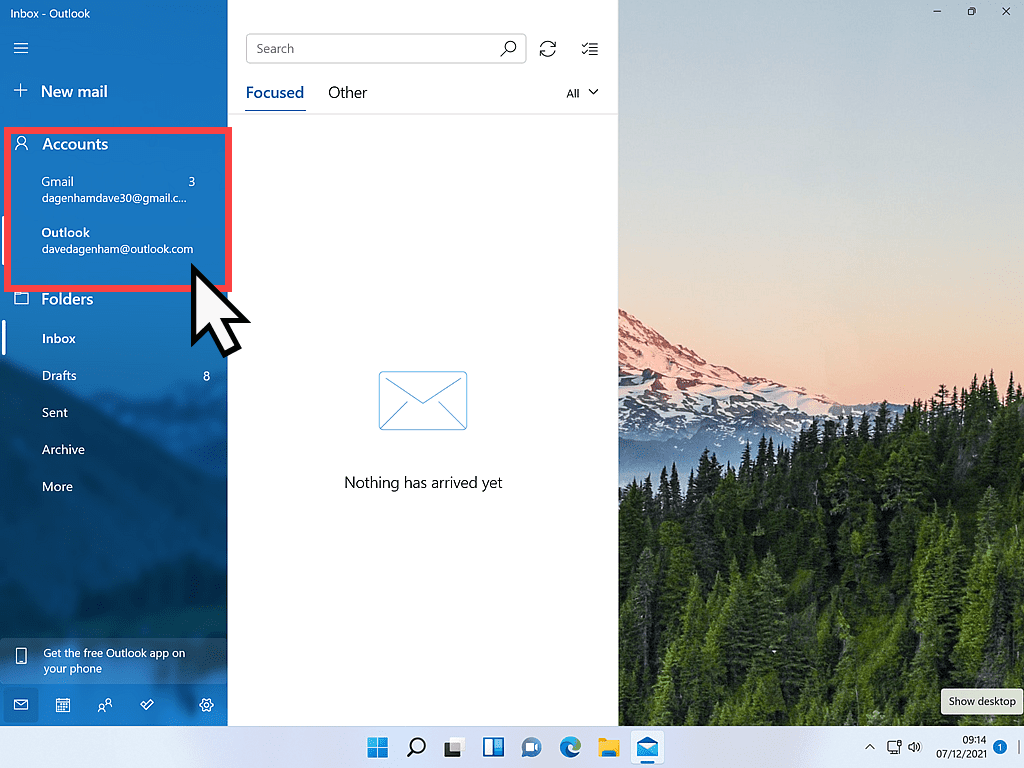
One of the benefits of using any email client is the ability to have multiple accounts and Windows Mail is no exception. Simply by opening Mail you can see all your email accounts in one place.
You can set up Windows Mail with more than just one email account.
It doesn’t matter if they’re from different email services, you can have Outlook.com, and Gmail and Yahoo or any other combination.
Switching between them is as simple as clicking on them in the left-hand panel.
Linking Accounts.
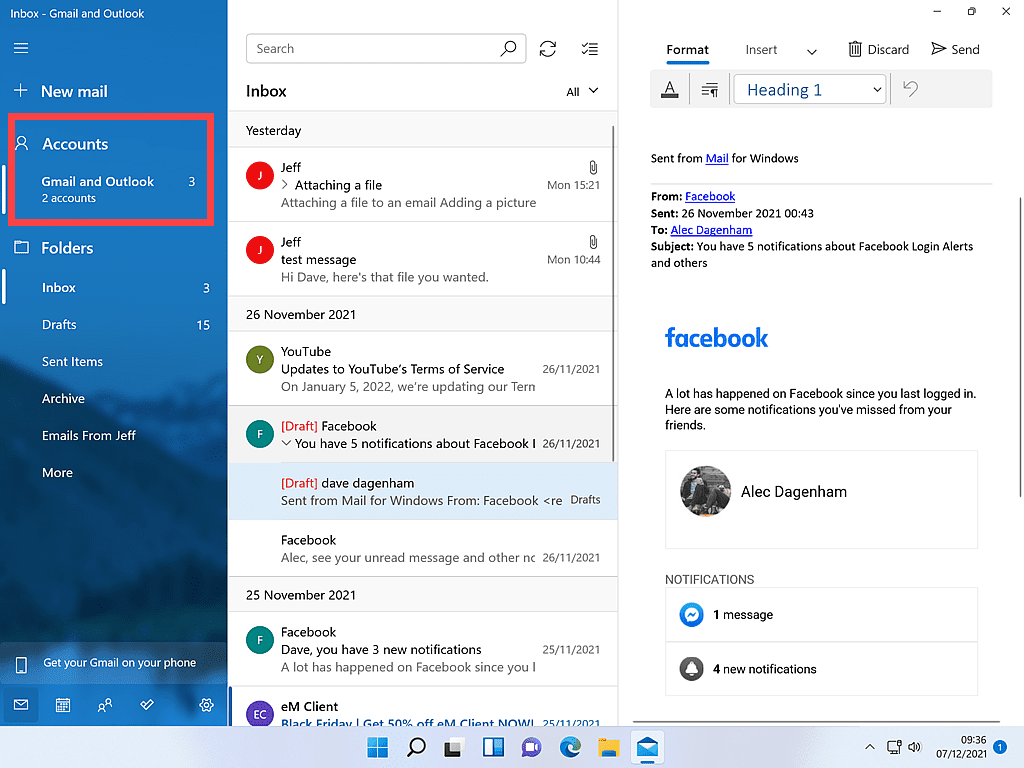
But it gets better. In Windows Mail, you can link your accounts. What linking does is to combine two or more accounts into just one account. So you don’t even need to click each account to check your mails, they are all there in the one Inbox.
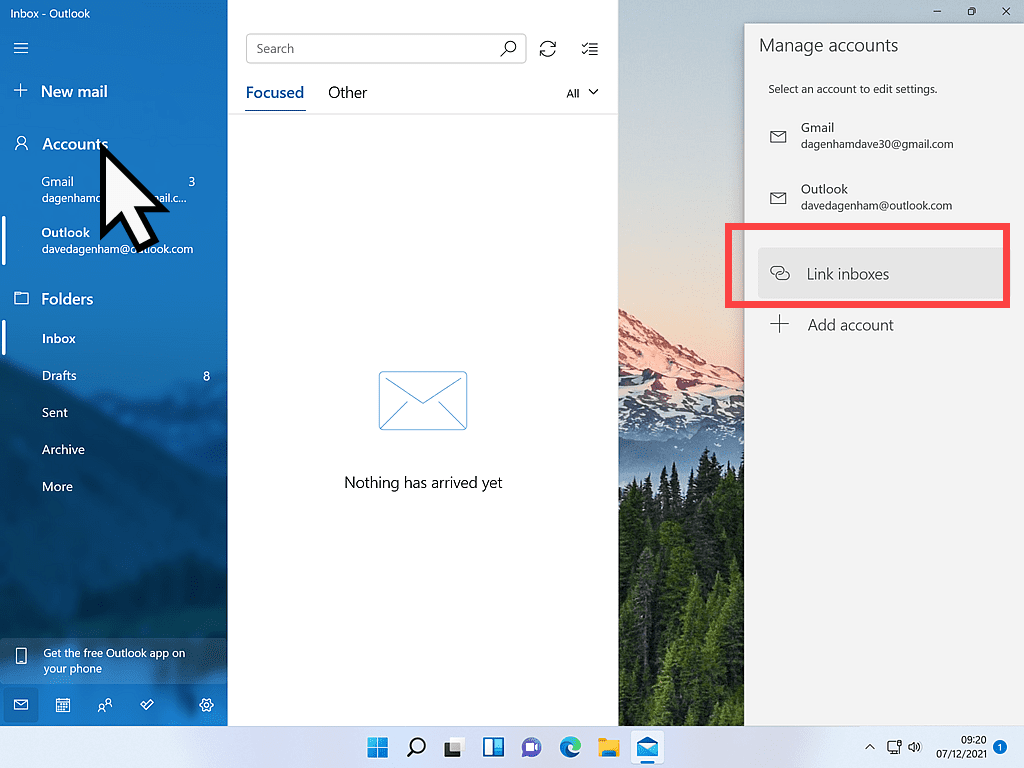
To link your email accounts in Mail left-click once on ACCOUNTS in the left-hand panel.
The Manage Accounts menu will open over on the right-hand side.
Click LINK INBOXES
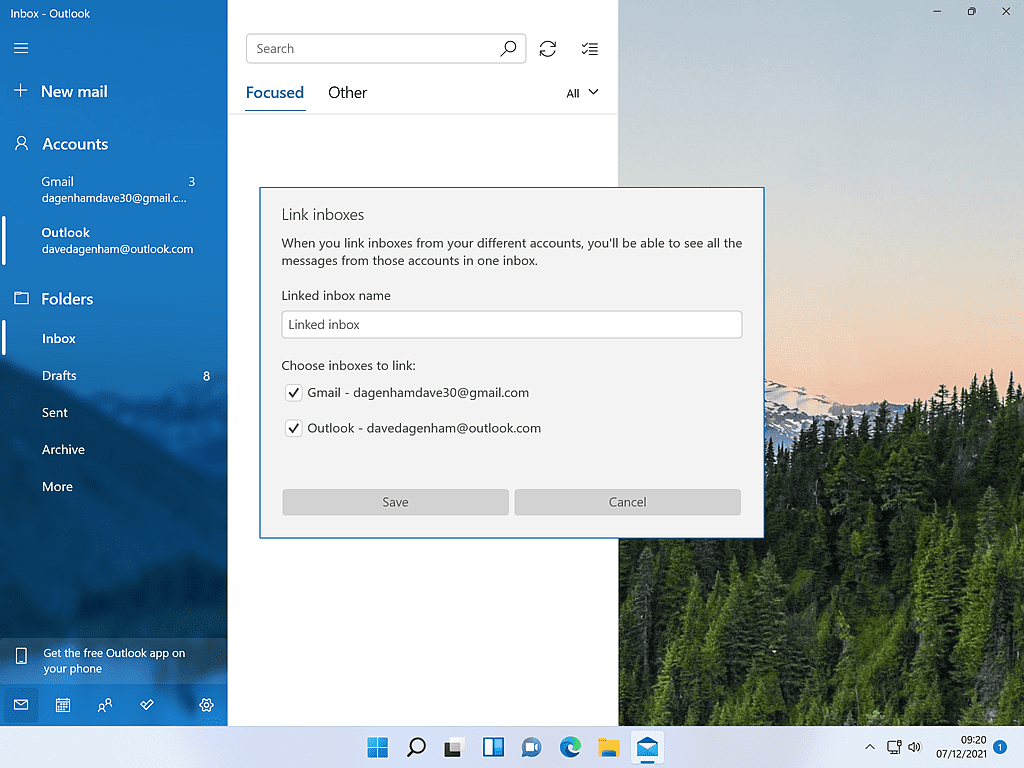
The Link Inboxes window opens.
In the Linked Inbox Name text box, you can give your links a name or just leave it as it is.
Under “Choose Inboxes To Link” you can deselect any accounts that you don’t want to be included by unticking the relevant box.
When you’re happy, click the SAVE button.
Now all your incoming emails, regardless of which account (email address) they were sent to, will be displayed as if you only had a single email account.
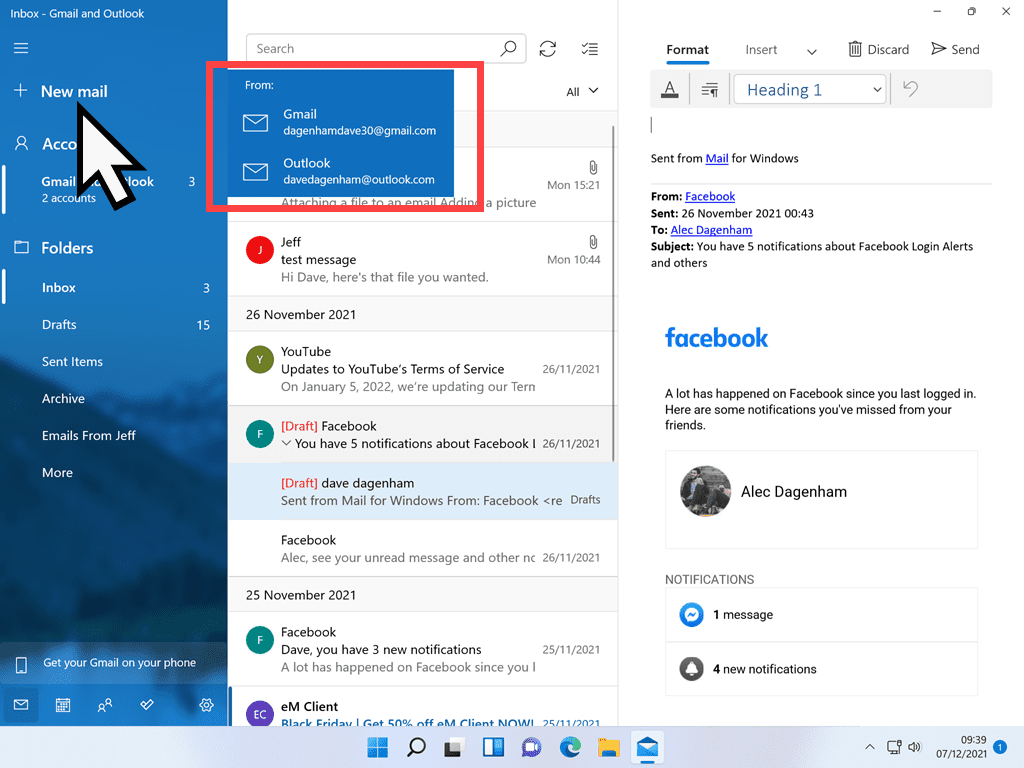
When you want to send an email, you’ll click the NEW EMAIL button as usual.
But now Windows Mail will ask you “from which account should the email be sent”.
You just click your choice.
Conclusion.
The Windows Mail app will satisfy most home users. It’s easy to use and fairly easy to set up. The great thing about using an email client like this is that you only need to learn one interface. Once you know how to print, then you know.
Unlike when logging into various different webmail accounts that all have their own interface. It makes finding the print button, or the attach file button etc, a bit of a challenge.
I really like the way in which Mail links your email accounts, but still keeps them separated when sending emails.
If you’re looking to to try out an email client, then you could do worse that give this a go, and as a bonus, it is already there on your Windows 10 or 11 PC.
At Home Computer Step By Step Guides.
These simple to follow guides aren’t a part of the course, instead they are standalone guides.
No post found!

