Windows File Explorer (sometimes called Windows Explorer or simply Explorer), is the central hub of all your files, folders and drives on your computer. It’s the way in which you find your way around the labyrinth that is a modern computer.
Whether you’re trying to save a document, upload a picture to Facebook, download a file from the Internet or simply play a music track or video that you’ve got saved on your computer, it’s always File Explorer that you’re using.
How To Open Windows File Explorer.
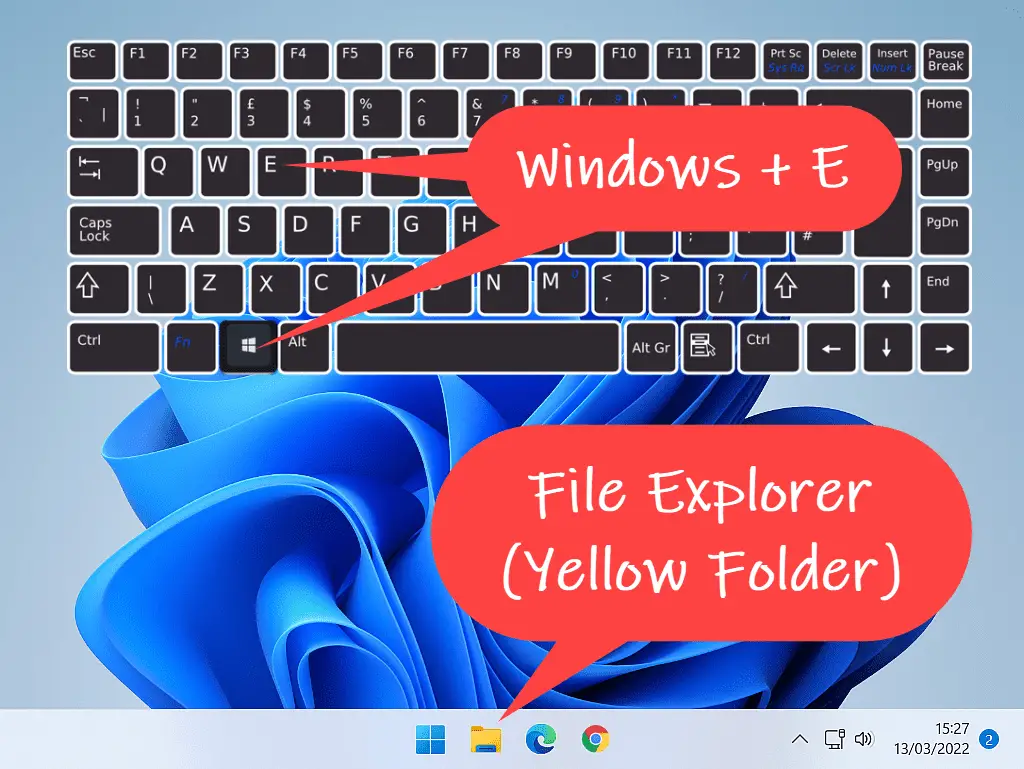
To open Windows File Explorer in both Windows 10 & 11, left-click once on the File Explorer icon (the yellow folder) on your Taskbar.
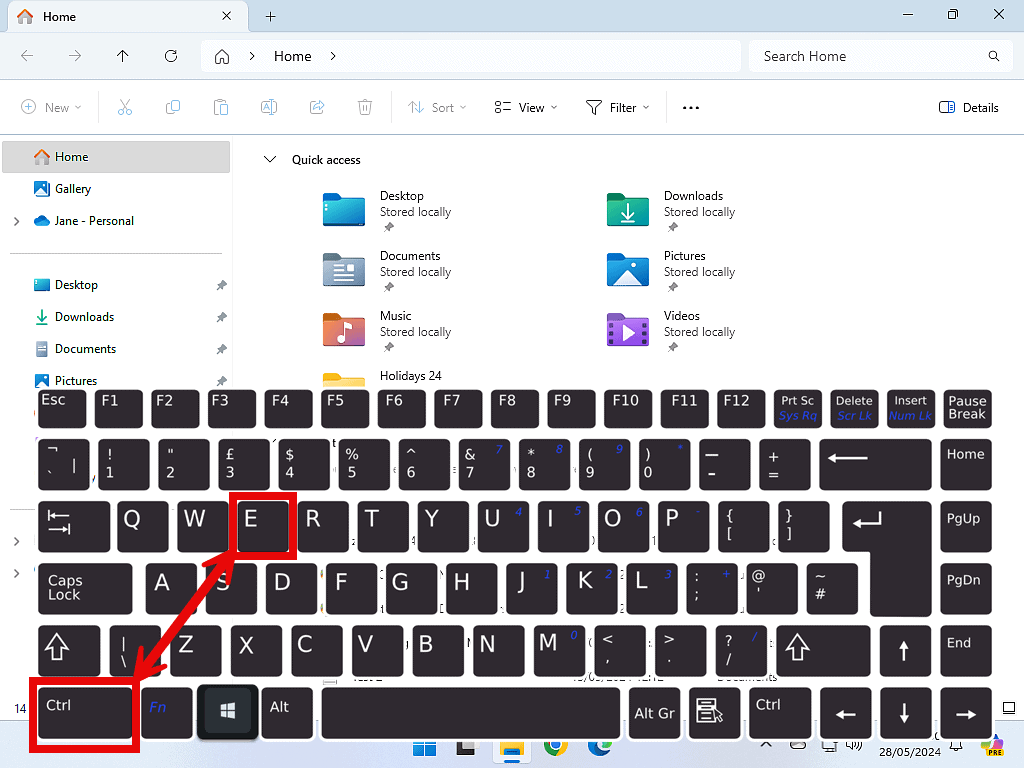
Or you can use a keyboard shortcut. Press the Windows key and the letter E on your keyboard.
If you can’t see File Explorer on your Taskbar, we covered replacing it here File Explorer Missing From Taskbar
Navigation Pane Not Visible In Windows 10 File Explorer.
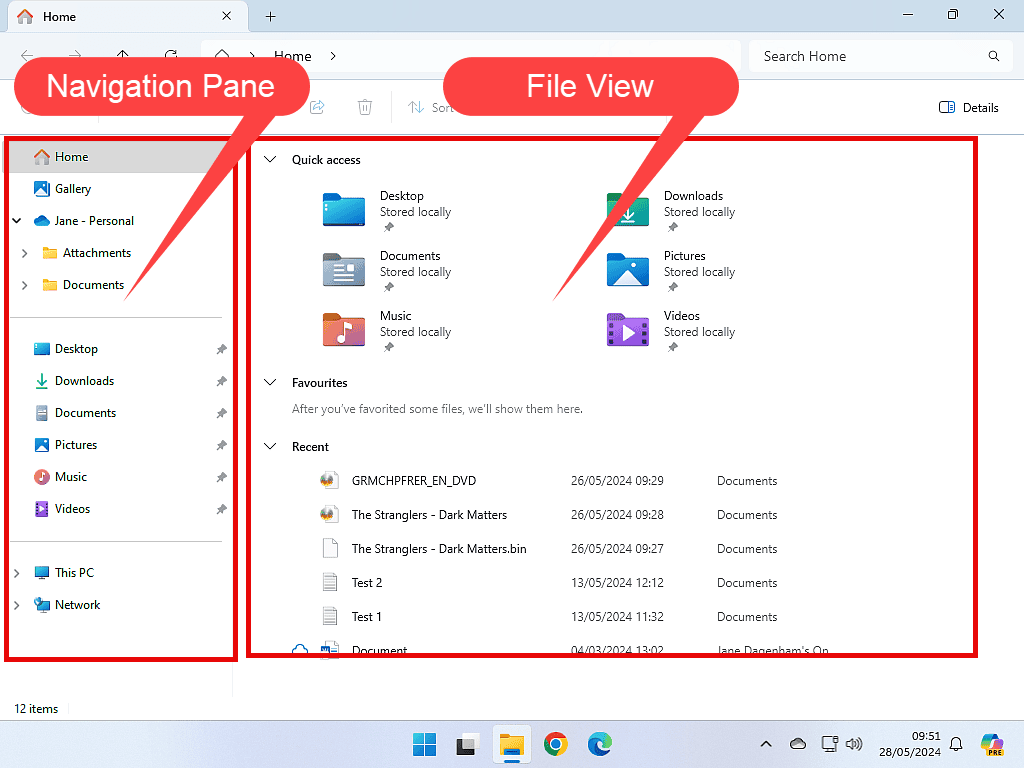
When Windows File Explorer opens you should normally be able to a window that’s split into two panes or panels. There’s a centre pane (or middle pane) and then over on the left, there should be a second panel. This second panel is called the Navigation Pane. If you’re using Windows 10, sometimes the Navigation panel can be hidden (or turned off).
If you can’t see the Navigation Pane, then
- Left-click VIEW
- Then click the NAVIGATION PANE button.
- On the small menu that appears, click Navigation Pane.
The Navigation Pane
Windows is the operating system that runs your computer and it’s incredibly customisable. Showing or hiding the Navigation Pane is just one of a myriad of customisations (or changes) that you could apply to your computer.
However, at this point, it’s important that we’re all looking at pretty much the same screen. Otherwise things will get really complicated.
File Explorer In Quick Access Or This PC Mode?
When File Explorer opens, it can open in one of two slightly different views. The first way (which is the default way) is called Quick Access mode or view. Unless you’ve changed this setting on your computer, the Quick Access view is what you’ll probably see.
The second way in which File Explorer might open is called This PC mode or view.
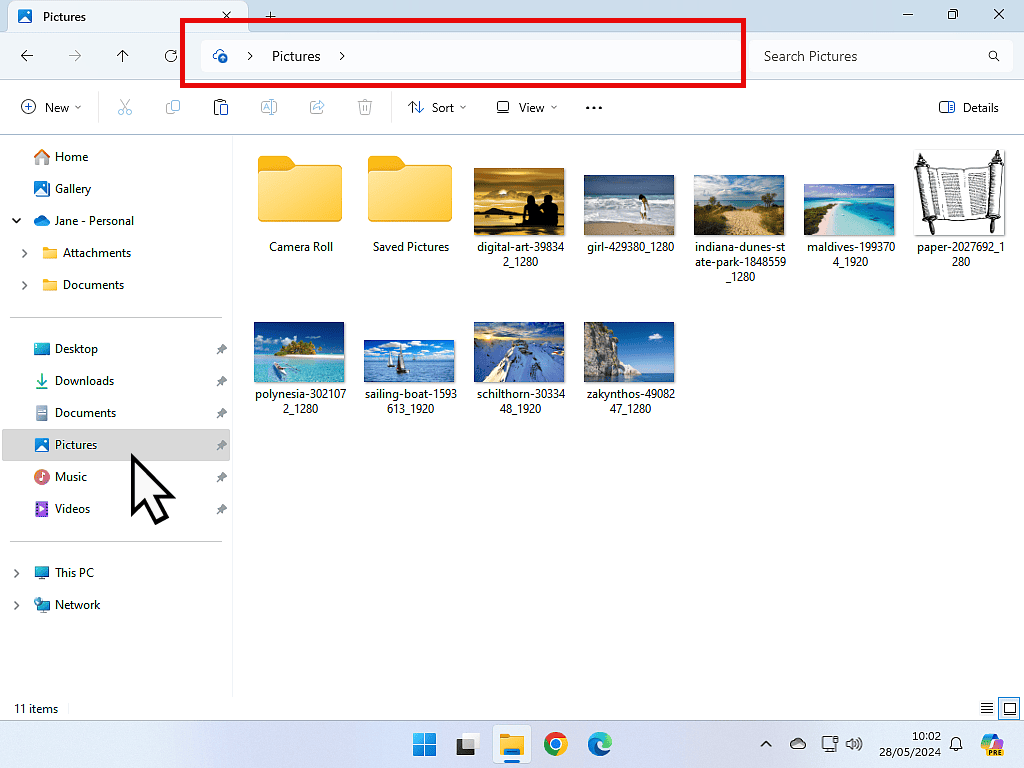
You can easily tell which way File Explorer is opening on your computer by looking at the Address Bar at the top of the window.
The main difference between the two views is that in Quick Access mode, File Explorer will display a list of your most recently opened files in the bottom half of the window.
In This PC mode, you’ll see all the drives (hard drives, external hard drives, USB drives, CD/DVD drives etc) that are currently attached to your computer.
Change To This PC View.
On your home computer, it makes more sense to have File Explorer always open to This PC rather than Quick Access. The reason for that is you’ve probably never opened a recent file from here before, and you’re unlikely to.
But you may well have searched around your computer trying to access a USB stick, external hard drive or maybe even your phone or digital camera that you’ve plugged in.
The way to access them is through File Explorer, in the Devices and Drives section. It just makes your life so much easier when you can just click the File Explorer icon and then see all your drives at once.
Setting Windows File Explorer To Open As This PC.
If your computer is already opening File Explorer to This PC view, you can skim over this section, but if what you see is the Quick Access view, then you should probably change it.
The way to change the setting is slightly different depending on whether you’re using Windows 10 or Windows 11, but it’s really not difficult to do in either version.
Setting File Explorer To Open To This PC In Windows 11.
- In Windows 11 File Explorer, left-click the 3 dots on the menu bar.
- Then click on OPTIONS, which appears on the menu
- Click the drop-down arrow beside the “Open File Explorer to” box
- Select This PC from the menu by left clicking on it
- Click the OK button at the bottom of the window.
- Finally close File Explorer using the X in the top right corner and then re-open it. You should now be looking at File Explorer in This PC view.
Setting File Explorer To Open To This PC In Windows 10.
- In Windows 10 File Explorer, right click on Quick Access in the left hand panel
- On the menu that appears, left click OPTIONS
- Click the drop-down arrow beside the “Open File Explorer to” box
- Select This PC from the menu by left clicking on it and then click the OK button
- Finally, close and then re-open File Explorer
Navigating Your Computer With Windows File Explorer.
Everything on your computer, whether it be a document of some sort, a picture, a video or a piece of music, is considered to be a file. So when we talk of files, we could be referring to just about anything stored on your PC.
All the files on your computer are stored inside folders (where else would you keep files), and these folders could well be inside another folder, inside even more folders. Even if the file is on the Desktop, the Desktop is actually a folder.
Windows File Explorer helps you to quickly navigate to, or “jump” to, the folder that you require. The folder that holds the file you’re looking for.
Whenever you open a folder, save a file, open a file, or upload a file to the ‘net, whenever you click that BROWSE button, it’s always File Explorer that you’re looking at.
Looking Around File Explorer.
File Explorer is split into two panels, the main, or centre panel, shows the contents of whichever folder you’re currently viewing, and the left-hand panel, called the navigation panel or pane, shows all the main folders on your system.
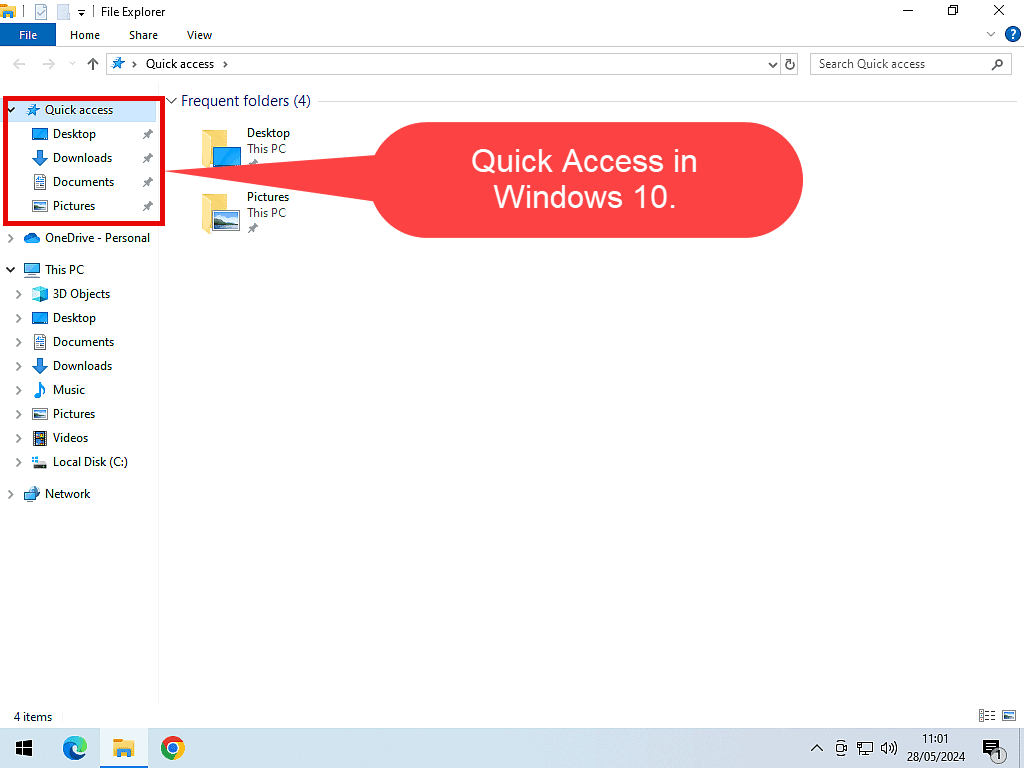
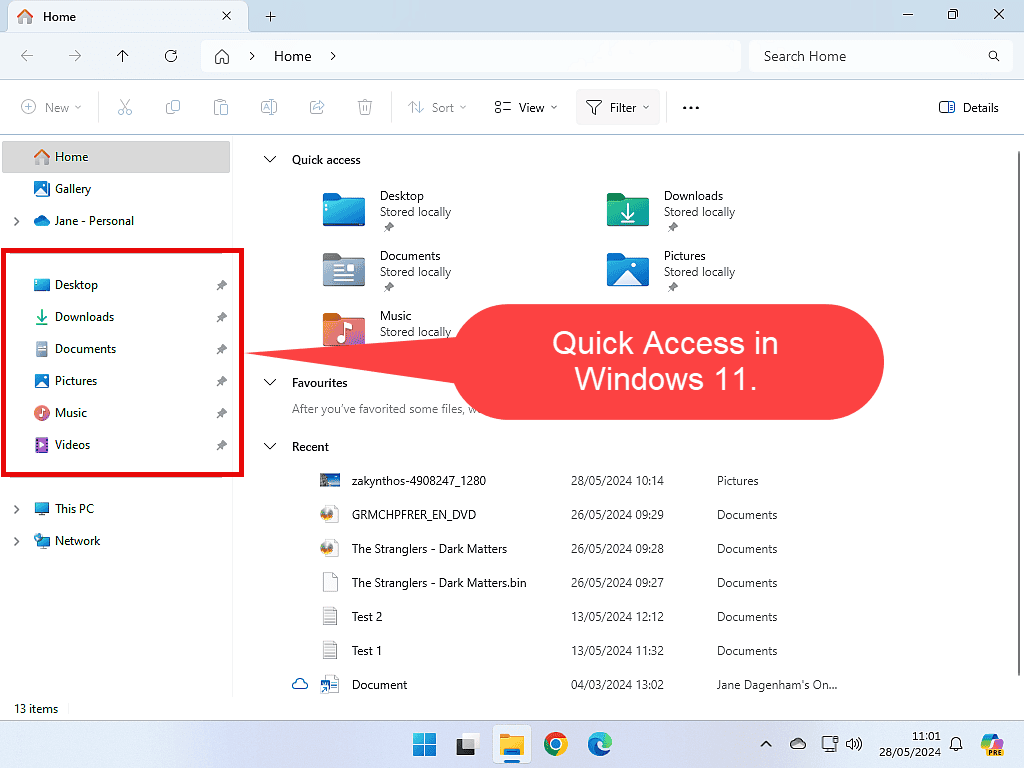
At the top of the navigation panel, we have the Quick Access area.
These are the folders that you’re using the most often. The folders in the Quick Access area aren’t there permanently, they will change over time, but we’ll get to that later.
Below the Quick Access area, you’ll see your Onedrive folder.
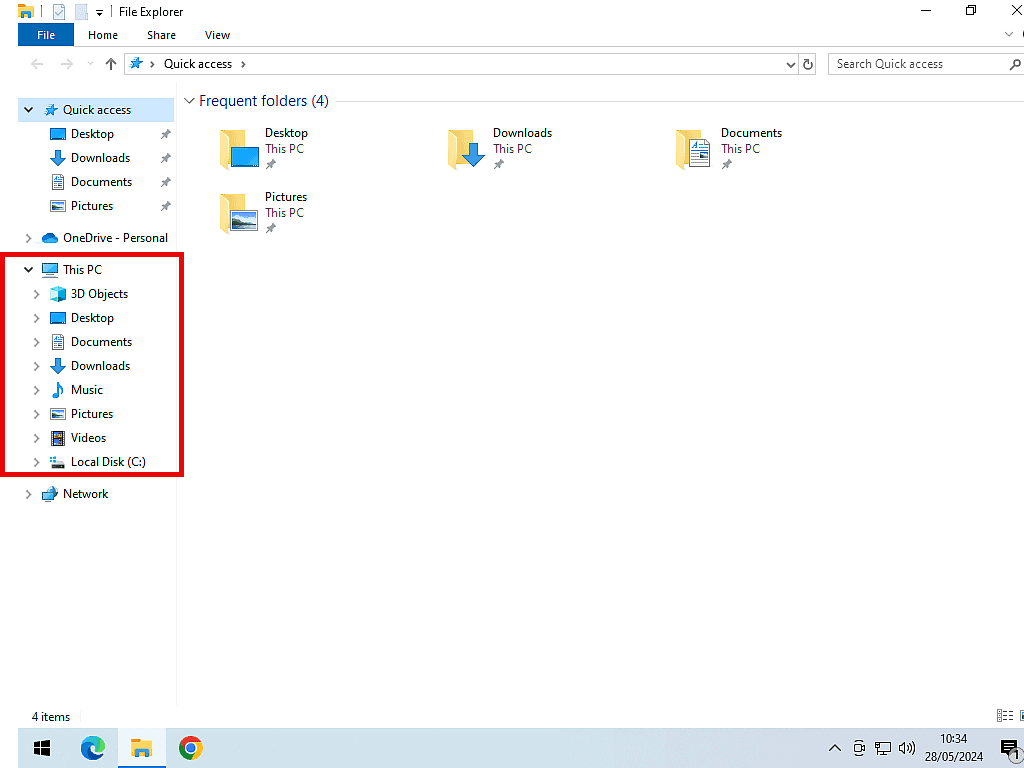
Below Onedrive you’ll see This PC. The folders under This PC are there permanently. They never change or move.
Quick Access Area.
The Quick Access area of the Navigation Pane is not to be confused with the Quick Access view in File Explorer that we’ve just changed.
In an effort to try to distinguish the two, Microsoft decided that it would be better to call them by exactly the same name (thanks a bunch MS).
Yeah I know, that’s not helpful, especially when you’re just learning. A word of warning, it happens a lot.
Expanding This PC
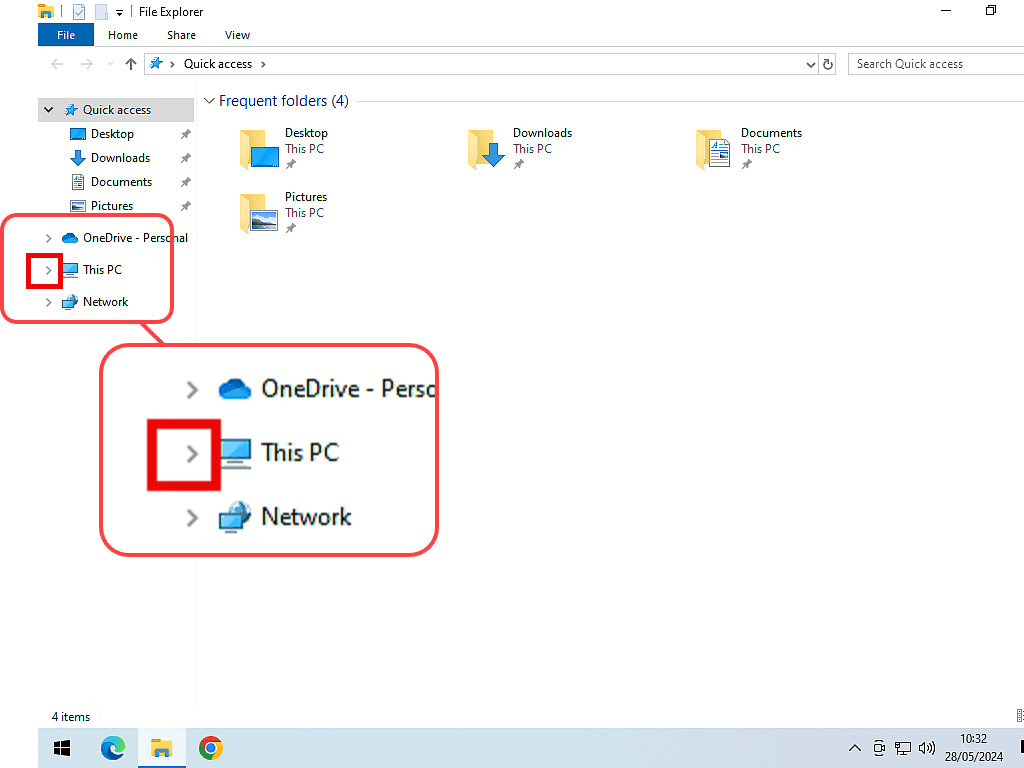
If you can’t see your folders under This PC, then it’s closed or collapsed.
Move your pointer over This PC, and a tiny arrowhead will appear beside it.
Left-click the arrowhead to open or expand This PC.
Now you can see all your main folders.
Expanding Devices And Drives
Also, if you can’t see your Devices and Drives in the main window, left-click the small arrowhead to open the section.
How To Use Windows File Explorer.
In Windows File Explorer, the navigation panel lets you navigate to, or jump to, any of your main folders (Desktop, Documents, Downloads, Music, Pictures and Videos)
The main window, or centre panel, will display the contents of any folder that you click on.
For instance, if you’re looking for a file or folder that is located on your Desktop, you’d simply left-click Desktop in the Navigation panel.
The centre panel will immediately display all the files, folders and other items that you’ve got on your Desktop.
The Address Bar (near the top of the window) tells you exactly where you are, which folder you’re looking at.
The Address Bar will track your movements and always show you the folder that you’re in.
This PC – Desktop.
Once you’re into the main folder (such as Desktop, Documents, Pictures etc), you then use the centre panel to open any of the subfolders within it. Or to open any of the files.
Note that the Address Bar is logging you’re movements, it’s following you as you go. Does anyone remember Hansel and Gretel and the breadcrumbs, the Address Bar does pretty much the same thing and for the same reasons.
The Quick Access Folders Area Of File Explorer.
The Quick Access area of File Explorer is the best part of the whole window because you can customise it to suit yourself.
As you use your computer, Windows will start to figure out which folders you’re using and add them to the Quick Access area.
As an example, let’s say you’re doing a lot of work on your photos, so you’re using the Pictures folder a lot, opening and closing it.
Because it’s being used a lot, the Pictures folder will suddenly appear in the Quick Access area.
It kinda gets promoted.
Similarly, folders that aren’t being used will be removed from the Quick Access area (or demoted if you like), to make way for more popular folders.
Set Up Your Quick Access Folders Area
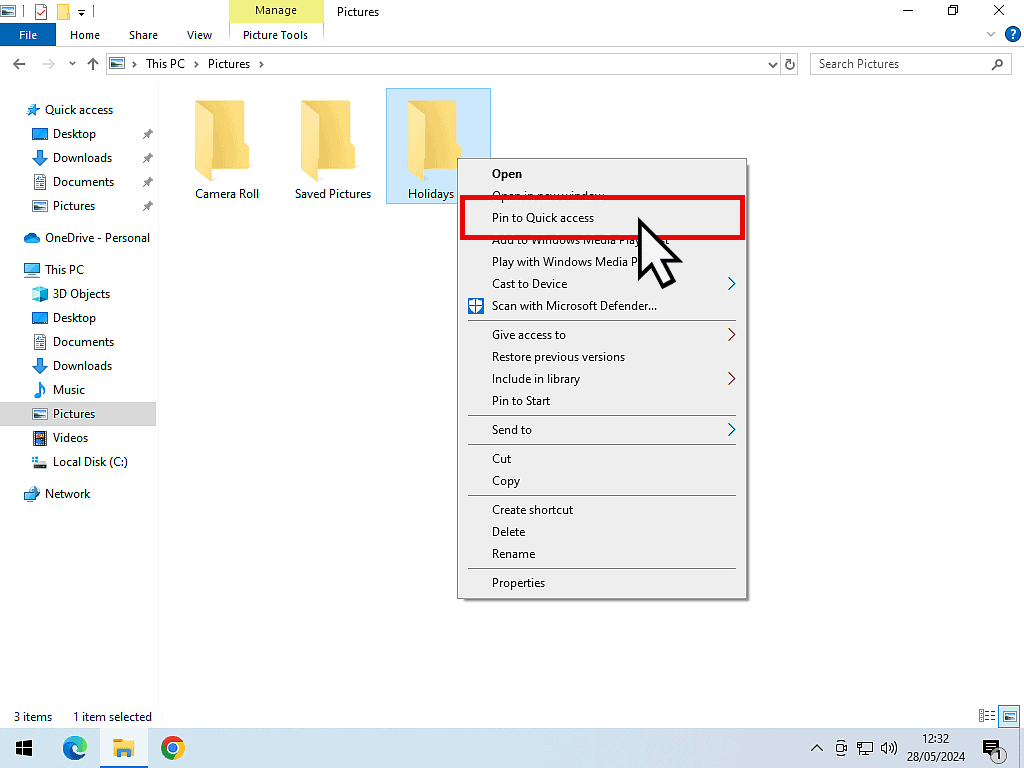
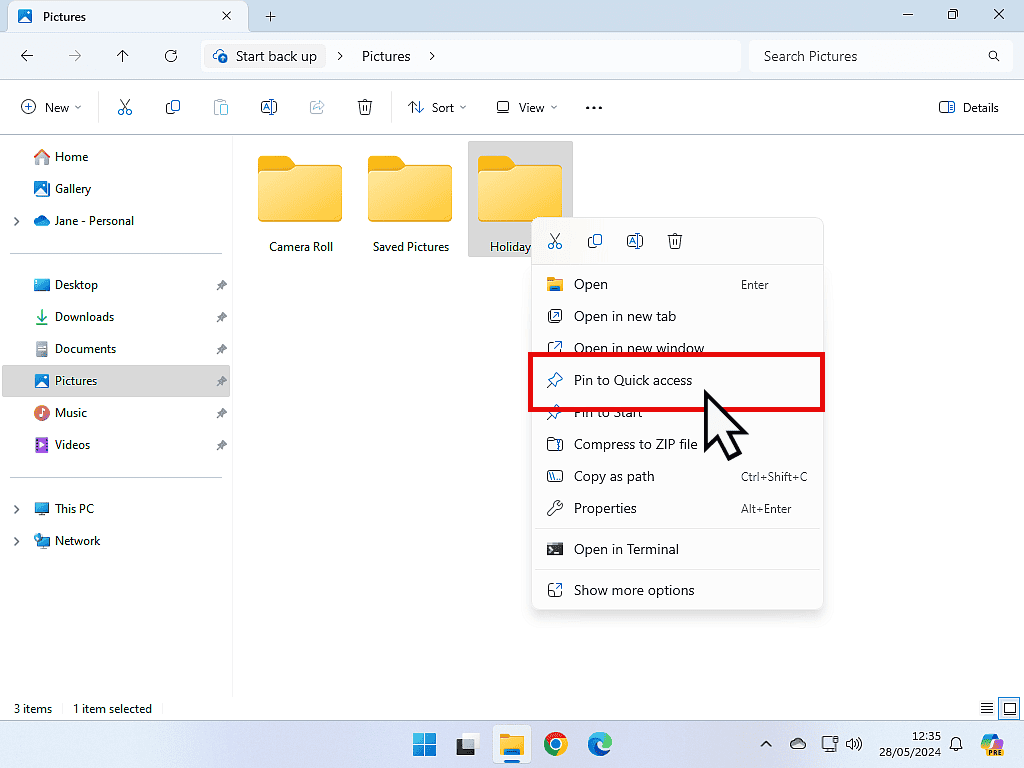
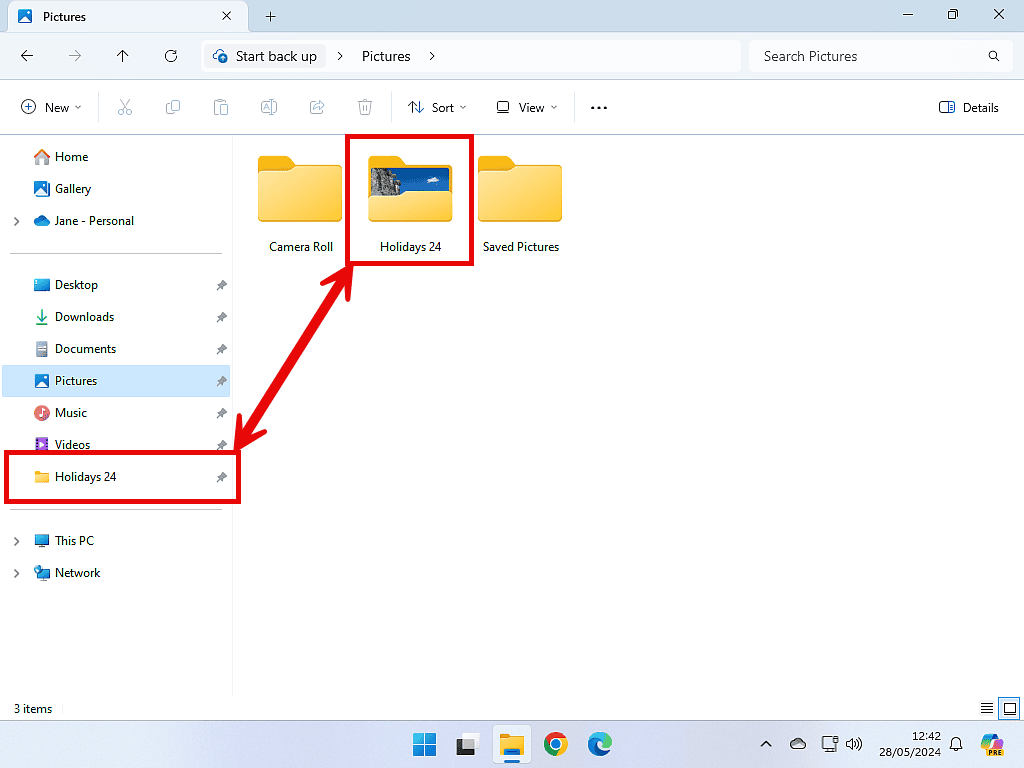
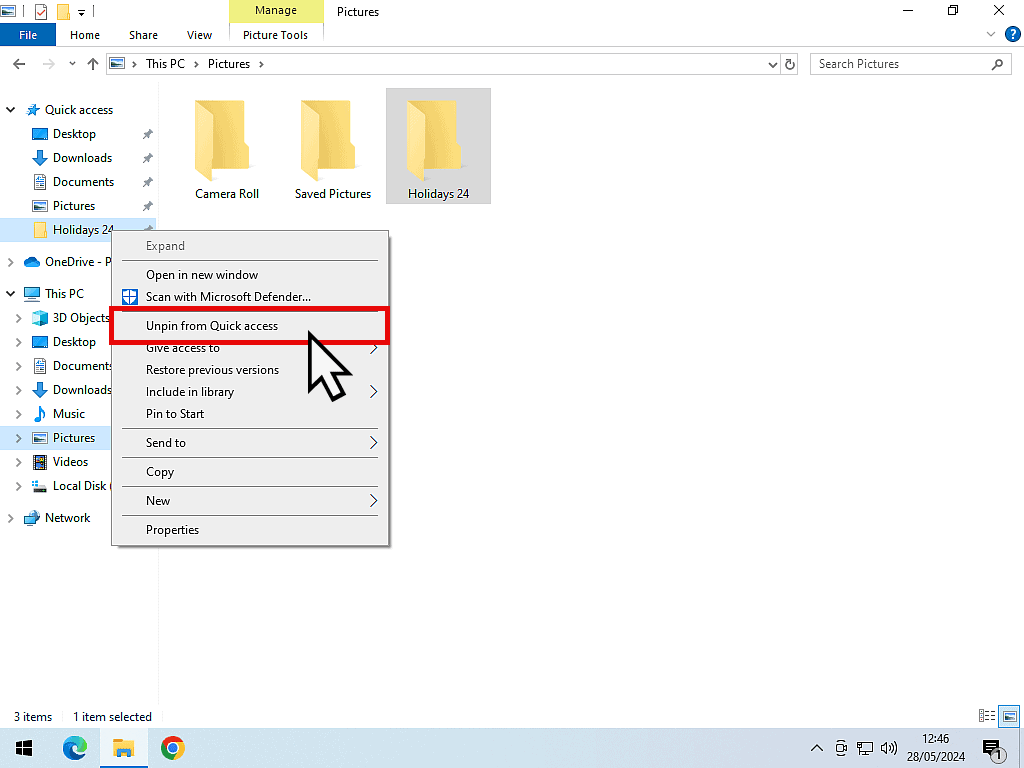
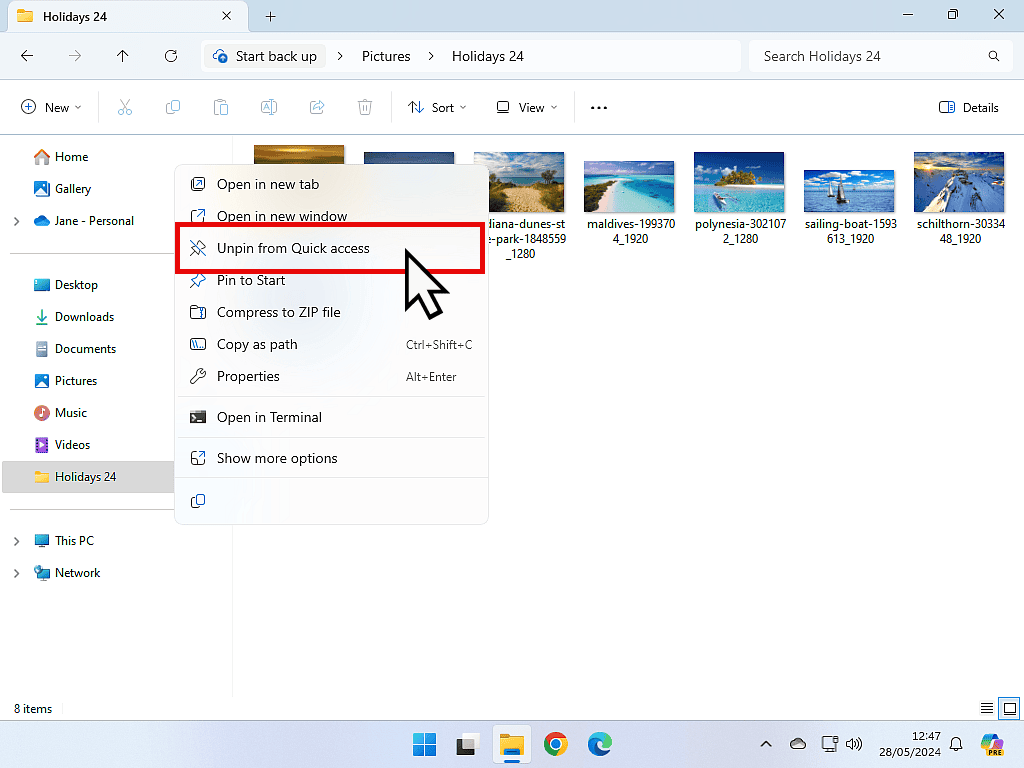
You can add (or pin) just about any folder that you want to the Quick Access area of File Explorer. You can also remove (unpin) any folders that you don’t want or need to be there.
To pin a folder that you’re currently using, right-click on it and then left-click PIN TO QUICK ACCESS.
To unpin a folder from the Quick Access area, right-click on the folder, then left-click UNPIN FROM QUICK ACCESS.
Concluding Windows File Explorer.
There’s a lot more to Windows File Explorer than we’ve covered here and we’ll get to that later in the course. For now, you just need to be able to use File Explorer to move from folder to folder. You just need to be comfortable with it because it does pop up all over your computer.
Set up your Quick Access area. It’s a great time saver for those of us that are constantly dropping in and out of folders looking for files or saving them. Don’t be afraid to pin a folder you’re currently using, even if you will only need it for a few days. You can always unpin it later.