
A calendar with a family photo on every month makes a lovely present, especially for grandparents. The trouble is that the photo printing websites charge more than you’d expect, and you have to upload all your photos to them first.
In this guide I’ll show you how to make a photo calendar at home, for free. Download my 2027 photo calendar template, add a photo to each month in a couple of clicks in PowerPoint or Word, and print it yourself. The UK bank holidays and family dates like Mother’s Day are already marked, so all you need to add is the pictures.
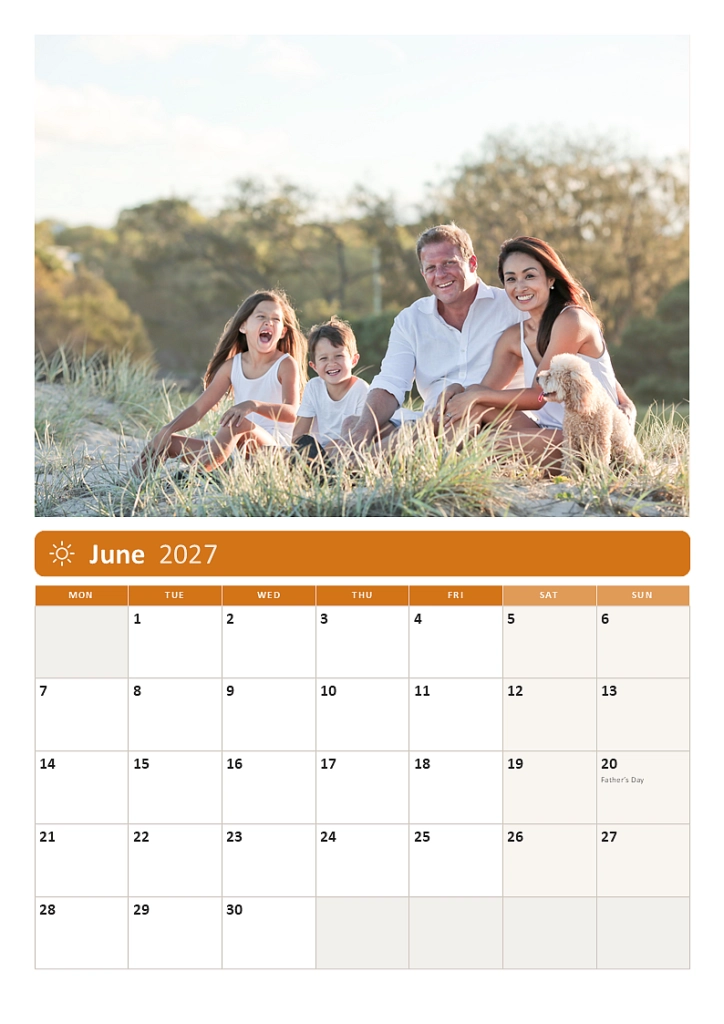
Table of contents
Download the Free 2027 Photo Calendar
There are two versions. I’d recommend PowerPoint, because it crops each photo to fill the space automatically. The Word version works too, but you may need to tidy up portrait photos (more on that below). Both are A4 portrait, the classic wall calendar shape.
Prefer A5? Download the A5 versions instead: PowerPoint · Word
Need more room to write? If you’d rather have big boxes for appointments and a to-do list instead of photos, try my free editable printable calendar.
Free to use: the calendar is free for personal, family and classroom use, and you can print as many copies as you like. If you’d like to share it, please link to this page rather than uploading the files somewhere else.
What’s in the Photo Calendar
- A cover page with a big space for your favourite photo and a name you can change, such as “The Smith Family 2027”
- A page for every month, with a photo across the top half and the month underneath
- UK bank holidays shaded in, plus Mother’s Day, Father’s Day, Easter and when the clocks change
- A year-at-a-glance page with all 12 months and the key dates listed
- Weeks that start on Monday, the way most UK calendars do
- A different colour for each month, and space in each day box to write on once it’s printed
- A4 and A5 versions

Before You Start: Choosing Your Photos
The fiddly part of making a photo calendar isn’t the computer side, it’s picking the photos. A few tips before you begin:
- You’ll need 13 photos: one for the cover and one for each month.
- Landscape photos work best on the month pages. The photo space is wider than it is tall, so a photo taken with your phone held sideways fits almost perfectly.
- Match the seasons. Snow or a cosy fire for January, the beach for August, bonfire night for November. It makes the calendar feel like it was made for that year.
- Put people in their birthday month. Grandparents love finding each grandchild on their own month.
- Use the original photos, not copies from WhatsApp or Facebook. Those apps shrink photos to save space, and they can look blurry when printed at this size.
Copy your chosen photos into one folder on your computer before you start. It makes finding them much quicker.
How to Make a Photo Calendar in PowerPoint
This is the easiest way, and the one I’d recommend.
- Download the PowerPoint version and open it. If you see a yellow Protected View bar at the top, click Enable Editing.
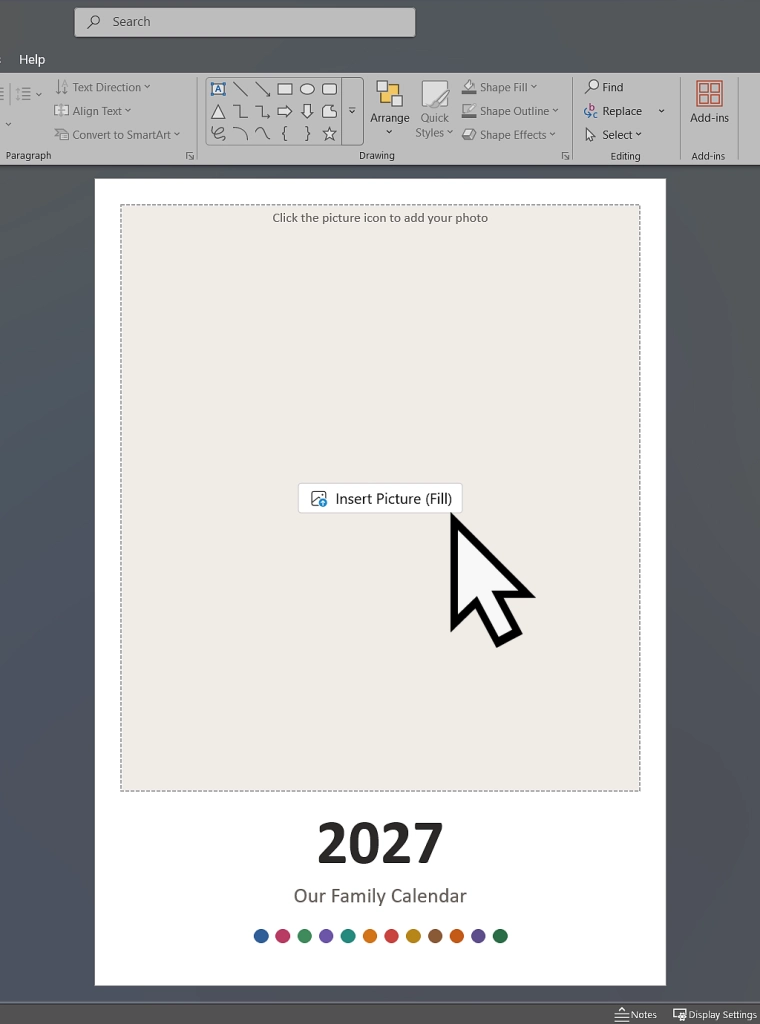
- On the cover (slide 1), click the small picture icon in the middle of the photo space.
- Find your photo, click it, then click Insert.
- The photo fills the space automatically. PowerPoint trims off any edges that don’t fit.
- Click on Our Family Calendar under the year and type your own name.
- Do the same for each month. January is slide 3 and December is slide 14.
- Click File > Save As and save your finished calendar with a new name, so you keep the blank one for next time.
Moving the Photo Inside the Space
If PowerPoint has trimmed off someone’s head, you can choose which part of the photo shows. Click the photo, then click Picture Format > Crop. Drag the photo until the part you want is inside the box, then click anywhere outside the photo to finish.
Swapping a Photo
Changed your mind? Right-click the photo, choose Change Picture > From a File and pick a different one. It goes into the same space at the same size.
How to Make a Photo Calendar in Word
If you’re more at home in Word, the Word version works in much the same way.
- Download the Word version and open it. Click Enable Editing if you see the yellow Protected View bar.
- Click the picture icon in the middle of the photo space on the cover.
- Find your photo, click it, then click Insert.
- Click on Our Family Calendar and type your own name.
- Scroll down and do the same for each month, then save your calendar with a new name.
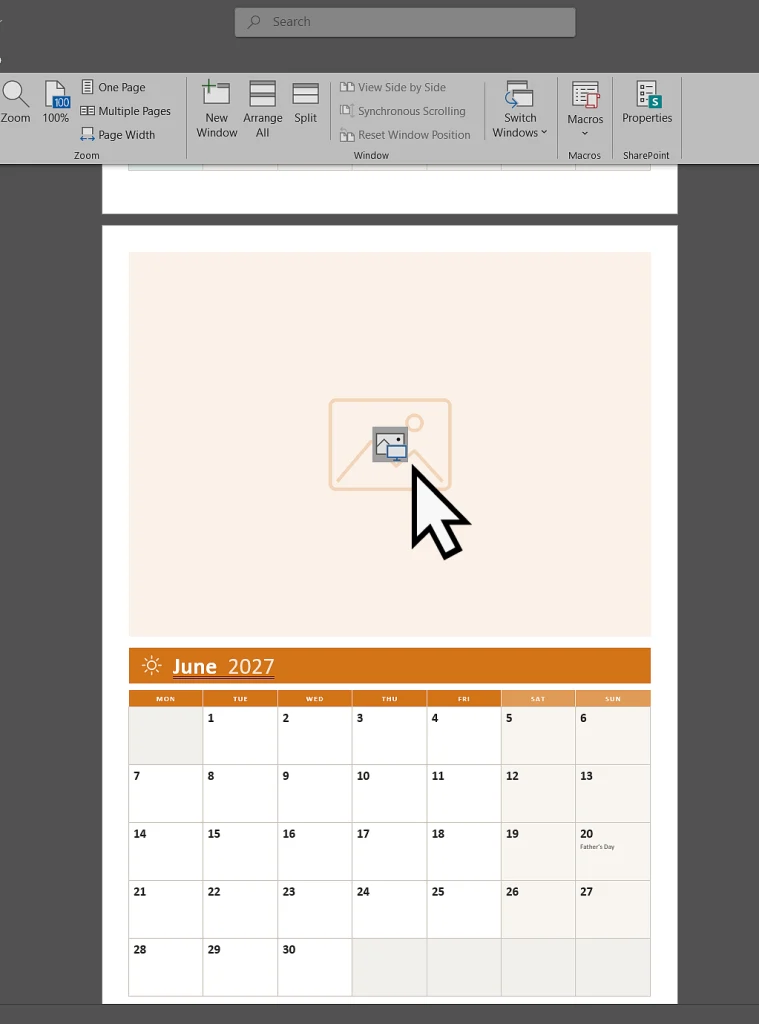
There’s one difference to know about. Word shrinks your photo to fit inside the space rather than trimming it. A landscape photo fills it almost perfectly, but a portrait photo (one taken with your phone held upright) will leave gaps at the sides. If most of your photos are portrait, use the PowerPoint version instead.
To swap a photo in Word, right-click it and choose Change Picture > From a File.
Printing Your Photo Calendar
The calendar is set up for A4, so there’s nothing to change. A few things make a big difference to how it looks, though:
- Use thicker paper. Normal printer paper is thin and curls on the wall. Photo paper or thicker card-like paper looks far better. Check your printer’s manual to see what thickness it can take.
- Tell the printer what paper you’re using. On the print screen, click Printer Properties and set the paper type (for example, photo paper) and the quality to the highest setting.
- Print one side only. Each page has its photo and its month together, so you don’t need double-sided printing.
- Print a test page first. Print one month on ordinary paper to check the colours before you use the good stuff.
To print just one page, type its number in the Slides box in PowerPoint, or the Pages box in Word. The cover is page 1, the year at a glance is page 2, January is page 3 and December is page 14.
Hanging It Up
The simplest way is a bulldog clip across the top of all the pages, hung on a nail or a stick-on hook. A clipboard works well too, and so do a couple of fridge magnets. If you’d like it to look shop-bought, a local print shop can add wire binding for not much money.
Troubleshooting
Clicking the picture icon does nothing. The file has opened in Protected View. Click Enable Editing in the yellow bar at the top, then try again.
I’ve deleted the photo space by mistake. Press Ctrl + Z straight away to undo it. If it’s too late for that, download a fresh copy of the calendar and copy your finished months across.
My photo doesn’t fill the space in Word. That’s normal for portrait photos in Word, which shrinks them to fit. Use a landscape photo, or use the PowerPoint version, which trims photos to fill the space.
My photos look blurry when printed. The photo is too small, which usually means it’s a copy from WhatsApp, Facebook or a screenshot. Use the original photo from your phone or camera.
There’s a white border round the edge of the printout. That’s normal. Most home printers can’t print right to the edge of the paper, so the calendar has a small margin built in.
The colours look different on paper. Every printer prints colours slightly differently. Make sure the paper type and quality are set correctly in Printer Properties, and print a test page first.
FAQ
Q: Is the photo calendar really free?
A: Yes. There’s no sign-up, no email address needed and no watermark. It’s free for personal, family and classroom use, and you can print as many copies as you like.
Q: Do I need Microsoft Office?
A: Yes, the calendar is made for PowerPoint and Word. The free web versions at office.com will open the files, but adding photos works best in the desktop apps.
Q: Should I use the PowerPoint or the Word version?
A: PowerPoint, if you have it. It trims each photo to fill the space automatically. Word shrinks photos to fit instead, so portrait photos leave gaps at the sides.
Q: Can I use photos from my phone?
A: Yes. Copy them to your computer first, and use the original photos rather than copies from WhatsApp or Facebook, which are smaller and can look blurry when printed.
Q: Can I put more than one photo on a month?
A: Yes, in the PowerPoint version. Add your first photo as normal, then use Insert > Pictures to add more and drag them into place to make a collage.
Q: Can I get the calendar printed professionally?
A: Yes. Save it as a PDF with File > Save As, choosing PDF as the file type, and take it to a local print shop. They can print it on thick paper and bind it for you.
Q: Does it include bank holidays for Scotland and Northern Ireland?
A: The calendar shows the bank holidays for England and Wales. The extra dates for Scotland and Northern Ireland are listed on my free editable printable calendar page, so you can type them into the day boxes yourself.
(Link “free editable printable calendar” to https://athomecomputer.co.uk/free-editable-printable-calendar/)
Q: Will there be a 2028 photo calendar?
A: Yes. Sign up to the newsletter at the bottom of this page and you’ll hear as soon as it’s ready.
Summary
Making your own photo calendar is easier than it looks. Download the free template, pick 13 photos, click the picture icon on each page to drop them in, and print it on some decent paper. Use the PowerPoint version if you can, because it fits each photo for you.
If you also want a calendar with plenty of room for appointments, my free editable printable calendar comes in Word, Excel and PowerPoint.
Want next year’s calendar? I’ll be making a 2028 version, and newsletter subscribers will be the first to get it. Pop your email in below and I’ll let you know as soon as it’s ready.