
Your monitor is too bright at night and too dim in the afternoon. You’d like to change it. So you open Windows Settings, look for the brightness slider, and it isn’t there.
You’re not going mad. On a desktop PC, Windows usually doesn’t give you a brightness slider at all. Microsoft’s own help page says it plainly, if your computer has an external monitor, “use the buttons on it”.
Which is fine advice if you enjoy poking at four unlabelled buttons under the front edge of your monitor and guessing which one is “down”.
There’s a much better way now, and it’s free and made by Microsoft. It’s a tool called Power Display, part of Microsoft PowerToys. It puts a proper brightness slider for every monitor you own into your system tray.
In this guide I’ll show you the built-in Windows brightness controls first, because on some computers they’re all you need. Then I’ll show you how to get a brightness slider for a desktop monitor, how to change several monitors at once, and what to watch out for before you turn it all on.
The Short Answer
It depends on what kind of screen you’re using, so here it is in two lines.
- Laptop or all in one PC. Press Windows key + A and drag the brightness slider. Windows can control a screen that’s built into the computer.
- Desktop PC with a separate monitor. Windows normally can’t. Install PowerToys, turn on Power Display, and you’ll get a slider in the system tray for each monitor.
The rest of this guide walks through both, and covers what to do when the slider is missing, greyed out, or moves without changing anything.
Why There’s No Brightness Slider for a Desktop Monitor
This confuses a lot of people, so it’s worth thirty seconds.
When the screen is built into the computer, like a laptop lid or an all in one PC, the screen is part of the machine. Windows has a direct line to the backlight and can turn it up and down. That’s why every laptop has a brightness slider and a pair of brightness keys on the keyboard.
A separate monitor is a different thing entirely. It’s its own little computer. It has its own settings menu, its own buttons and its own idea of how bright it should be. Your PC just sends it a picture down a cable. It doesn’t own the backlight, so it has nothing to turn up.
That’s why Microsoft’s advice has always been to use the buttons on the monitor.
But monitors have had a back channel for years, a little two way conversation that runs down the same cable as the picture. It’s called DDC/CI. Almost every monitor sold in the last fifteen years supports it. Windows has simply never used it.
Power Display is Microsoft finally using it.
The Built in Windows Brightness Controls
Try these first. If you’re on a laptop, you may not need anything else.
Using the Quick Settings Slider
This is the fastest way.
- Press Windows key + A on your keyboard. You can also click the group of icons at the right hand end of the taskbar, the wi-fi, sound and battery icons.
- Find the slider with the little sun icon at the left of it.
- Drag it left to dim the screen, right to brighten it.
- Click anywhere else on the desktop to close the panel.
The change happens as you drag, so you can stop when it looks right.
Using Windows Settings
There are a couple of extra options tucked away here that are worth knowing about.
- Press Windows key + I to open Settings.
- Click System in the list on the left.
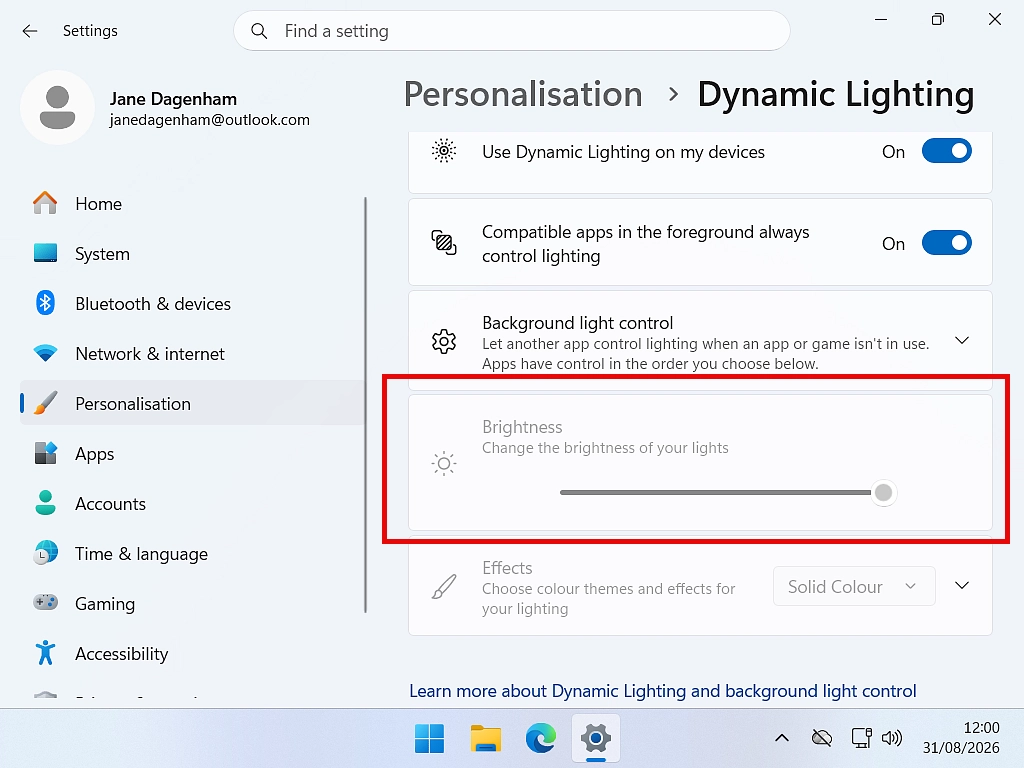
- Click Personalisation on the left, then Dynamic Lighting on the right hand panel.
- Scroll down to the Brightness slider.
As well as the slider, you may see one or both of these.
- Change brightness automatically when lighting changes. Only appears if your computer has a light sensor. Turn it off if your screen keeps changing brightness on its own.
- Change brightness based on content. This is the one that catches people out. It dims the screen when a dark picture is on it and brightens it for a light one, to save battery. If your laptop screen seems to fade while you’re watching something, set this to Off.
Quick Tip
“Change brightness based on content” is the single most common cause of “my screen keeps dimming by itself” on a laptop. It’s doing it on purpose, and turning it off is the fix. If it isn’t listed on your PC, your machine doesn’t have the feature and something else is going on.
Why the Slider Might Be Missing
If there’s no brightness slider anywhere, it’ll be one of these.
- You’re on a desktop PC with a separate monitor. This is normal and expected. Skip to the next section.
- You’re on a laptop and it’s still missing. That’s a display driver problem. It’s usually fixed by updating the graphics driver from the laptop maker’s own support site, not Windows Update. Interestingly, Power Display can sometimes work on these machines even when the Windows slider has vanished, so it’s worth trying.
How to Change Monitor Brightness With Power Display
Power Display is one of the tools inside Microsoft PowerToys. PowerToys is free, it’s made by Microsoft, and it’s not the sort of thing that fills your computer with rubbish. I’ve written a full guide to installing PowerToys safely if you haven’t got it yet. It takes about two minutes.
Once it’s installed, here’s how to get your brightness sliders.
Turning Power Display On
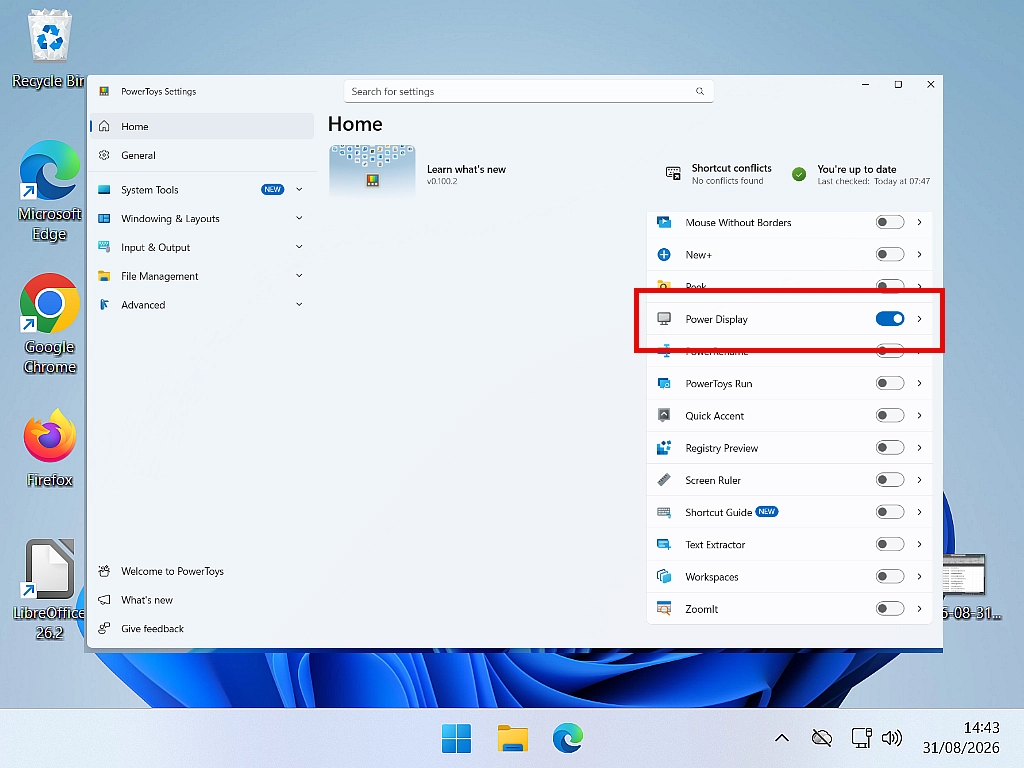
- Open PowerToys from the Start menu.
- Scroll down the list on the left and click Power Display.
- Switch Enable Power Display to On.
- Make sure Show system tray icon is also on. That’s how you’ll open it.
Give it a few seconds. The first time it runs it has a quiet conversation with each of your monitors to find out what they can do, and that takes a moment per monitor.
Opening the Brightness Flyout
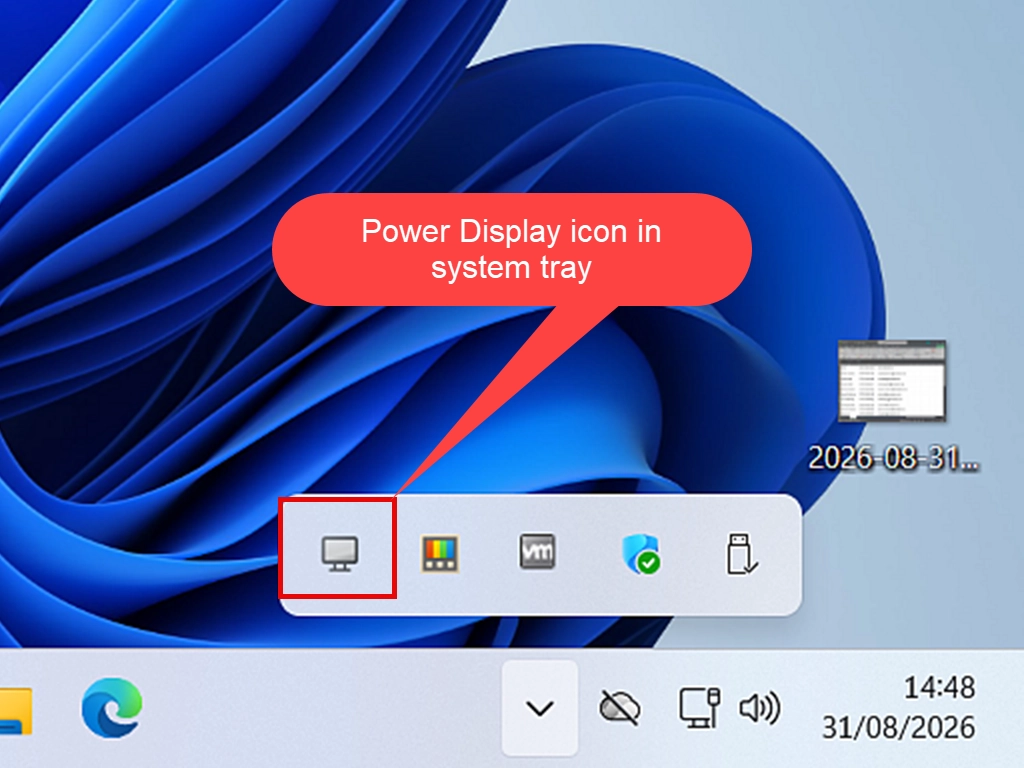
Click the Power Display icon in your system tray, down at the right hand end of the taskbar beside the clock. A small panel slides up with your monitors listed in it.
You may need to click the little arrow beside the tray icons to find it. Windows hides tray icons it doesn’t think you use.
There’s also a keyboard shortcut, Windows key + Ctrl + Shift + P.
Setting the Brightness on Each Monitor
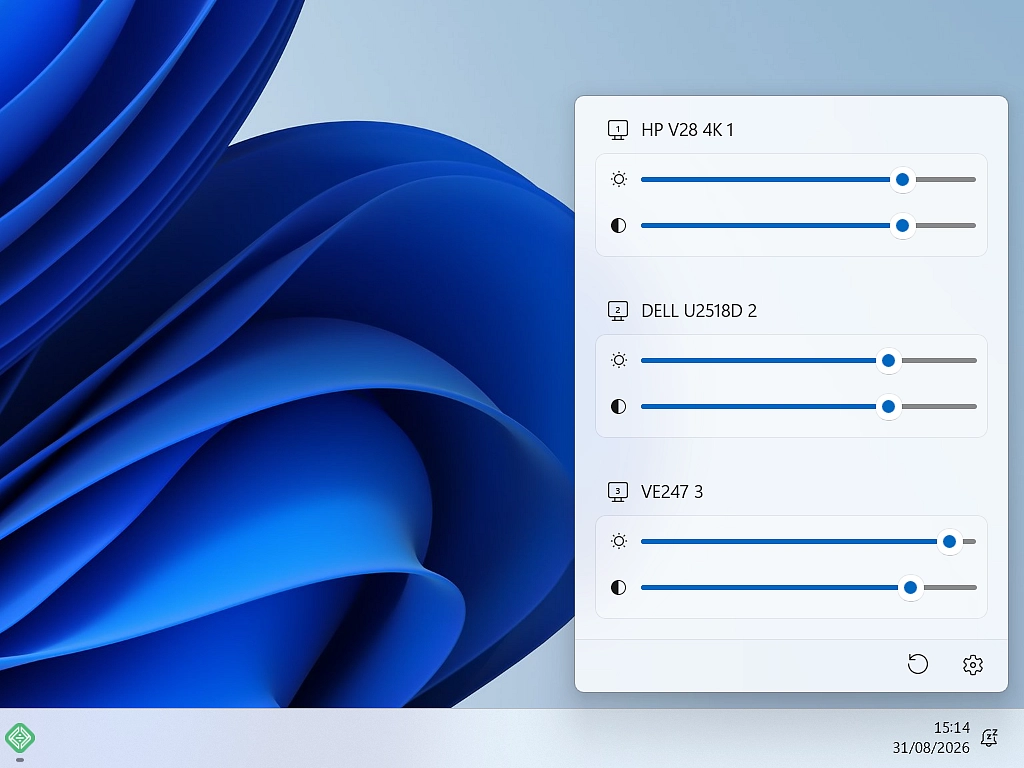
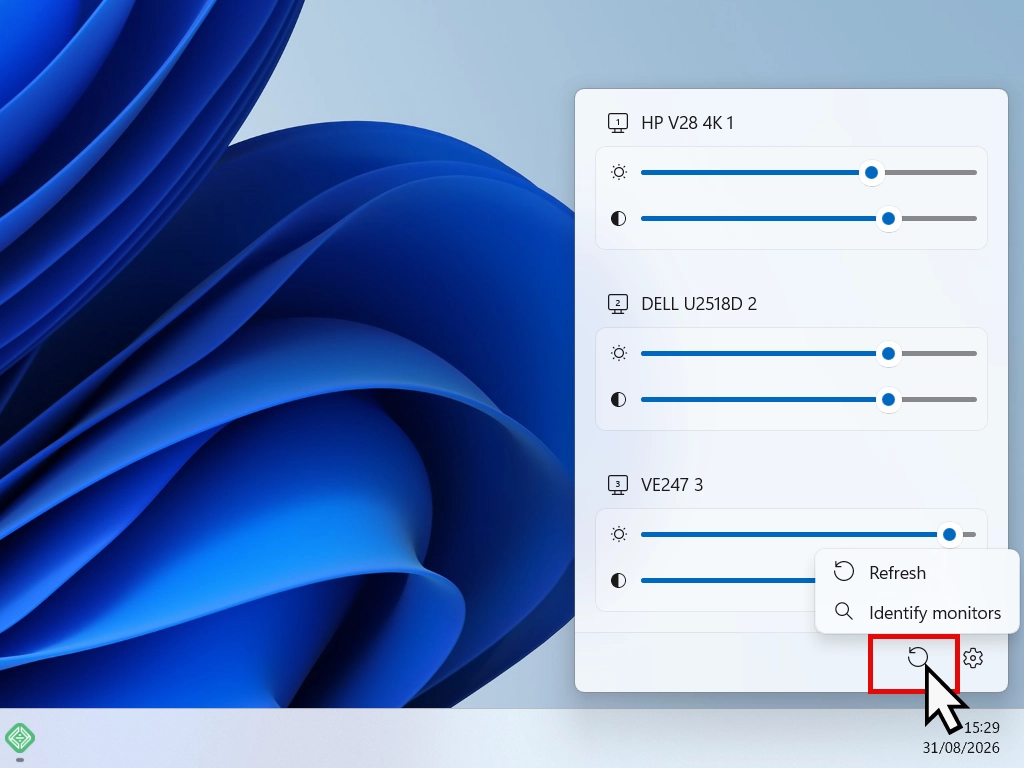
Each monitor gets its own section in the panel, with its own brightness and contrast slider. Drag the slider and the monitor changes as you go, just like the laptop one.
If you’ve got two or three monitors and you can’t tell which is which in the list, click the Rescan Connected Monitors button (it looks like a reload symbol), then click Identify Monitors on the menu. Clicking it flashes a big number up on each screen so you can match them to the list.
The Fastest Way of All
Hover over the Power Display tray icon and scroll your mouse wheel to change brightness. No clicking, no panel, no slider.
Open the Power Display popup window using either the keyboard shortcut Windows key + Ctrl + Shift + P or click the icon in the system tray. Then hover your mouse over either the brightness or contrast setting for your monitor and scroll up or down depending on whether you want to increase or decrease either settings.
Does It Work on a Laptop?
Yes, for brightness. This has changed, and most of what’s written about Power Display online still says it doesn’t, so it’s worth being clear.
Power Display now handles laptop screens through a completely different route to the one it uses for desktop monitors. Separate monitors get the DDC/CI conversation down the cable. Your laptop’s own screen doesn’t need that, because Windows already has a direct line to it, the same one the normal brightness slider uses. Power Display just uses that instead.
The practical result is simple.
- Your laptop screen appears in the list, with a brightness slider.
- It only gets brightness. No contrast, no volume, no input switching, no colour temperature. Those are all things a separate monitor does in its own hardware, and a laptop panel simply hasn’t got them.
If You Plug Your Laptop Into a Monitor
This is where it genuinely earns its place, and it’s the situation the tool is best at.
Plug a laptop into an external monitor and you have two screens that are controlled in two completely different ways. The laptop screen has a slider in Windows. The monitor has buttons on the front. Getting them to match is a nuisance, and they never quite do.
Power Display puts both of them in the same panel, and with linked brightness turned on, a single All Displays slider moves them together. That’s a genuinely useful thing that nothing built into Windows can do.
Gaming Laptops and Laptops With Two Graphics Chips
If your laptop has both a built in graphics chip and a separate gaming graphics card, and it switches between them, there’s one thing you need to know.
Until the August 2026 update, Power Display got confused on these machines. Switch the laptop over to the gaming graphics card and Windows would report the built in screen as though it were an external monitor. Power Display would then try to talk to it down the cable, get no answer, and drop it. People saw “can’t detect a display” and assumed the tool was broken.
It’s fixed. If you’re seeing this, update PowerToys and it’ll work.
Should you bother, on a laptop?
Honestly, if the laptop screen is the only screen you use, probably not. Windows already gives you a slider and brightness keys on the keyboard, and Power Display isn’t going to beat that.
It’s worth installing if you plug into an external monitor, if you want one slider for both screens, or if your laptop’s brightness slider has gone missing and you need something that still works.
Saving Your Settings as a Profile
If you find yourself changing the brightness at the same times every day, you can save the settings and apply them with one click.
A profile remembers brightness, contrast, volume and colour temperature across whichever monitors you choose. Set everything how you want it, save it with a name like Daytime or Evening, and it’s a click away from then on.
- Get your monitors set exactly how you like them.
- Open the Power Display page in PowerToys Settings.
- Find the Profiles section and create a new profile.
- Give it a name you’ll recognise and save it.
- Turn on Show profile switcher button so you can change profiles straight from the tray panel.
Two profiles is usually enough. A bright one for daytime and a gentler one for the evening covers most people.
Dimming Your Monitors Automatically at Night
Power Display ties into Light Switch, the PowerToys tool that puts Windows into dark mode automatically at sunset. You can tell it to apply one profile when Windows goes dark and another when it goes light, so your monitors dim themselves in the evening without you touching anything.
The setting lives on the Light Switch settings page, under Apply monitor settings to, where you pick a Dark mode profile and a Light mode profile.
Before You Use the Other Controls, Read This
Brightness is the safe one. The other controls in Power Display reach further into your monitor’s own hardware, and a small number of monitors don’t handle that well.
None of this is common, and none of it will break your monitor permanently. But you won’t find it in most articles about this tool, and I’d rather you knew.
- Colour temperature can stick. Some monitors show odd colours when it’s changed, and a few keep the new value even after you close Power Display. Getting the original colours back can mean resetting the monitor from its own menu.
- Input switching can black out your screen. If you switch the monitor to an input that’s got nothing plugged into it, you get a black screen, and you’ll need the physical buttons to get back. Don’t try this on your only monitor.
- Some monitors won’t wake up again. Putting a monitor into standby from software works fine on most, but a few won’t come back without the power button or unplugging the cable.
- A very small number of monitors can cause a blue screen. When Power Display first asks a monitor what it can do, a badly written answer from the monitor can trip a bug in Windows itself. It’s a Windows fault, not a PowerToys one. Microsoft keeps a list of known bad monitors and skips them, and Power Display will switch itself off if it spots crashes happening. But it can happen.
My advice
Use it for brightness, and use it for contrast if you want to. Those two work just fine.
Leave colour temperature, input switching and the power controls alone unless you’ve got a specific reason to want them. Nothing bad is likely to happen, but there’s no prize for finding out.
What Else Can Power Display Change
With that said, here’s the full set, so you know what the other sliders and buttons in the panel are for.
- Contrast. The difference between the darkest and lightest parts of the picture. Safe to play with.
- Volume. Only if your monitor has speakers built in. Handy, because monitor speakers are usually buried three menus deep.
- Input source. Switches the monitor between HDMI 1, HDMI 2, DisplayPort and so on. Useful if you’ve got a games console plugged into the same screen. See the warning above.
- Rotation. For turning a monitor on its side to read long documents.
- Colour temperature. Warmer or cooler colours. See the warning above.
- Power. Turn a monitor off, and on supported monitors, back on again. The waking up part is new.
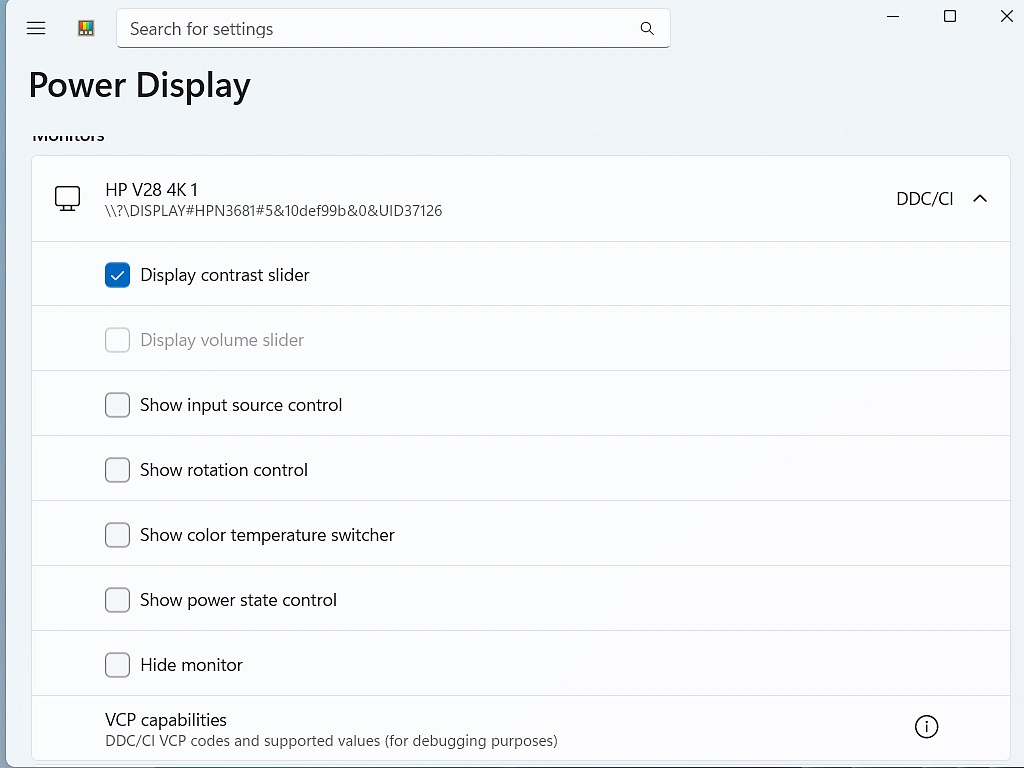
You don’t have to have all of them cluttering up the panel. In the Power Display settings, each monitor has its own set of switches for which controls appear, so you can strip it back to just brightness if that’s all you want.
You can also hide a monitor from the list entirely, which is worth knowing if one of your screens doesn’t play nicely.
Other Ways to Change Monitor Brightness
For completeness, because Power Display isn’t the only answer.
The Buttons on the Monitor
The original method. The buttons are usually along the bottom edge, underneath the front, or there’s a single little joystick round the back on the right.
Press any of them and a menu appears on screen, with labels showing which button does what. Brightness is nearly always in the first section, often called Picture or Brightness/Contrast.
It works. It’s just slow, and awkward if the monitor is on a shelf or an arm.
Your Monitor Maker’s Own Software
Dell, LG, BenQ, Samsung and others all offer a free program that does much the same job as Power Display for their own monitors. If you’ve got one brand of monitor and you’re happy installing more software, they’re worth a look, and they sometimes expose settings the standard method can’t reach.
The catch is they only work with that maker’s monitors. If you’ve got a Dell and an LG side by side, you’re running two programs. That’s exactly the problem Power Display solves.
Night Light Is Not the Same Thing
Windows has a feature called Night light in Settings, System, Display. It’s often suggested as the answer to a screen that’s uncomfortable in the evening, and it’s worth trying, but it isn’t brightness.
Night light makes the colours warmer, taking the blue out. The screen puts out just as much light. If the problem is that the screen is too bright in a dark room, night light won’t fix it, and turning the brightness down will.
Troubleshooting
My Monitor Isn’t in the List
Work through these in order.
- Turn on Max compatibility mode in the Power Display settings. It asks the monitor about every setting one at a time instead of trusting its summary, and it finds monitors the normal method misses. You’ll get a confirmation box first, and it rescans straight away.
- Check DDC/CI is switched on in the monitor’s own menu. Quite a few monitors let you turn it off, and some ship with it off. Press the monitor’s menu button and look under Others, System or Setup.
- Plug the monitor straight into the PC. Docking stations, USB-C hubs, KVM switches and cheap HDMI adapters often don’t pass the DDC/CI conversation through, even though the picture works perfectly.
- Try a different cable. A worn or very cheap cable can carry the picture and still lose the data channel.
- Increase the Monitor refresh delay in the settings. It tells Power Display to wait a bit longer after your screens change before it goes looking, which helps on slower setups.
If none of that works, your monitor is one of the ones that says it supports this and doesn’t really. It’s not something you can fix, sadly.
There’s No Icon in the System Tray
Check Show system tray icon is on in the Power Display settings. Then click the small arrow beside the tray icons on your taskbar, Windows hides icons it thinks you’re not using, and it hides new ones by default.
The Slider Moves but Nothing Happens
The monitor has told Power Display it can do brightness, and then hasn’t done it. Try turning Max compatibility mode on, and check the monitor isn’t in a preset picture mode that locks brightness. Gaming and HDR modes often do this, and the monitor won’t tell you.
My Brightness Resets Every Time I Restart
Turn on Restore monitor brightness and colour temperature when Power Display launches. It puts your settings back each time it starts up.
It Says It Can’t Detect a Display
If you’re on a laptop with switchable graphics, this is the bug I described earlier and updating PowerToys fixes it. On a desktop, work through the “My monitor isn’t in the list” steps above.
The Colours Went Strange and Won’t Go Back
This is the colour temperature warning coming true. Use the monitor’s own menu and look for Reset, Factory Reset or Recall, usually in the last section of the menu. It’ll wipe any other adjustments you’ve made on the monitor itself, but it will fix the colours.
Frequently Asked Questions
Q1. Why is there no brightness slider for my monitor in Windows 11?
Because Windows can only control a screen that’s built into the computer. A separate monitor has its own controls and its own settings menu, so Windows leaves it alone. Microsoft’s own advice is to use the buttons on the monitor, but PowerToys Power Display gives you a slider instead.
Q2. Does Power Display work on a laptop screen?
Yes, for brightness. It handles built in laptop screens through Windows itself rather than through the monitor cable, so the slider works, but you don’t get contrast, volume or the other controls. Laptop screens simply don’t have them.
Q3. Can I change the brightness of two monitors at the same time?
Yes. Turn on linked brightness in the Power Display settings and you get a single All Displays slider that moves every monitor together. You can also hover over the tray icon and scroll the mouse wheel.
Q4. Is PowerToys safe to install?
Yes. It’s made by Microsoft and it’s free. Just get it from the Microsoft Store or Microsoft’s own GitHub page, not from a download site you found in a search result.
Q5. Will changing brightness this way damage my monitor?
No. It’s changing exactly the same setting the buttons on the front change, just from the keyboard instead. Your monitor can’t tell the difference.
Q6. What is DDC/CI?
It’s a two way conversation between your PC and your monitor that runs down the same cable as the picture. It’s how software can change your monitor’s settings. Most monitors have supported it for years, and some let you switch it off in their own menu.
Q7. Does it work over HDMI, or do I need DisplayPort?
Both work. What tends to cause problems isn’t the type of cable, it’s what the cable goes through. Docking stations, USB-C hubs, KVM switches and cheap adapters often block it, even when the picture is perfect.
Q8. Will my brightness setting stay after I turn the computer off?
The monitor usually remembers it on its own. If it doesn’t, turn on the option to restore brightness and colour temperature when Power Display launches.
Q9. Does turning the brightness down save electricity?
A little. The backlight is the hungriest part of a monitor, and running at half brightness rather than full noticeably cuts what it uses. On a laptop it also buys you extra battery life, which is the more useful saving.
Q10. My screen keeps dimming on its own. How do I stop it?
On a laptop it’s almost always the setting called “Change brightness based on content” in Settings, System, Display, Brightness. Set it to Off. If your PC has a light sensor, also turn off “Change brightness automatically when lighting changes”.
Summary
If your screen is built into your computer, Windows has always had a brightness slider for you. Press Windows key + A and it’s there.
If you’re on a desktop PC with a separate monitor, Windows has never had one, and for years the only answer was the buttons on the front of the monitor. That’s changed. PowerToys now includes Power Display, which puts a proper brightness slider for every monitor into your system tray, free, from Microsoft.
Turn it on, use it for brightness, and be a bit careful with the colour and input controls. Set up two profiles if you find yourself changing it every evening.
And if the screen is still hard to read once the brightness is right, the problem might not be brightness at all. Have a look at how to make text and icons bigger, that fixes it for a lot of people. If your monitors are turning themselves off sooner than you’d like, stopping your computer going to sleep is the setting you want.
Rename Multiple Files at Once
Got a folder full of photos called IMG_4471.jpg? Windows can rename the lot in one go.
Start with the built-in F2 method, then use PowerRename for photos, folders and file extensions. Both are free.
You can find this and other related step by step guides in – At Home Computer Guides