
Copy a batch of photos off a camera or a phone and you end up with a folder full of names like IMG_4471.jpg. Perfectly useful to the camera. Completely useless to you. It simply doesn’t mean anything.
Renaming four hundred of them one at a time is nobody’s idea of a good afternoon. The good news is that Windows can rename a whole folder full of files in one go, and it has been able to for years. Most people have simply never been shown where to click.
I’ll start with the method that’s built into Windows, because for a lot of jobs it’s all you need and there’s nothing to install. Then I’ll show you PowerRename, a free Microsoft tool that does everything the built in method can’t. Swapping one word for another in every file name, numbering files properly, changing file extensions in bulk, and naming your photos after the date you actually took them.
PowerRename is one of the tools inside Microsoft PowerToys, a free bundle of extras made by Microsoft. You’ll need PowerToys on your PC for the second half of this guide, and I’ve written a separate step by step for installing PowerToys if you haven’t got it yet.
The Short Answer
Select all the files, press F2, type one new name and press Enter. Windows renames every file you selected to that name with a number in brackets after it. That’s the built in method and it’s all most people need. For anything cleverer, like changing part of a name or numbering photos by the date they were taken, use PowerRename.
Table of contents
- How to Rename Multiple Files at Once in Windows
- Getting PowerRename
- How to Bulk Rename Files with PowerRename
- How to Add or Remove Words from File Names
- How to Number Files in Order
- How to Rename Photos by the Date They Were Taken
- How to Change the File Extension on Multiple Files
- How to Rename Multiple Folders at Once
- How to Undo a Bulk Rename
- Troubleshooting
- Summary
How to Rename Multiple Files at Once in Windows
This works in Windows 11 and Windows 10, and there’s nothing to download.
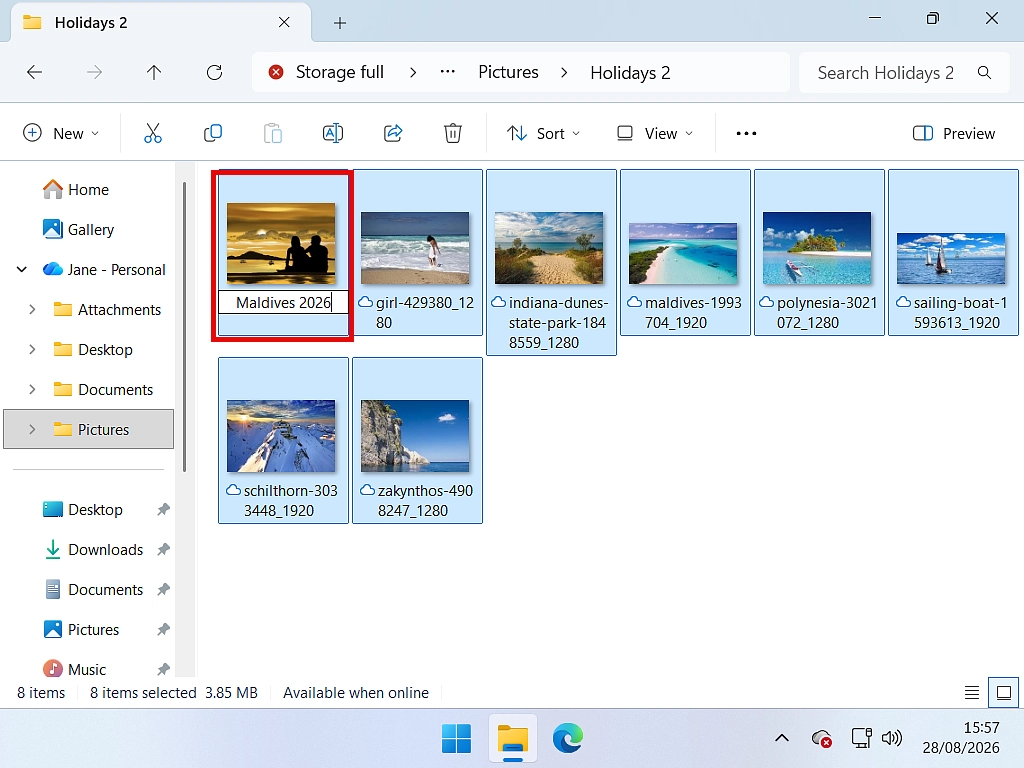
- Open the folder holding the files you want to rename.
- Select the files. Press Ctrl + A to select everything in the folder.
- Press the F2 key. One of the file names turns into an editable box.
- Type the name you want.
- Press Enter.
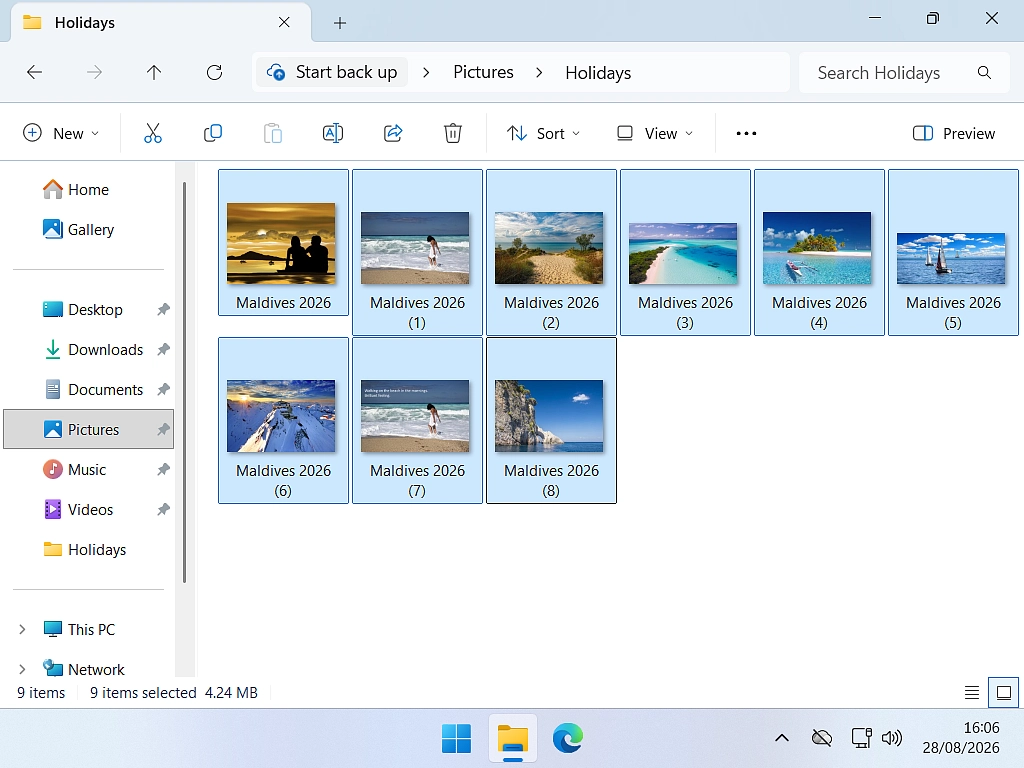
Every file you selected now has that name with a number in brackets after it. For example, Cornwall (1).jpg, Cornwall (2).jpg, Cornwall (3).jpg, and so on all the way down the folder. You could even add the date to the file names
If picking out a group of files is the bit you’re stuck on, I’ve covered every way of doing it in how to select multiple files in Windows.
Quick Tip
The numbers follow the order the files are showing in the folder, not the order you clicked them. So sort the folder the way you want before you press F2. For photos, sorting by Date rather than Name is usually what you’re after, otherwise you get them in whatever order the camera happened to number them.
Renaming Files One After Another with the Tab Key
There’s a second built in trick that hardly anybody knows about, and it’s the answer to renaming multiple files with different names.
Click the first file, press F2, type its new name, then press Tab instead of Enter. Windows saves that name and drops you straight into renaming the next file down. Tab, type, Tab, type, all the way through the folder without touching the mouse once.
Shift + Tab goes back up the list if you overshoot.
You’re still typing one name at a time, so it isn’t great. It’s just a quicker than right clicking and choosing Rename over and over.
What the Built-In Method Can’t Do
F2 has one setting and no options. It can’t:
- Change part of a name and leave the rest alone
- Remove a word like IMG_ from every file name
- Add a word to the front or back of names you want to keep
- Number files as 001, 002, 003 instead of (1), (2), (3)
- Rename photos using the date they were taken
- Change file extensions in bulk
- Show you what the result will look like before you commit to it
That last one is the real weakness. F2 gives you no preview whatsoever. You type, you press Enter, and then you find out.
Which is where PowerRename comes in.
Getting PowerRename
PowerRename isn’t a separate download. It’s one of around thirty tools inside Microsoft PowerToys, which is free, made by Microsoft, and takes a couple of minutes to set up. If it isn’t on your PC yet, work through how to install Microsoft PowerToys and then come back here.
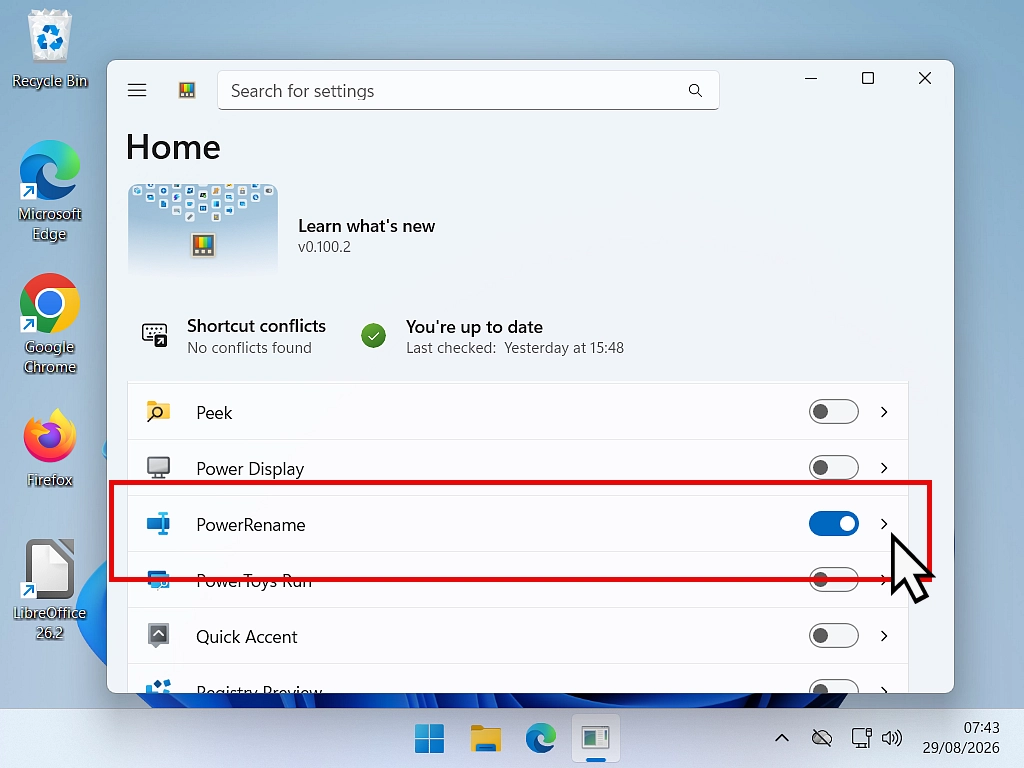
With PowerToys installed, check that PowerRename is switched on.
- Open PowerToys.
- Click PowerRename in the list down the left hand side.
- Make sure the switch at the top of the page is set to On.
Where PowerRename Lives in the Right-Click Menu
This is the bit that catches people out, so it’s worth reading twice.
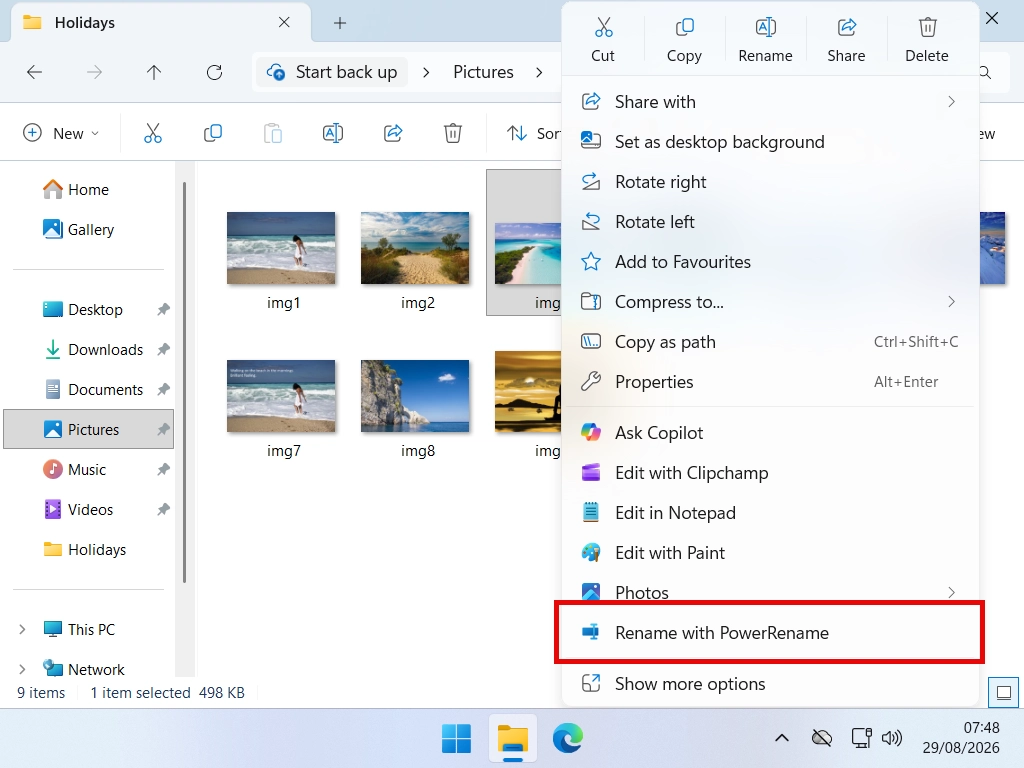
PowerRename has no Start menu shortcut. Searching the Start menu for it will find you nothing at all. It lives in the right click menu, and nowhere else.
Select your files, right click one of them, and look for Rename with PowerRename.
On Windows 11 you might not see it straight away. Windows 11 has a short right click menu with Show more options at the bottom, which opens the older, longer menu underneath. Which of those two PowerRename shows up in is a setting, so you can put it wherever suits you.
- Open PowerToys and click PowerRename.
- Find the setting called Show PowerRename in.
- Choose the default menu to have it on the short Windows 11 menu, or the extended menu to keep it tucked away under Show more options.
My advice is to put it on the default menu. You’ll use it more often than you expect, and one fewer click every time adds up.
Quick Tip
Holding Shift while you right click opens the long menu straight away, skipping Show more options entirely. Worth remembering, because it works for everything hiding down there, not just PowerRename.
Or you could just change it back to the old style right click menu for good.
How to Bulk Rename Files with PowerRename
PowerRename works on a simple idea. You tell it a bit of text to look for, and what to put there instead. Everything else in the window is a refinement of that.
- Select the files you want to rename.
- Right click one of them and choose Rename with PowerRename.
- In the Search for box, type the part of the name you want to change.
- In the Replace with box, type what you want in its place.
- Read the preview on the right hand side.
- Click Apply.
For example
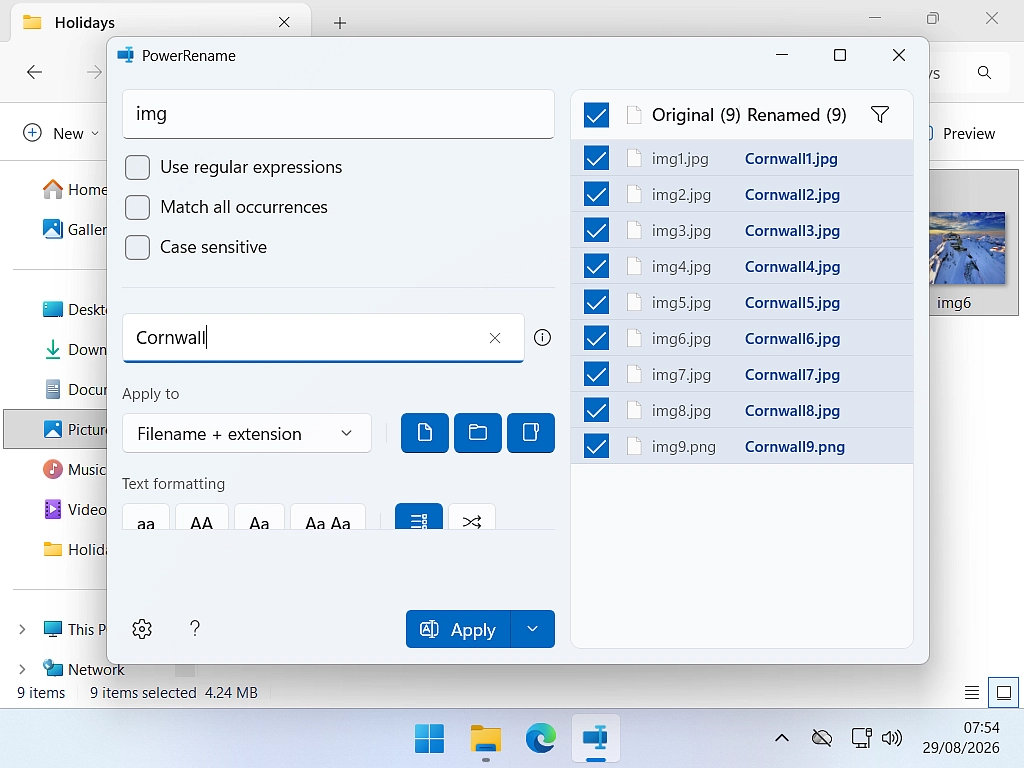
Say your holiday photos are called IMG_4471.jpg, IMG_4472.jpg and so on. Put IMG in the Search for box and Cornwall in the Replace with box, and you get Cornwall_4471.jpg, Cornwall_4472.jpg.
The camera’s numbers stay on the end, which is handy because it means every file keeps a unique name and nothing clashes. The .jpg on the end is left completely alone.
The Preview Shows You Exactly What Will Happen
The right hand side of the PowerRename window has two columns. The name each file has now, and the name it’s about to get. It updates as you type, and nothing at all changes on your PC until you click Apply.
Two things about it are worth knowing.
- Untick any file in the list and PowerRename leaves that one alone. Useful when one file in the batch needs to keep its name.
- Click the Renamed column heading and the list filters down to show only the files that are actually going to change. On a folder of a few hundred files, that’s the quickest way to check you haven’t caught something you didn’t mean to.
If the preview shows nothing changing at all, the text you put in the Search for box doesn’t appear in your file names. Check for a capital letter you’ve missed, and have a look at the troubleshooting section further down.
How to Add or Remove Words from File Names
Two of the most common jobs, and both of them are a couple of clicks.
Removing a Word
To strip IMG_ off the front of every photo, put IMG_ in the Search for box and leave the Replace with box completely empty. Click Apply and IMG_4471.jpg becomes 4471.jpg.
That works for anything you want gone. A “copy of” that’s crept in, a download prefix, a date you no longer want, a set of underscores.
Adding a Word
The easy way is to search for something the files already have in common and replace it with itself, plus your new word.
Search for IMG, replace with Cornwall IMG, and IMG_4471.jpg becomes Cornwall IMG_4471.jpg. Slightly cheeky, but it works and you don’t need to learn anything.
Quick Tip
If your files have nothing in common to search for, there’s a proper way to put a word at the front of all of them. Tick Use regular expressions and Match all occurrences, set Apply to to Filename only, then put this in the Search for box:
^(.+)and this in the Replace with box:
Cornwall $1That grabs the whole name the file already has and puts it back with your word in front of it. Regular expressions are a huge subject and you honestly don’t need them for anything else in this guide, so don’t feel you have to go and learn them.
Tidying Up Capital Letters
PowerRename also has a text formatting option with four choices, lower case, UPPER CASE, Title Case and Capitalise Every Word. Pick one and the names get tidied up to match as they’re renamed.
Handy for a folder of files that have come from half a dozen different places and look it.
How to Number Files in Order
The F2 method gives you (1), (2), (3). If you’d rather have 001, 002, 003, which sorts properly once you get past file number nine and looks a lot tidier, PowerRename will do it.
The counter is typed into the Replace with box as a little pattern. This one gives you three digits, starting at 1:
${padding=3;start=1}The pieces you can use are:
${}on its own, a plain counter starting at zerostart=1to begin at a number you choosepadding=3to pad the number out with zeros, so 1 becomes 001increment=2to count up in twos rather than ones
Put them inside the one set of brackets with semicolons between them.
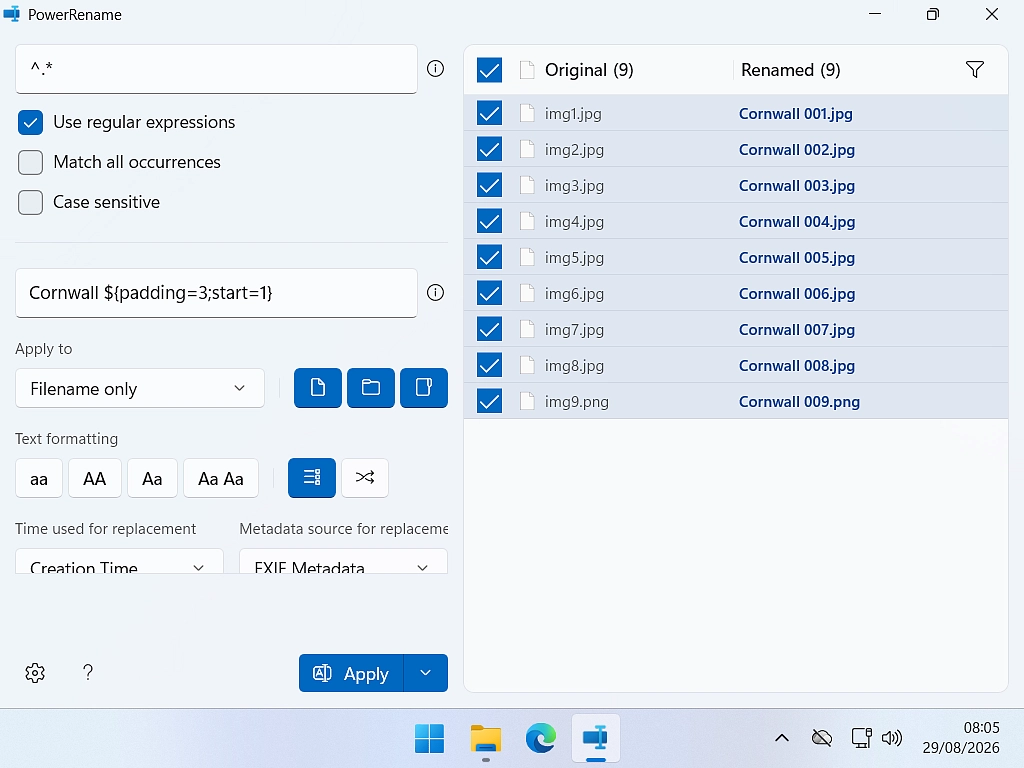
To replace the file name completely rather than just part of it, you need to tell PowerRename to match the whole thing. Tick Use regular expressions, set Apply to to Filename only, leave Match all occurrences unticked, and put this in the Search for box:
^.*With this in the Replace with box:
Cornwall ${padding=3;start=1}That turns the whole folder into Cornwall 001.jpg, Cornwall 002.jpg, Cornwall 003.jpg. The extensions are untouched because Apply to is set to Filename only.
How to Rename Photos by the Date They Were Taken
This is the one that makes PowerRename worth installing all on its own, and I’ve barely seen it covered anywhere.
Every photo your camera or phone takes has information tucked away inside the file. The date and time of the shot, the camera it was taken on, the settings that were used, sometimes even where you were standing. It’s called EXIF data, and PowerRename can read it and use it in the new file name.
Which means a folder of IMG_4471.jpg can become a folder that sorts itself into the order you actually took the pictures.
- Select your photos, right click, and choose Rename with PowerRename.
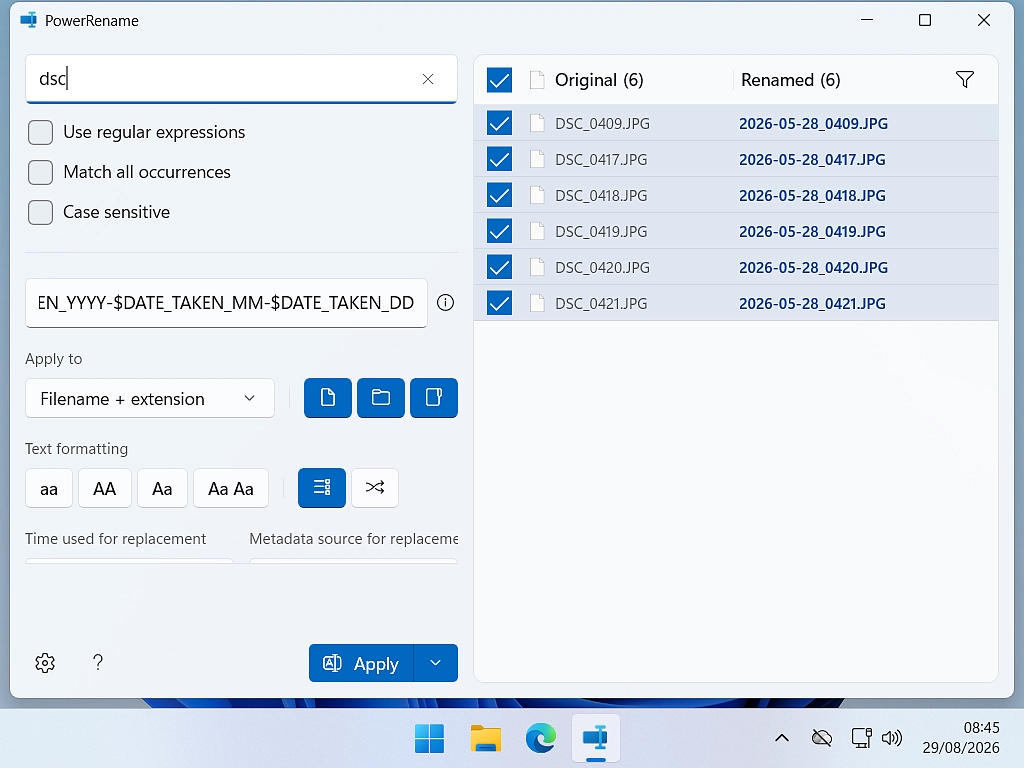
- In the “Search for” box type something that all the images have in common, for example you could type img or in this case DSC.
- In the Replace with box, put the date pattern from the code box below.
- Check the preview, then click Apply.
$DATE_TAKEN_YYYY-$DATE_TAKEN_MM-$DATE_TAKEN_DDIMG_4471.jpg becomes 2026-07-14_4471.jpg.
Putting the year first is deliberate. Sort the folder by name afterwards and the photos fall into date order on their own, which they won’t do if you write the date the way we normally say it.
Add a place name on the end if you like, and you get 2026-07-14 Cornwall_4471.jpg.
Watch out for the wrong date
PowerRename has two sets of date variables and they are not the same thing.
The short ones, $YYYY and $MM, use the date the file was created on your PC. Copy your holiday photos across in September and every single one of them will say September, no matter when you took them.
The $DATE_TAKEN_ ones read the date out of the photo itself. That’s the date you actually want, so those are the ones to use.
The date is the useful one, but it isn’t the only thing in there. You can also pull out:
$CAMERA_MAKEand$CAMERA_MODEL$LENS$ISO,$APERTURE,$SHUTTERand$FOCAL$WIDTHand$HEIGHT$LATITUDE,$LONGITUDEand$ALTITUDE
Most of those are of more interest to keen photographers than to the rest of us, but they’re there if you want them.
One honest warning. Screenshots, scans and pictures saved from the internet usually have no EXIF data at all. If the preview shows gaps where the date should be, that’s why, and there’s nothing to be done about it.
How to Change the File Extension on Multiple Files
Useful when a camera or an app has handed you a pile of .jpeg files and you’d rather they said .jpg.
- Select the files, right click, and choose Rename with PowerRename.
- Set Apply to to Extension only.
- Search for jpeg and replace with jpg.
- Check the preview and click Apply.
Setting Apply to Extension only is what protects the rest of the name. Leave it on the default and the word jpeg would be changed wherever it turned up, including in the middle of a file name.
If you can’t see any extensions on your files, Windows is hiding them from you. In File Explorer, click View, then Show, then tick File name extensions.
Renaming is not converting
This is important and it catches people out all the time.
Changing .heic to .jpg does not turn a HEIC photo into a JPEG. All you’ve changed is the label on the outside. The contents of the file are exactly the same as they were, and whatever you open it with will either complain or refuse point blank.
Only use this where the file genuinely is the same format and just has the wrong label, like .jpeg to .jpg. To actually change a file from one format to another you need a converter, which is a different job altogether.
How to Rename Multiple Folders at Once
PowerRename handles folders just as happily as it handles files. Three tick boxes decide what it touches.
- Include files, which is on to start with
- Include folders, for renaming the folders themselves
- Include subfolders, which reaches down inside and works on everything it finds
To rename a batch of folders and nothing else, tick Include folders and untick Include files.
Include subfolders catches more than you’d think
Select a folder with Include subfolders ticked and PowerRename works on everything inside it, all the way down. On a photo library that could be thousands of files rather than the dozen you had in mind.
Glance at how many rows the preview is showing before you click Apply. If it’s far more than you expected, that tick box is why.
Renaming a single folder doesn’t need any of this, of course. If that’s what you’re after, it’s covered in how to create, name, rename and delete folders.
How to Undo a Bulk Rename
You’ve got two safety nets, and I’d use both.
The first is the preview. Nothing on your PC changes until you click Apply, so read the right hand column properly before you do. That single habit will save you every time.
The second is undo. If you’ve already applied a rename and want it back, click into the File Explorer window and press Ctrl + Z. That puts the whole batch back, not just the last file.
Undo has a short memory though. Do something else in File Explorer, or close the window, and it may well have forgotten. If you’ve renamed something and undo won’t bring it back, you’ll have to rename it back yourself, and PowerRename will do that job just as well as it did the first one.
Quick Tip
When you’re trying something new, and especially anything with a regular expression in it, copy five files into a test folder and try it there first. No harm done if it goes wrong, and you’ll see straight away whether it does what you thought it would.
Troubleshooting
Rename with PowerRename Isn’t in My Right-Click Menu
Three things to check, in this order.
- Is PowerToys actually running? Look for its icon in the system tray at the bottom right, behind the little arrow if it’s hidden. If it isn’t there, open PowerToys from the Start menu.
- Is PowerRename switched on? Open PowerToys, click PowerRename, and check the switch at the top.
- Is it hiding under Show more options? Right click a file, click Show more options, and have a look down the longer menu. If it’s there, change the Show PowerRename in setting to put it on the main menu.
If you’ve only just installed PowerToys and none of that helps, restart the PC. Right click menu entries sometimes need one before they show up.
Nothing Changes in the Preview
The text in the Search for box doesn’t appear in your file names. Usually it’s one of three things.
- Case sensitive is ticked and you’ve typed img rather than IMG.
- There’s an underscore or a space where you assumed there wasn’t. Copy the name off an actual file rather than typing it from memory.
- The bit you’re searching for is in the extension, and Apply to is set to Filename only.
Windows Says the File Name Isn’t Valid
Windows won’t allow any of these characters in a file name, no matter how you rename it:
\ / : * ? " < > |A colon is the usual culprit, because people put one in a date or a time without thinking. A name can’t end in a full stop or a space either.
It Renamed Files I Didn’t Want Touched
Almost always Include subfolders. Press Ctrl + Z in File Explorer straight away to put everything back, then untick it and run the rename again.
The File Is Open in Another Program
Windows won’t rename a file that something else has open. Close whatever’s using it and try again.
If you’ve closed everything and Windows still says no, something is holding on to it in the background. I’ve written a full guide to finding out what has a file open, which will sort it.
The Extension Has Vanished, or the File Won’t Open
Apply to was left on the default and the text you searched for turned up in the extension as well as the name. Press Ctrl + Z, set Apply to to Filename only, and run it again.
The Dates Are All the Same, or All Wrong
You’ve used $YYYY rather than $DATE_TAKEN_YYYY. The short ones give you the date the file arrived on your PC, which for a batch of copied photos is the same day for every one of them. Undo, switch to the $DATE_TAKEN_ versions, and make sure the EXIF option is chosen in the dropdown.
If some photos come out dated and others don’t, the blank ones have no EXIF data in them to read.
Summary
Windows has been able to rename a folder full of files in one go for years, and almost nobody knows. Select them, press F2, type a name, press Enter. Every file gets that name with a number after it, which is perfectly fine when all you wanted was to be rid of IMG_4471.jpg.
PowerRename covers everything past that point. Swapping one word for another, adding or removing text, numbering files properly with leading zeros, changing extensions in bulk, doing folders as well as files, and showing you every single change before you commit to any of it.
The one I’d try first is the date trick. Point it at a folder of holiday photos with the $DATE_TAKEN_ pattern in the Replace with box and you’ll have them all named and sorted in about ten seconds. It’s the sort of thing that makes you wonder how long you’ve been doing it the hard way.
PowerRename is one of around thirty tools in the suite. If you want to see what else is in there, I’ve gone through the lot in my guide to Microsoft PowerToys. And if File Explorer itself is still a bit of a mystery, start with how to use Windows File Explorer.
Change Monitor Brightness in Windows
No brightness slider for your desktop monitor? You’re not going mad. Windows usually doesn’t give you one.
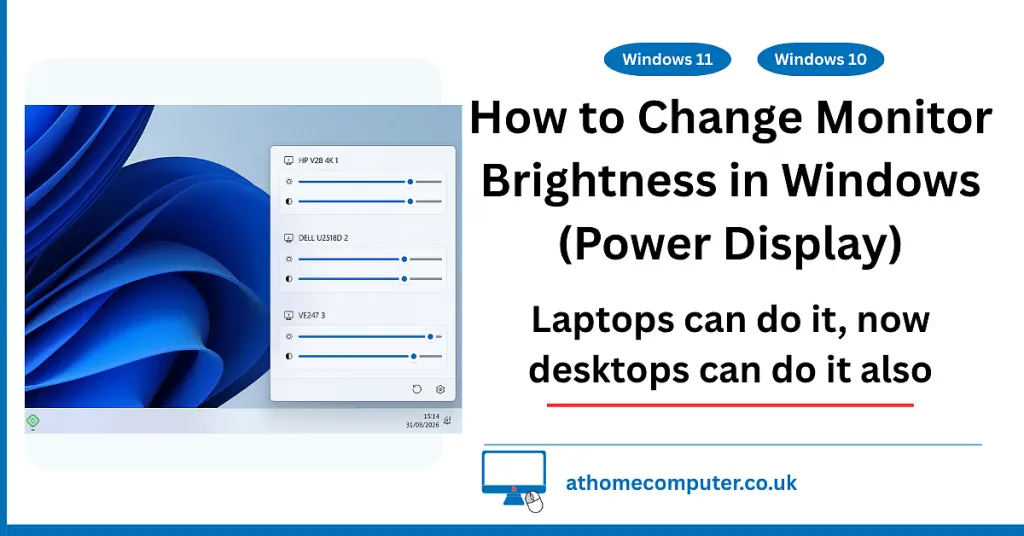
Here’s how to change the brightness of any external monitor from Windows itself. Free, and no fiddly buttons.
You can find this and other related step by step guides in – At Home Computer Guides