The desktop is the perfect place for files, folders and shortcuts that you use regularly, but having too many items scattered all across your desktop becomes really frustrating.
When you’ve got too many icons on your desktop you can spend a lot of time scanning each item in turn looking for the one that you want.
What you need is a way to arrange your desktop icons into some sort of order that makes them both easy to use and easy to find.
Windows Desktop Icons.
In the real world, if you were sitting at a real desk, you’d have the things that you use most often right there in front of you, on top of the desk. That makes sense, right? Everything else would be stored away in the desk drawers or in filing cabinets etc.
On your Windows desktop, the icons all represent something. They could be files, folders, programs or shortcuts to programs.
Just like the real world desktop, the Windows Desktop icons should generally be either the most used items, or maybe the most important items.
Easy to get at and easy to use.
However, over time, as more and more icons are added, it can all get cluttered and become confusing and difficult to use. It becomes hard to find what you want or need.
Have Windows Arrange Your Desktop Icons Automatically.
You can manually arrange your desktop icons (which we’ll look at further down this page) or you can have Windows automatically organise them for you.
Both Windows 10 and Windows 11 have two small menus dedicated to organising desktop icons.
To access the menus, move your mouse pointer to a bit of free space on your desktop, not touching anything else, and right-click once. The Windows context menu (sometimes called the options menu) will open.
The first two entries on the options menu, VIEW and SORT BY refer specifically to arranging your desktop icons.
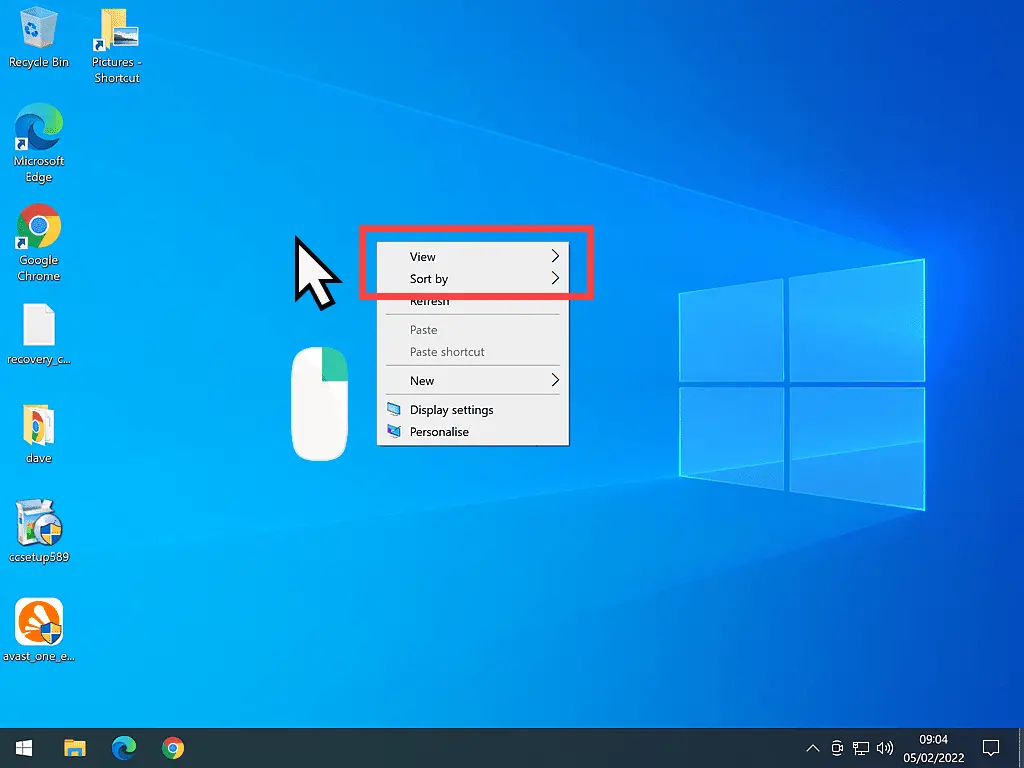
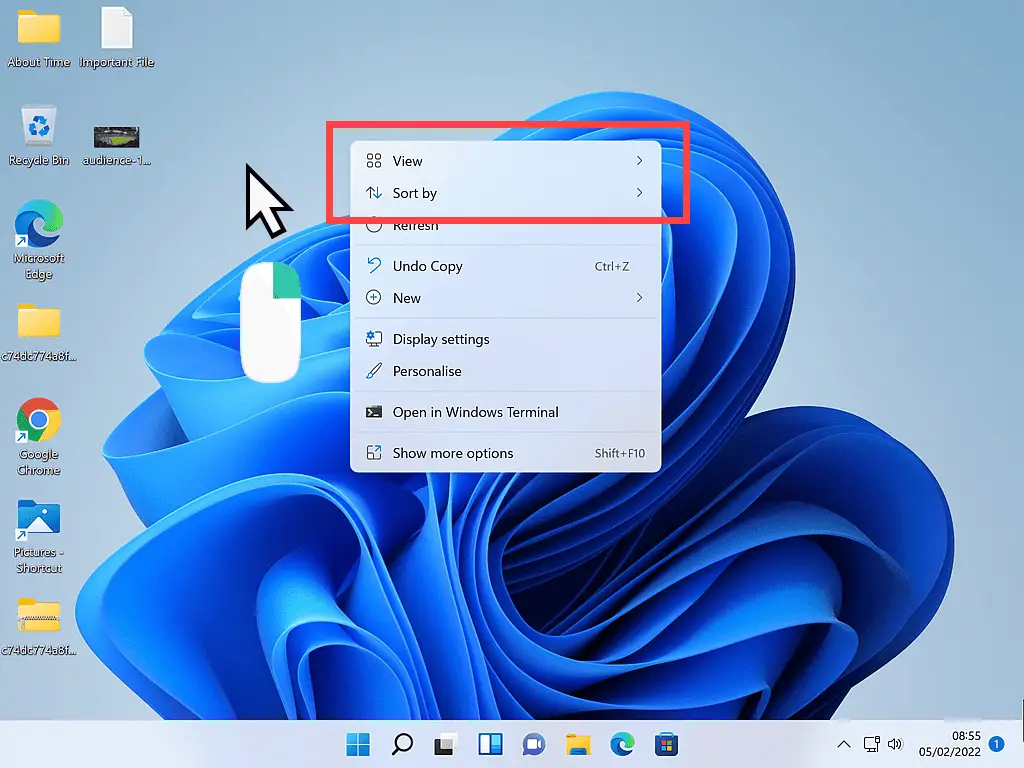
The View Menu.
Hover your pointer over VIEW and a second menu (or submenu) will open.
The very top section of the View submenu allows you to choose the size of your desktop icons. the options are LARGE, MEDIUM or SMALL. You’ll see a dot beside the currently selected size.
Question – can you see your desktop icons clearly? Are they big enough or maybe they’re too big? If you want to change the size of your desktop icons, left-click on the appropriate option.
When you click, the menu will disappear and the icons on your desktop will change size accordingly. To re-open the context menu, right-click once on your desktop again. Note that there isn’t a “correct” size for Desktop Icons, it’s just whatever works best for you on your computer screen
Auto Arrange Icons.
The next setting on the View menu is AUTO ARRANGE ICONS. When Auto Arrange Icons is selected all the icons will line up in neat columns on the left of the screen.
However, it doesn’t put them into any sort of order, the icons just line up randomly into columns. This doesn’t really help that much, since you still end up searching for the particular icon you want/need, but at least everything’s neat and tidy.
Auto Arrange Icons works best when combined with one of the options from the Sort By menu, which we’ll get to a little later.
When Auto Arrange Icons is turned on (selected), you’ll see a small tick appear next to it. If you don’t see a tick, then it’s turned off (deselected).
Show Desktop Icons.
The final setting of note in the View menu is Show Desktop Icons.
In my opinion, this setting should always be selected (have a tick beside it).
If it’s turned off (deselected) then all your icons will suddenly disappear. You’ll have a blank Desktop.
If Your Desktop Icons Have Suddenly Disappeared.
The Show Desktop Icons setting can all too easily be deselected by accident.
So, if you’re icons suddenly “disappear”, then this is the most likely cause. To get them back, right-click on your Desktop, move your pointer onto VIEW, then left-click SHOW DESKTOP ICONS.
The Sort By Menu.
Below the View menu, you’ll see the SORT BY menu. Hover your pointer over Sort By to open the submenu. Your choices are to sort (or put in order of) Name, Size, Item Type or Date Modified.
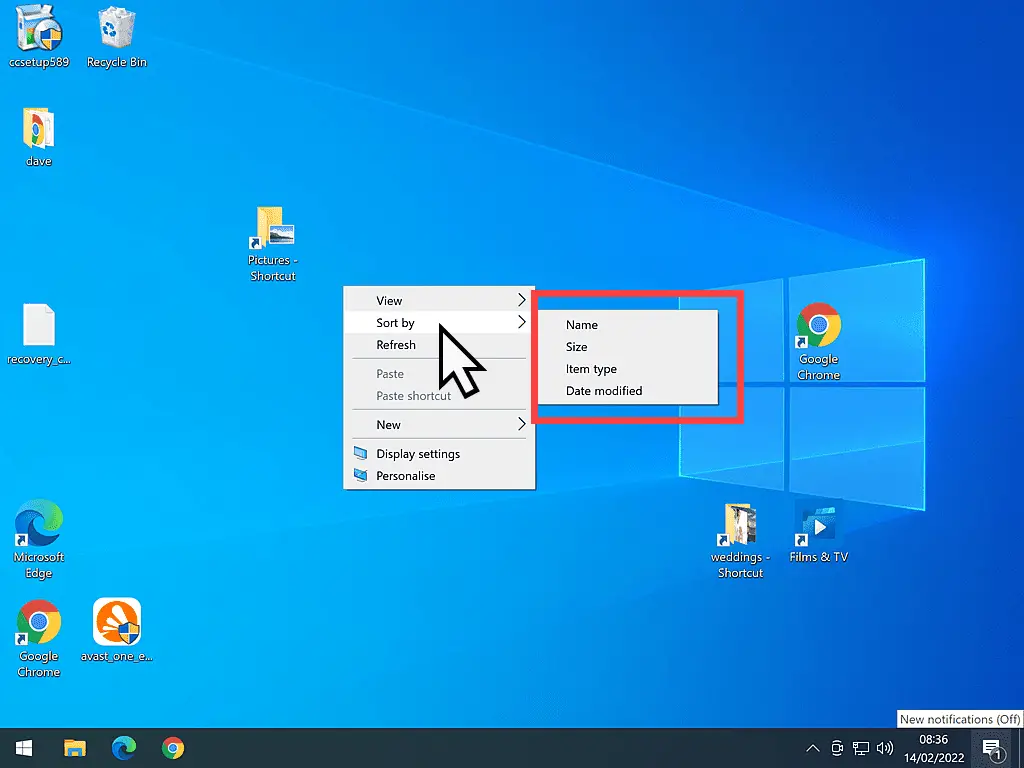
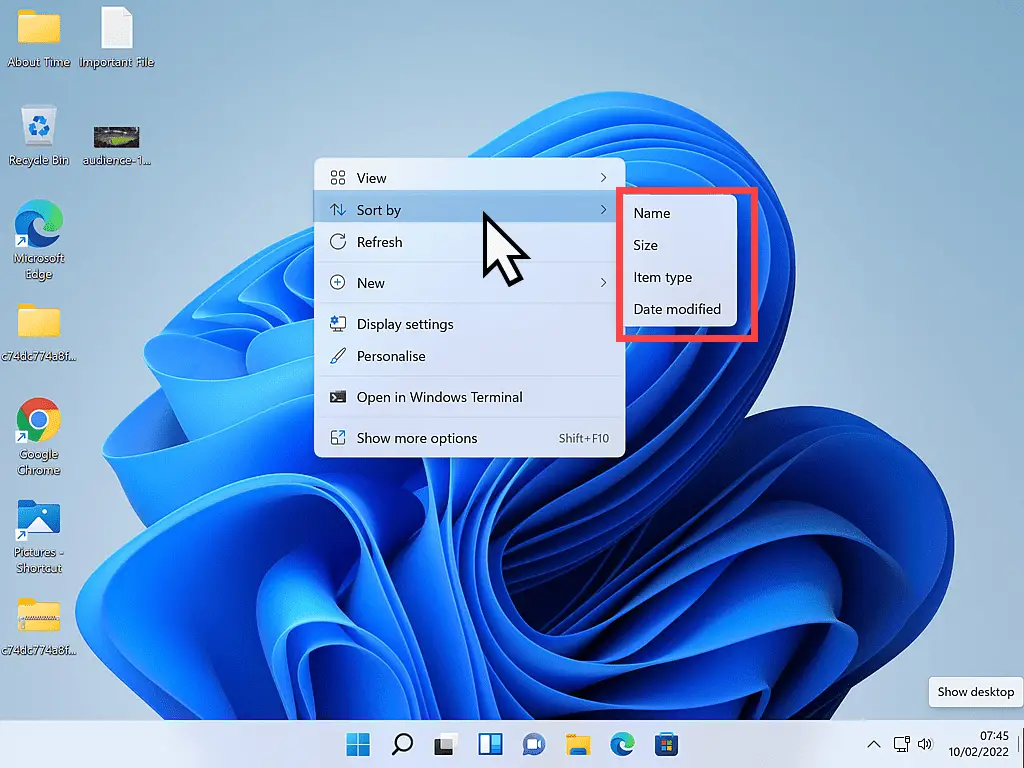
By far the two most useful options are to sort by Name and Item Type :
- Name – If you left-click on the Name option, all your desktop icons will instantly be arranged alphabetically, starting from the top left corner of the screen.
- Item Type – If you choose Item Type, then all your folders will be grouped together, all your pictures are grouped together, all the shortcuts are placed together etc.
The Sort By Options.
The Sort By options (Name, Size, Item Type and Date Modified) are one-time only commands. By that I mean it’s not permanent.
For example, if you chose to Sort your Desktop icons by Name, then they would all line up alphabetically. But just this once. As you add more items, they won’t automatically be sorted by name.
The Sort By commands are a quick way of arranging your desktop icons right now, after that, it’s up to you to keep things organised.
You can, however, run any of the Sort By commands as often as you want to.
Manually Arranging Your Desktop Icons.
Having your computer automatically arrange your desktop icons is a really quick and easy way to get them sorted into some kind of order, but it’s not the best way.
Manually arranging them into related groups is, for me, the best way to deal with a crowded, messy desktop.
For example, I’ll keep all the files, folders and shortcuts related to this website grouped together in one part of the Desktop.
Banking, bills, receipts and other financial stuff in another area.
Setting my Desktop icons up like this helps me because I know what area of the screen to look at for what I’m after, rather than having to scan over every icon.
Drag And Drop Your Desktop Icons.
To manually arrange your desktop icons, the first thing to do is to ensure that Auto Arrange Icons is turned off (or deselected).
Right-click on your Desktop and hover your pointer over View.
If there isn’t a tick beside Auto Arrange Icons, then it’s turned off (deselected) and your good to go. Simply left-click once on your Desktop to close the menus.
If there is a tick beside it, then it’s turned on (selected). To deselect it, left-click once on it.
To move an icon, put your mouse pointer directly on top of it and then hold down the left-hand mouse button.
With the mouse button held down, move your mouse across the screen and you’ll see that the icon moves with you (DRAG).
When it’s in the right place, release the mouse button (DROP) and the icon will stay where you’ve put it.
Keep going until you’ve arranged all the icons on your Desktop the way you want them.
Summary.
It really is easy to get your desktop organised in such a way that it works for you. Change the size of your icons to better suit you. Most monitors these days are High-Definition screens but a lot of us don’t have HD eyes. Make your icons big enough to see easily.
Try out the Auto Arrange Icons feature or have a go at dragging and dropping them into organised groups. If your desktop is a little crowded, you’ll find that grouping items together will really help.
I’ll see you on the next page where we’ll be resizing and moving program windows.

At Home Computer Guides.
These easy to follow guides aren’t part of the course, rather, they are standalone guides. They extend beyond the basics that we’re covering on the course.