
Disk Management is the tool built into Windows for looking after your hard drives and SSDs. You can use it to see every drive and partition in your PC, set up a new drive, format a drive, change a drive letter, and make partitions bigger or smaller.
It looks a little technical the first time you open it, but once you know what you’re looking at, it’s easy to use. And there’s nothing to download: Disk Management looks and works the same in Windows 11 and Windows 10.
In this guide I’ll show you how to open Disk Management, how to read what it’s telling you, and how to do each of the everyday jobs, step by step.
The Short Version
- Right click the Start button (or press Windows key + X) and click Disk Management.
- The bottom half shows each physical disk (Disk 0, Disk 1 and so on) and the partitions on it.
- Right click a partition to format it, change its drive letter, or shrink, extend or delete it.
- Right click the disk label on the left to initialise a new disk or convert it to GPT or MBR.
- Unallocated means space that isn’t being used yet.
Table of contents
- How to Open Disk Management
- Find Your Way Around Disk Management
- Set Up a New Drive in Disk Management
- How to Format a Drive in Disk Management
- How to Change a Drive Letter
- How to Shrink a Volume
- How to Extend a Volume
- How to Delete a Volume
- Other Things Disk Management Can Do
- Troubleshooting
- Common Questions (FAQ)
- Summary
How to Open Disk Management
There are several ways to open Disk Management. The first one is the quickest, and it’s the one I use.
From the Start Button (Windows Key + X)
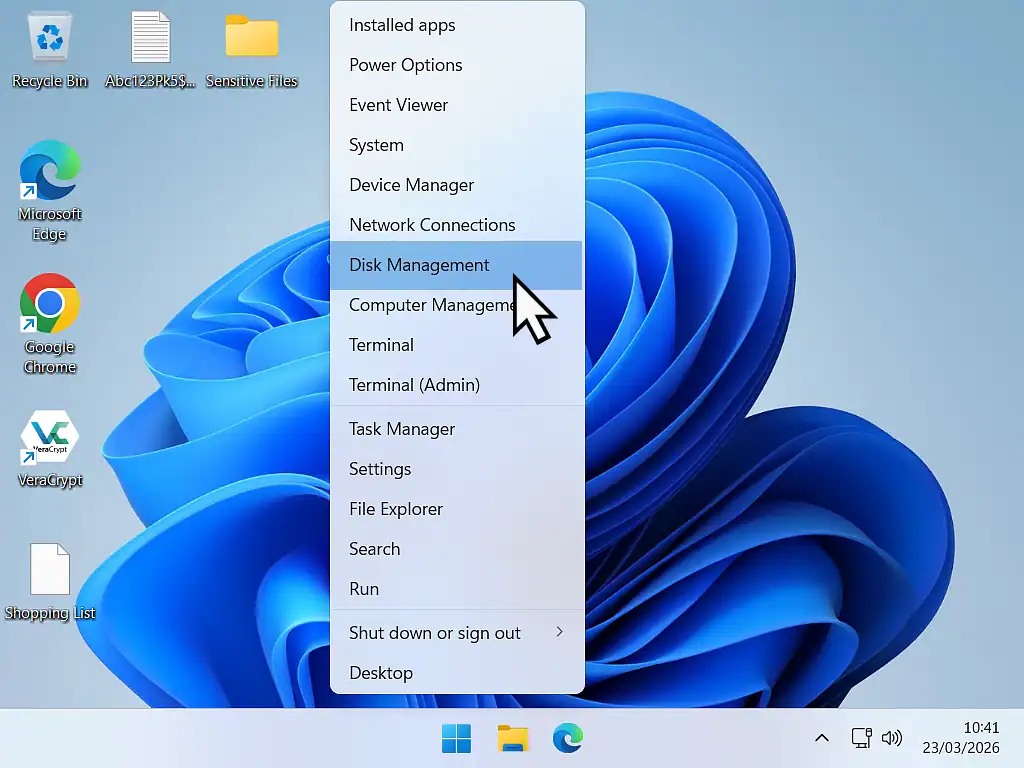
- Right click the Start button, or press Windows key + X.
- Click Disk Management on the menu.
Search for Disk Management
Click the Start button and type disk management. The result is called Create and format hard disk partitions. Click it and Disk Management opens.

Use the Run Box (diskmgmt.msc)
Press Windows key + R, type this and click OK. You can also type it into Command Prompt, PowerShell or Terminal:
diskmgmt.mscFrom Computer Management
Right click the Start button and click Computer Management. In the left hand panel, under Storage, click Disk Management. This is handy if you also want Device Manager, which is in the same window.
Quick Tip
Disk Management needs an administrator account. If you sign in with a standard account, Windows will ask for an administrator’s password first.
Find Your Way Around Disk Management
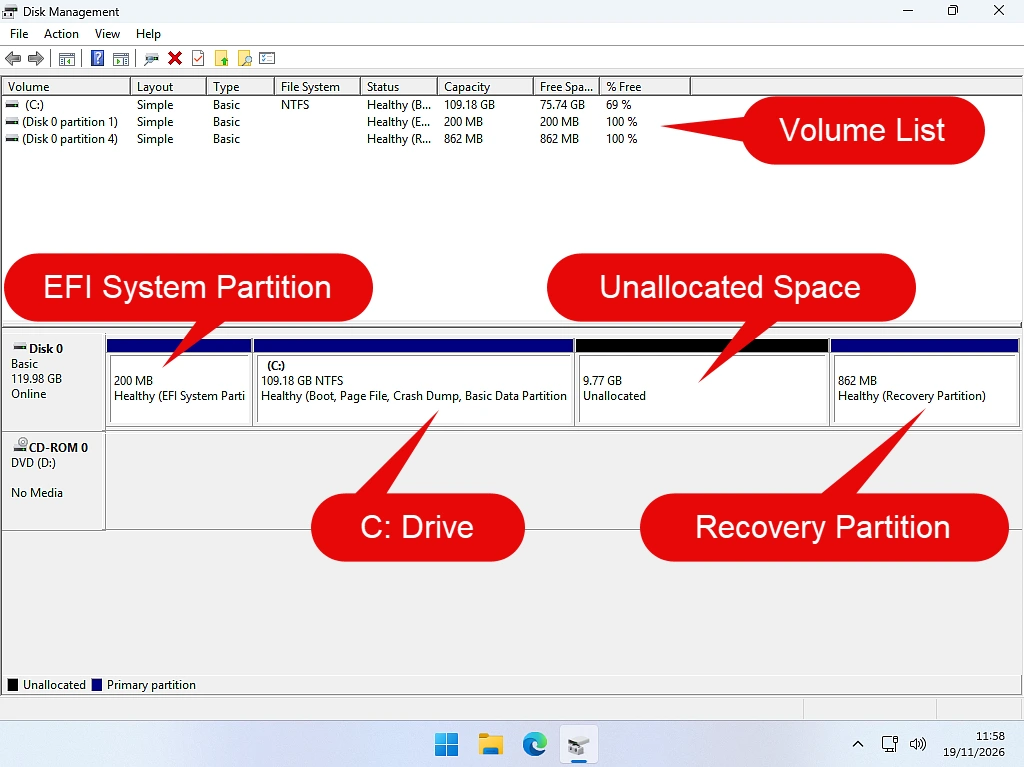
Disk Management is split into two halves.
- The top half is a list of volumes (partitions), with each one’s drive letter, file system (such as NTFS), status, capacity and free space.
- The bottom half is a picture of each physical disk, Disk 0, Disk 1 and so on, with its partitions drawn as coloured bars from left to right, in the order they sit on the disk.
On the left of each disk in the bottom half is the disk label. It tells you the disk number, whether it’s Basic or Dynamic, its size and whether it’s Online. Right clicking the disk label gives you options for the whole disk. Right clicking a partition gives you options for just that partition.

What the Words in Disk Management Mean
- Healthy (Boot, Page File, Crash Dump, Basic Data Partition): your C: drive, where Windows is.
- Healthy (EFI System Partition) and Healthy (Recovery Partition): small partitions Windows needs to start and to repair itself. Leave them alone.
- Unallocated: space on the disk that isn’t part of any partition, so you can’t use it yet. It shows as a black bar.
- Unknown, Not Initialised: a new disk that hasn’t been set up yet.
- Offline: Windows can see the disk but has switched it off.
- RAW: a partition with a file system Windows can’t read, or none at all.
- Basic and Dynamic: almost every disk is Basic. Dynamic is an old type Microsoft no longer recommends.
If you’d like to know more about the partitions themselves, I explain what a partition is and what each one on a Windows 11 PC does in a separate guide.
Set Up a New Drive in Disk Management
A new internal hard drive or SSD arrives blank, so it won’t show up in File Explorer until you set it up. If your new hard drive is not showing up, this is almost always why.
Initialise a New Disk
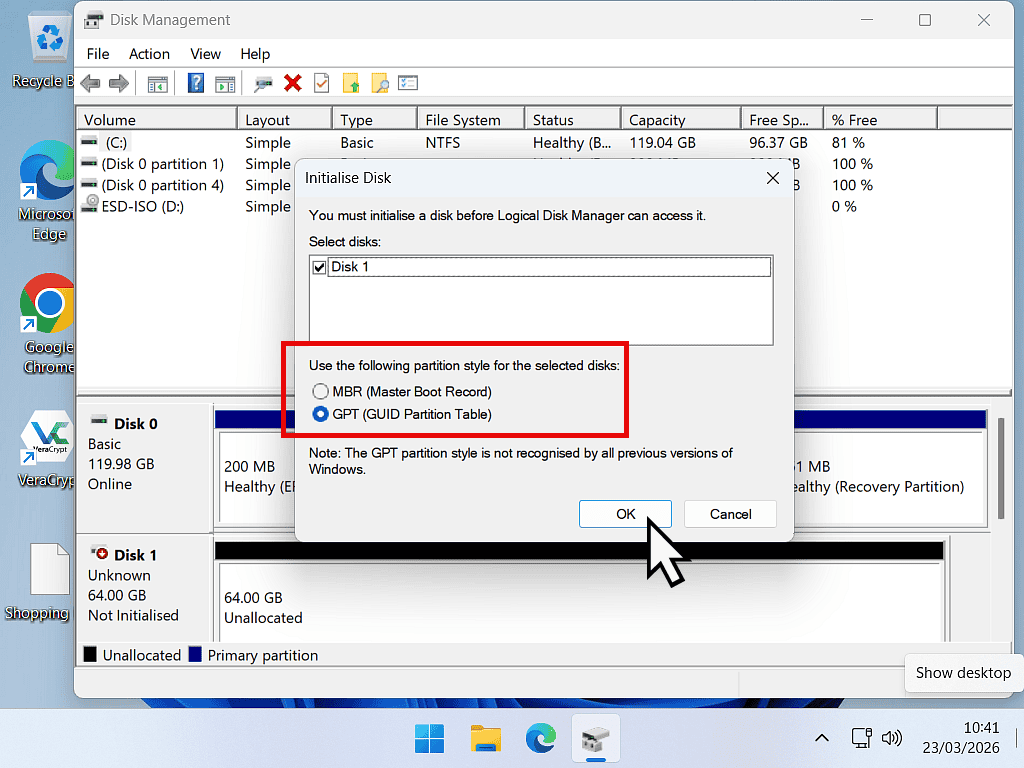
- Open Disk Management. A new disk usually brings up the Initialise Disk window straight away. If it doesn’t, right click the disk label (it says Unknown, Not Initialised) and click Initialise Disk.
- Choose GPT (GUID Partition Table) and click OK.
Create a New Volume (New Simple Volume)
- Right click the black Unallocated space and click New Simple Volume.
- Click Next, leave the size at the maximum, and click Next again.
- Pick a drive letter and click Next.
- Leave the file system as NTFS, type a name in Volume label, keep Perform a quick format ticked, then click Next and Finish.

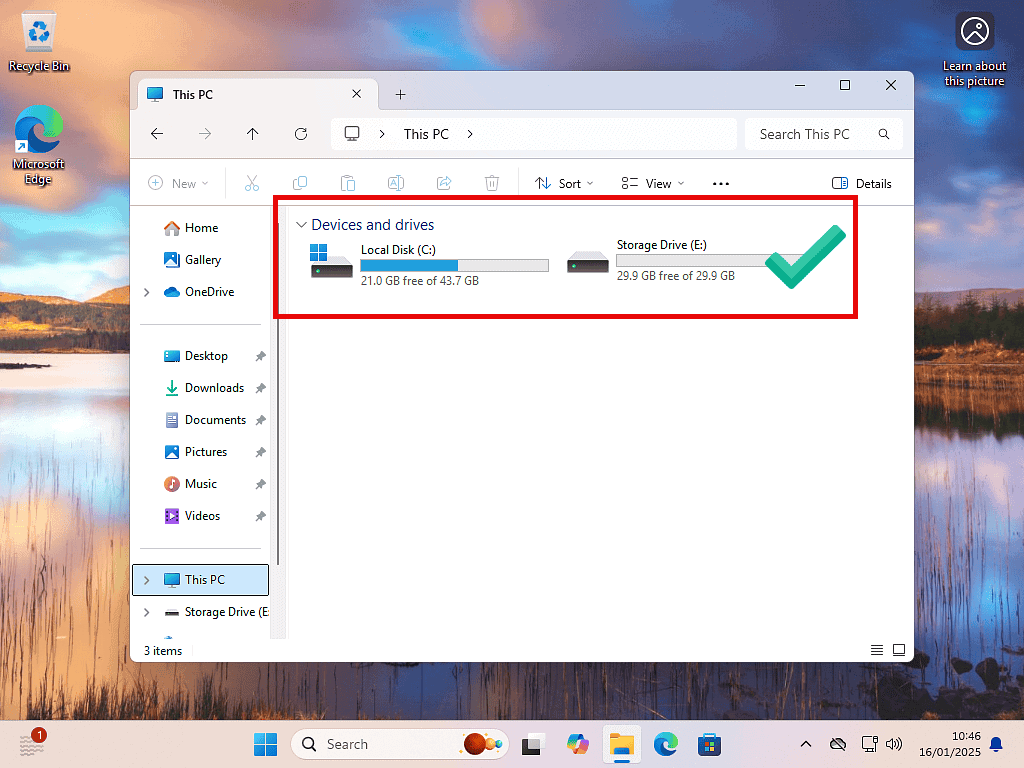
The new drive appears in File Explorer straight away. If you want to split the space into more than one partition, see my guide on how to create a partition.
How to Format a Drive in Disk Management
Formatting a drive wipes it and gives it a fresh, empty file system. It’s the quickest way to clear out a USB drive or an old data drive.
- Right click the partition you want to format and click Format.
- Type a name in Volume label.
- Choose a File system (see below) and leave Allocation unit size as Default.
- Keep Perform a quick format ticked and click OK.
- Click OK again to confirm that everything on it will be erased.
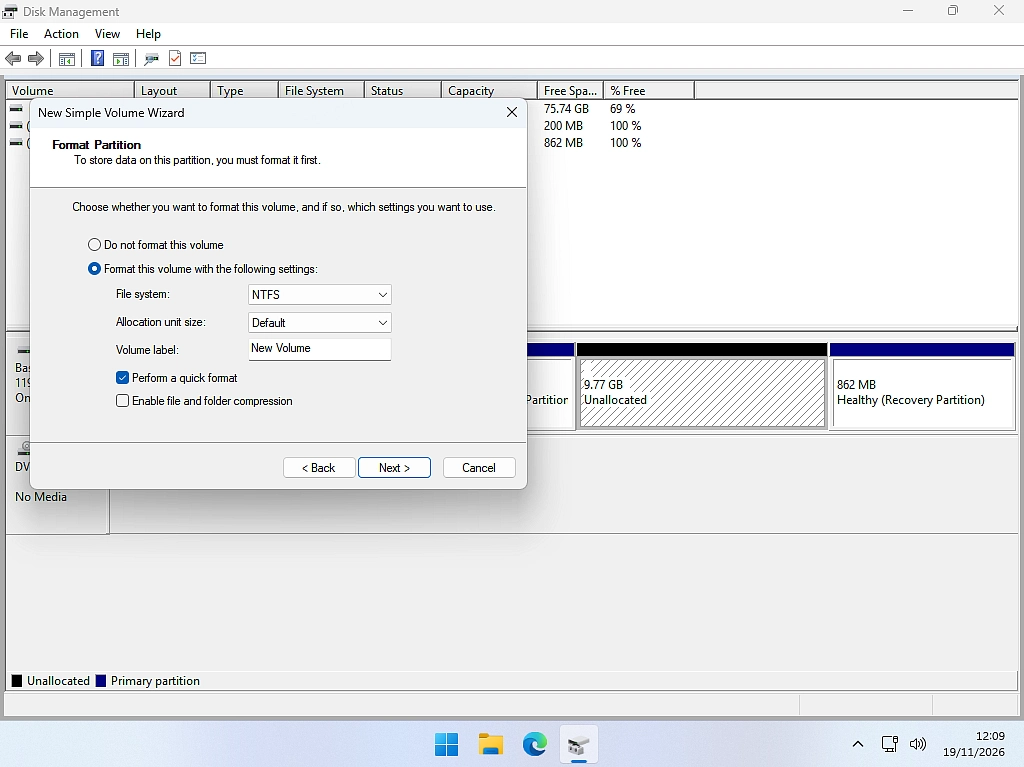
Which file system should you choose?
- NTFS for internal drives and any drive that’s only used with Windows PCs.
- exFAT for USB drives and external drives you also use with a Mac, a TV or a games console.
- FAT32 only for small drives that need to work in very old devices. Disk Management only offers it for volumes of 32 GB or less.
If you untick Perform a quick format, Windows also checks every part of the drive for faults. It can take hours on a big drive, so only do it if you suspect a problem.
Be Careful
Formatting erases everything on the partition, so check the drive letter and size before you click OK. You can’t format the C: drive while Windows is running, and Disk Management won’t let you try.
How to Change a Drive Letter
You can give any drive except C: a different letter. It’s handy if a USB drive keeps getting a different letter each time, or you want your data drive to always be D:.
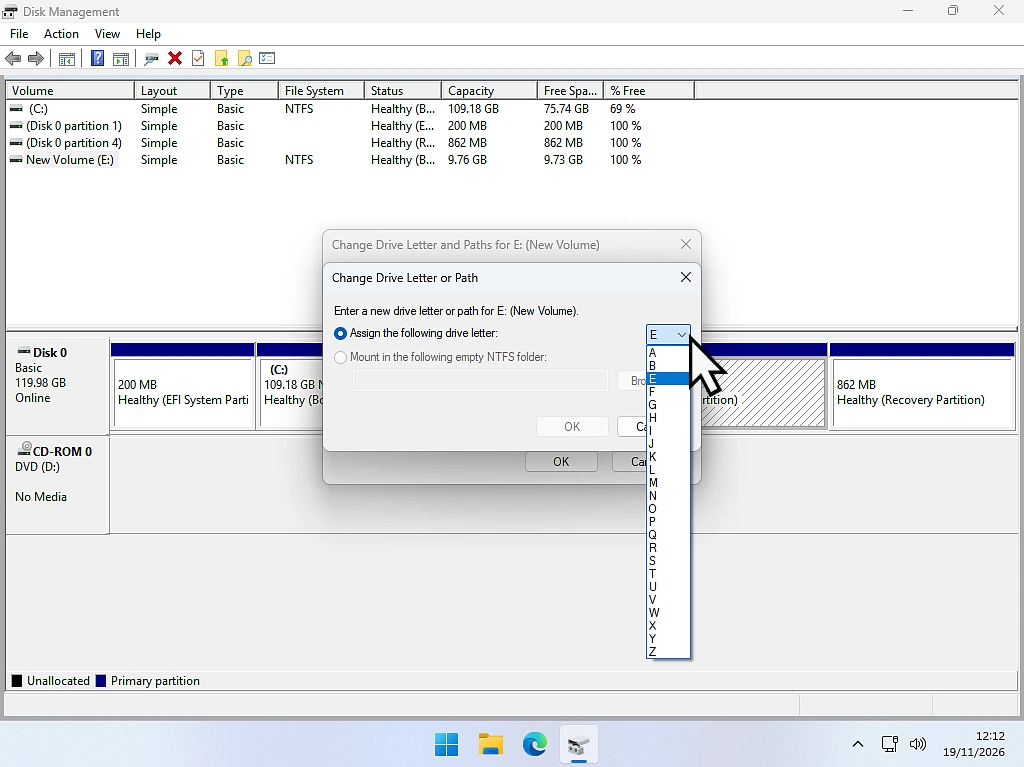
- Right click the partition and click Change Drive Letter and Paths.
- Click Change (or Add if it has no letter).
- Choose a letter from the Assign the following drive letter list and click OK.
- Windows warns that some programs that rely on drive letters might not run correctly. Click Yes to carry on.
Only change the letter of a drive that has programs installed on it if you have to, because those programs may stop working. For a drive that just holds files, it’s completely safe.
How to Shrink a Volume
Shrinking a volume makes a partition smaller and turns the space it frees up into unallocated space, which you can then use for a new partition. Your files stay where they are.
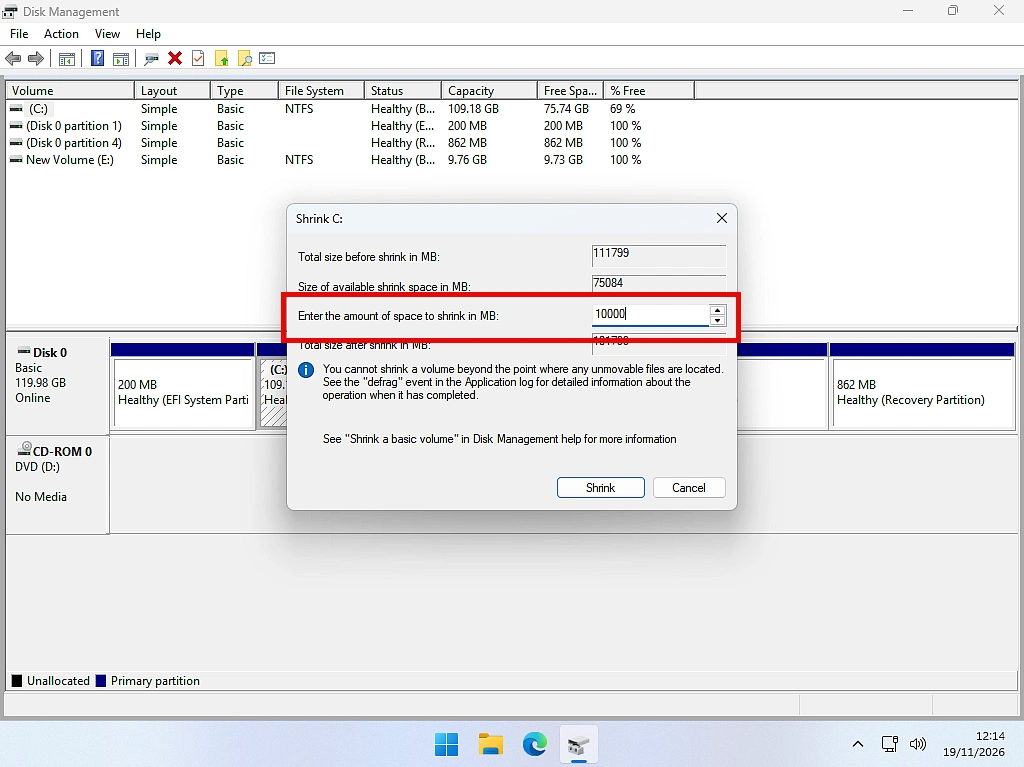
- Right click the partition and click Shrink Volume.
- Wait while Windows works out how much space it can free up.
- In Enter the amount of space to shrink in MB, type how much to take off. 1 GB is 1024 MB, so 51200 MB is 50 GB.
- Click Shrink.
You might find Windows won’t let you shrink a partition by as much as its free space suggests. The window explains why: you cannot shrink a volume beyond the point where any unmovable files are located. Files such as the page file and System Restore points can’t be moved while Windows is running, so the shrink stops at them.
How to Extend a Volume
Extending a volume makes a partition bigger by adding unallocated space to it.
- Right click the partition and click Extend Volume.
- Click Next. The wizard selects all the available space. Type a smaller amount if you don’t want to use it all.
- Click Next, then Finish.
There’s one rule: the unallocated space has to be immediately to the right of the partition, with nothing in between. On most PCs the Recovery partition sits straight after C:, which is why so many people find Extend Volume greyed out.
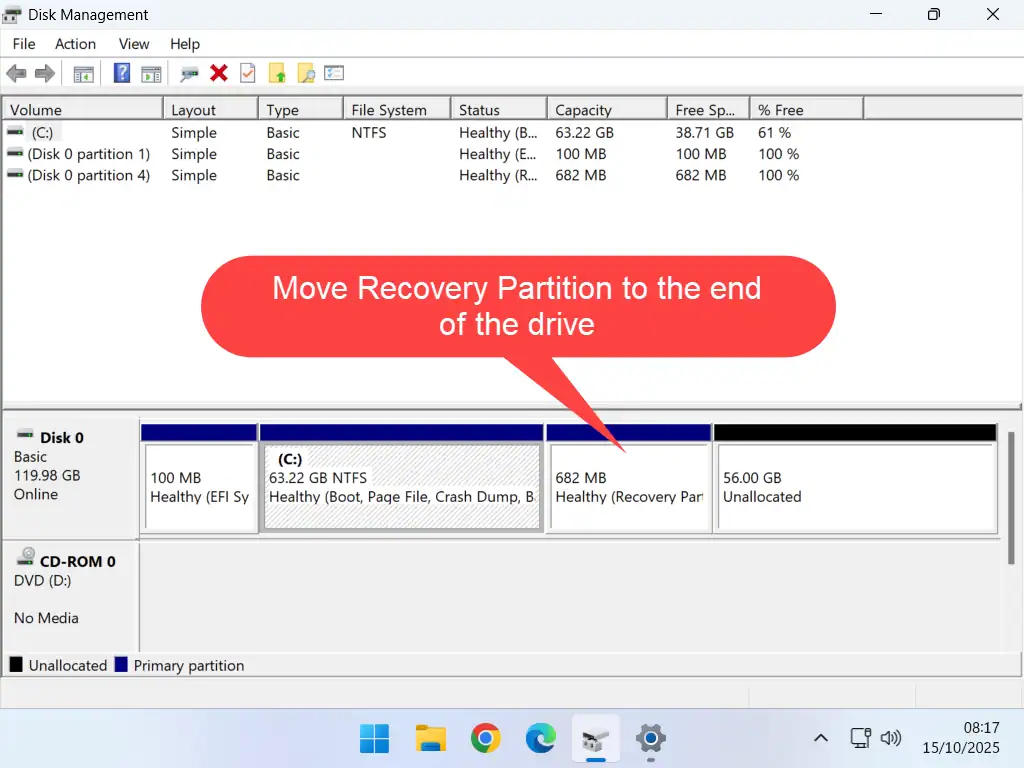
Disk Management can’t move a partition out of the way, but a free tool can. Here’s how to fix Extend Volume greyed out by moving the partition.
How to Delete a Volume
Deleting a volume removes the partition and everything on it, leaving unallocated space. Copy off anything you want to keep first.
- Right click the partition and click Delete Volume.
- A warning says all data on the volume will be erased. Check it’s the right one, then click Yes.
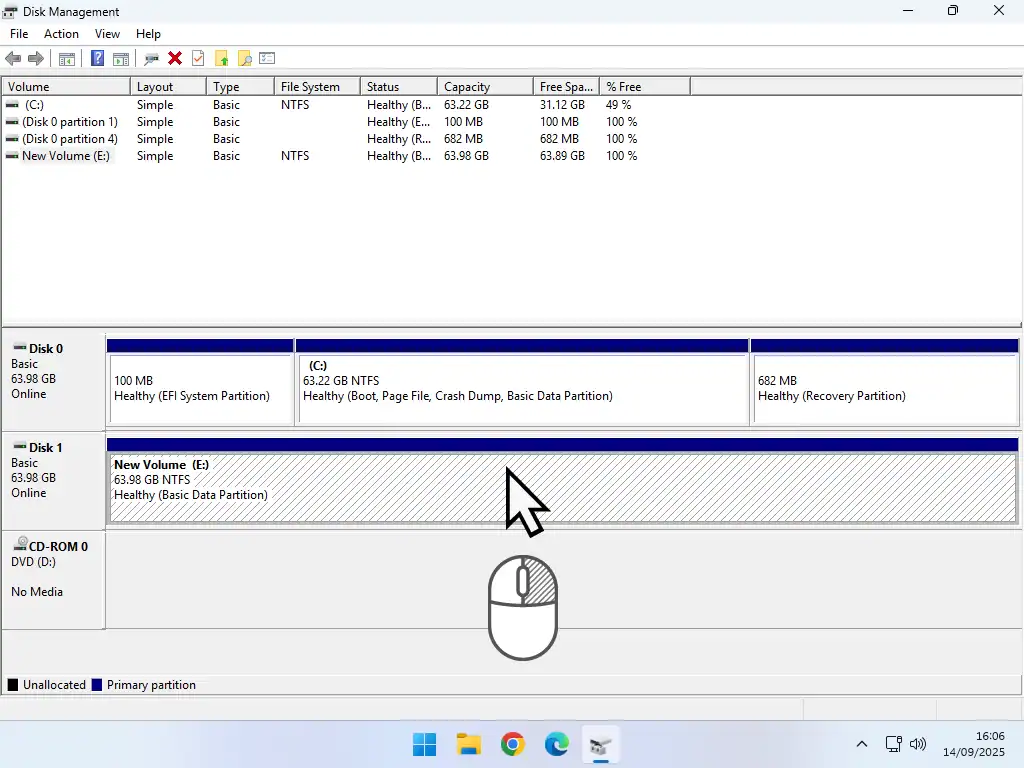
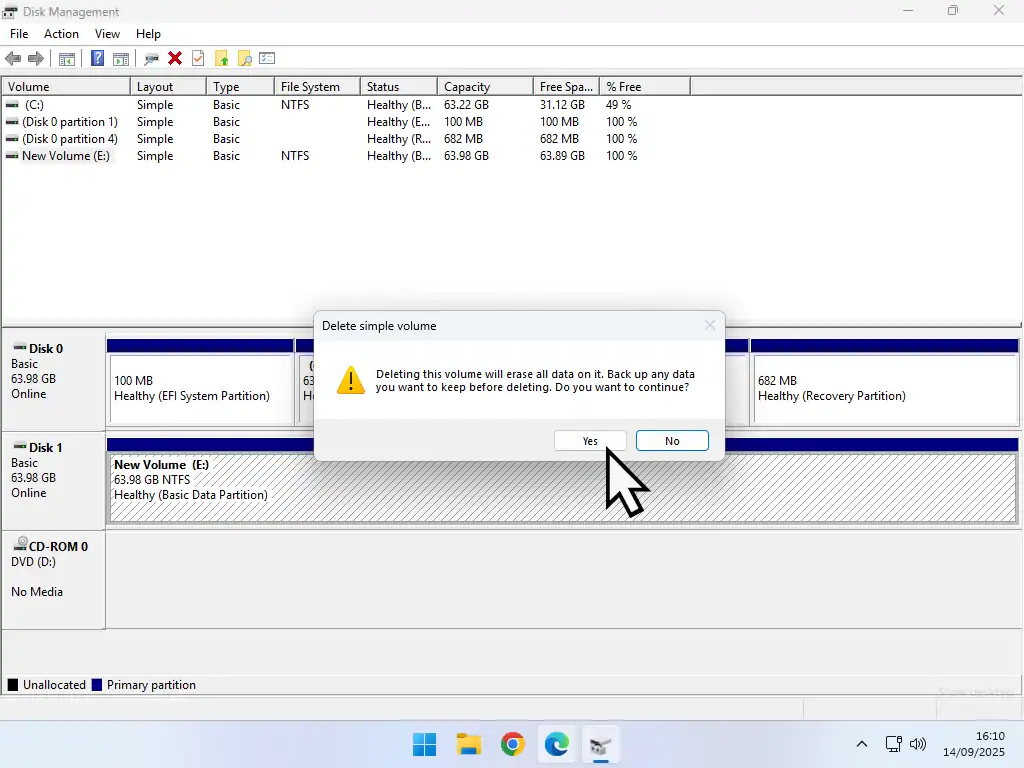
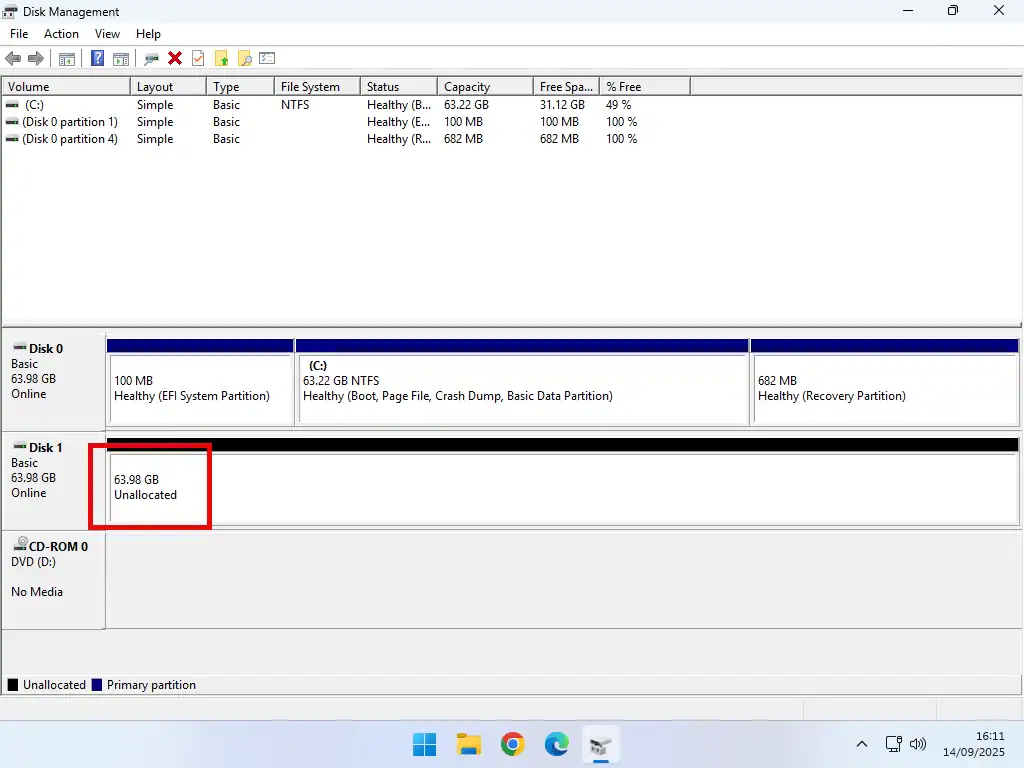
Disk Management won’t let you delete C:, and the EFI System Partition and Recovery Partition only offer Help when you right click them. That’s deliberate. Windows needs them.
Other Things Disk Management Can Do
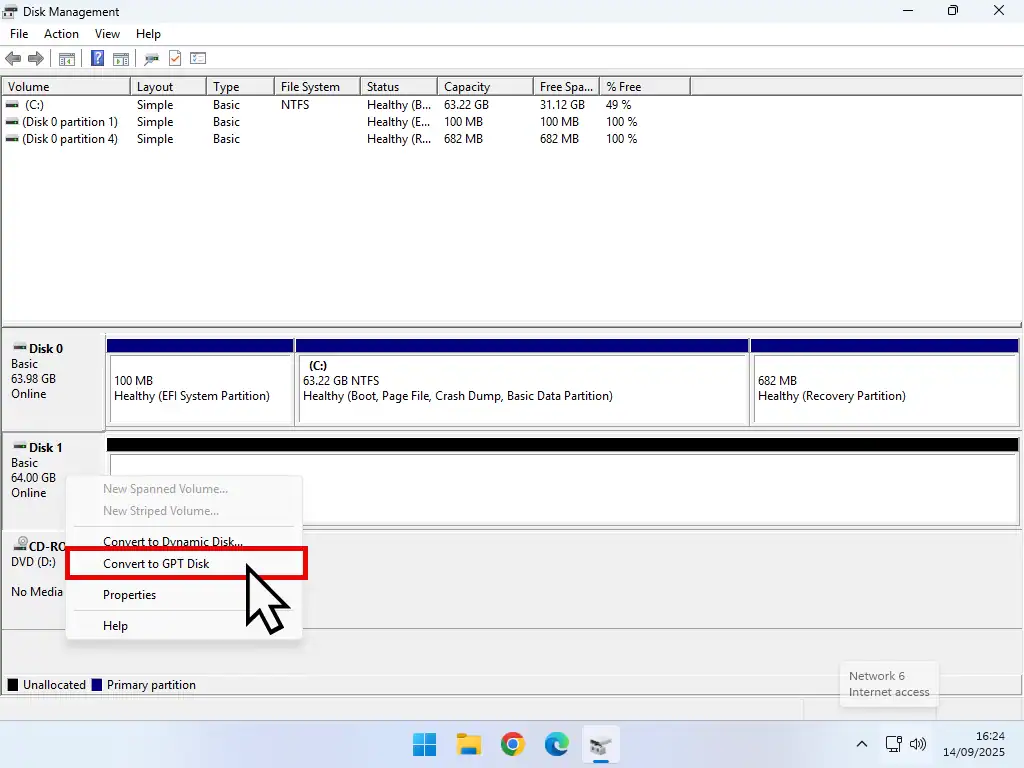
- Convert to GPT Disk or MBR Disk: right click the disk label. It only works on an empty disk. For the drive Windows is on, see how to convert MBR to GPT without losing anything.
- Offline and Online: right click the disk label to switch a whole disk off or back on.
- Properties: right click the disk label, click Properties and open the Volumes tab to see whether it’s MBR or GPT.
- Rescan Disks: on the Action menu. Use it if you’ve just plugged a drive in and it hasn’t appeared.
- Create VHD and Attach VHD: also on the Action menu, for creating or opening virtual hard disk files.
- Mark Partition as Active: only on MBR disks, and only needed for old boot repairs. You can safely ignore it.
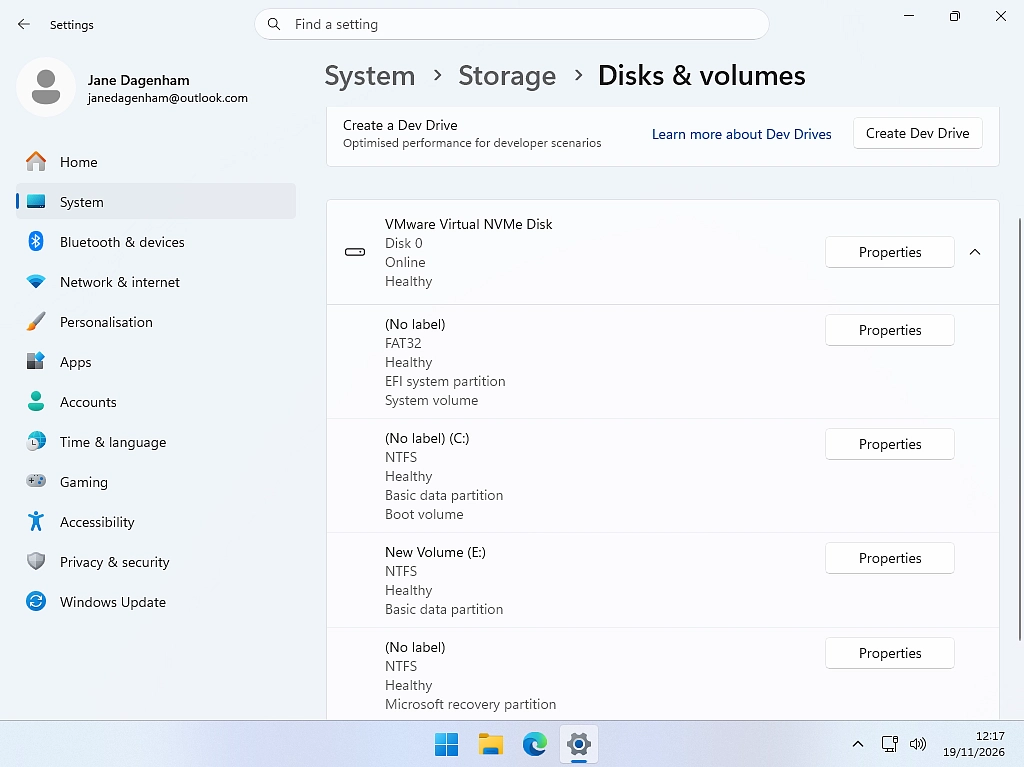
Disks and Volumes: Disk Management in Windows 11 Settings
Windows 11 also has a newer, simpler version of Disk Management in the Settings app. Open Settings, System, Storage, click Advanced storage settings and then Disks & volumes.
From there you can initialise a new disk, create and format volumes, change drive letters, take a disk offline, and create virtual hard disks and Dev Drives. Microsoft intends it to replace Disk Management eventually, but for now Disk Management can still do more, and it’s the only one in Windows 10.
Disk Management vs Diskpart
Diskpart is the command line version, typed into Command Prompt. It can do everything Disk Management does and a few things it can’t, such as deleting protected partitions. But it doesn’t ask “are you sure?”, so one wrong number can wipe the wrong drive. For everyday jobs, Disk Management is the safer choice.
Troubleshooting
Disk Management Is Not Loading or Stuck on Connecting to Virtual Disk Service
Disk Management sometimes sits on Connecting to Virtual Disk Service and never opens. Try these in order:
- Unplug any USB drives, card readers and memory cards, then try again. A faulty one can stop Disk Management loading.
- Restart your PC.
- Press Windows key + R, type services.msc and click OK. Find Virtual Disk, double click it and check Startup type is Manual, not Disabled. Click Start if it isn’t running.
- Run System File Checker to repair any damaged Windows files.
A Drive Isn’t Listed in Disk Management
If a drive doesn’t appear at all, Windows can’t see it, so the problem is the connection, the power or the drive itself. Click Action, Rescan Disks first, then work through my guide to a hard drive not showing up.
An Option Is Greyed Out
- Extend Volume: there’s no unallocated space directly to the right of the partition.
- Shrink Volume: the partition isn’t NTFS, or there’s no free space to take.
- Delete Volume or Format: it’s the C: drive or a partition Windows needs.
- Convert to GPT Disk or MBR Disk: the disk still has partitions on it.
Common Questions (FAQ)
Q: How do I open Disk Management in Windows 11?
A: Right click the Start button, or press Windows key + X, and click Disk Management. You can also press Windows key + R, type diskmgmt.msc and click OK.
Q: What is diskmgmt.msc?
A: It’s the file name of Disk Management. Typing diskmgmt.msc into the Run box, Command Prompt or PowerShell opens Disk Management directly.
Q: Is Disk Management the same in Windows 10 and Windows 11?
A: Yes. It looks and works the same in both. Windows 11 also has a newer Disks & volumes page in Settings that does many of the same jobs.
Q: Can Disk Management delete my files?
A: Only if you format or delete a volume, or convert a disk. Both warn you first. Opening Disk Management and looking around is completely safe.
Q: How do I format a hard drive in Windows 11?
A: Open Disk Management, right click the partition, click Format, choose a volume label and file system (NTFS for most drives), keep Perform a quick format ticked and click OK.
Q: How do I change a drive letter in Windows 11?
A: In Disk Management, right click the partition, click Change Drive Letter and Paths, click Change, choose a new letter and click OK. You can’t change the letter of C:.
Q: Why is Extend Volume greyed out?
A: Disk Management can only extend a partition into unallocated space directly to its right. On most PCs the Recovery partition is in the way, so it needs moving first with a free partition manager.
Q: Why can’t I shrink my C: drive more?
A: Disk Management can’t move some system files, such as the page file and System Restore points, so it can only shrink the partition up to where they are.
Q: Why is Disk Management stuck on Connecting to Virtual Disk Service?
A: Usually a USB drive or card reader is stopping it. Unplug them and restart. Also check the Virtual Disk service in Services is set to Manual.
Q: What does Unallocated mean in Disk Management?
A: It’s space on a disk that isn’t part of any partition, so you can’t use it yet. Right click it and choose New Simple Volume to make a new drive, or use Extend Volume to add it to the partition next to it.
Summary
Disk Management is the one place in Windows that shows you every drive and partition in your PC. Open it with Windows key + X, right click a partition for its options, and right click the disk label for options that affect the whole disk.
Most jobs are safe and quick, but formatting, deleting and converting all erase data. Always check the disk number and size before you click OK, and back up anything you can’t afford to lose.
Related Posts
How to Partition a Hard Disk in Windows
Split a drive into more than one partition with Disk Management.
What Is a Hard Drive Partition?
Primary, logical, EFI and recovery partitions, and MBR vs GPT, explained.
How to Convert MBR to GPT Without Losing Data
Get the drive Windows is on ready for Windows 11.
Show Thumbnails Instead of Icons
Open your Pictures folder and all you get is file names or blank icons?
See your photos instead. Two Windows settings control this, and most guides only tell you about one.
You can find this and other related step by step guides in – At Home Computer Windows 11 Guides
Written by Jeff Porter. I’ve been fixing Windows PCs since 2010 and I’m CompTIA Network+ certified. More about me