System Restore in Windows 10 and 11 creates what are called Restore Points. These restore points are a kind of “snapshot” of most of the settings and configuration of your computer.
The idea is that you create restore points of your machine just before making any major changes (installing software, editing the registry, etc), then if things don’t work out well, you can rollback the computer to the way it was when you created the restore point, without the need to use system backups or completely re-installing Windows.
Windows System Restore.
System Restore has been around for many years, and whilst it didn’t always work that well in previous versions of Windows, in Windows 10 and 11 it is much more reliable.
With System Restore turned on, your computer will create restore points when –
- You install new software
- You update or install new hardware drivers
- You manually create a restore point.
- Certain Windows updates are applied
- These restore points contain backup settings of your Windows system files together with the Windows registry and certain program files and drivers.
- Note that it doesn’t back up your personal files (documents, pictures, etc) and so isn’t a replacement for a proper backup plan.
System Restore In Windows 10 And 11.
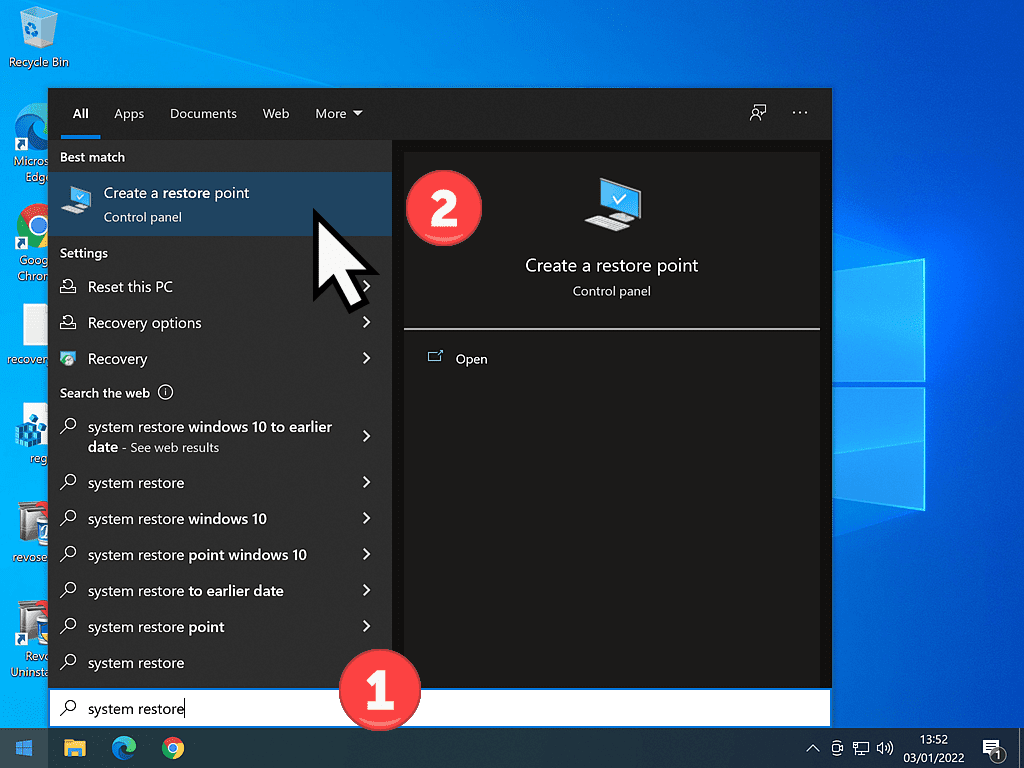
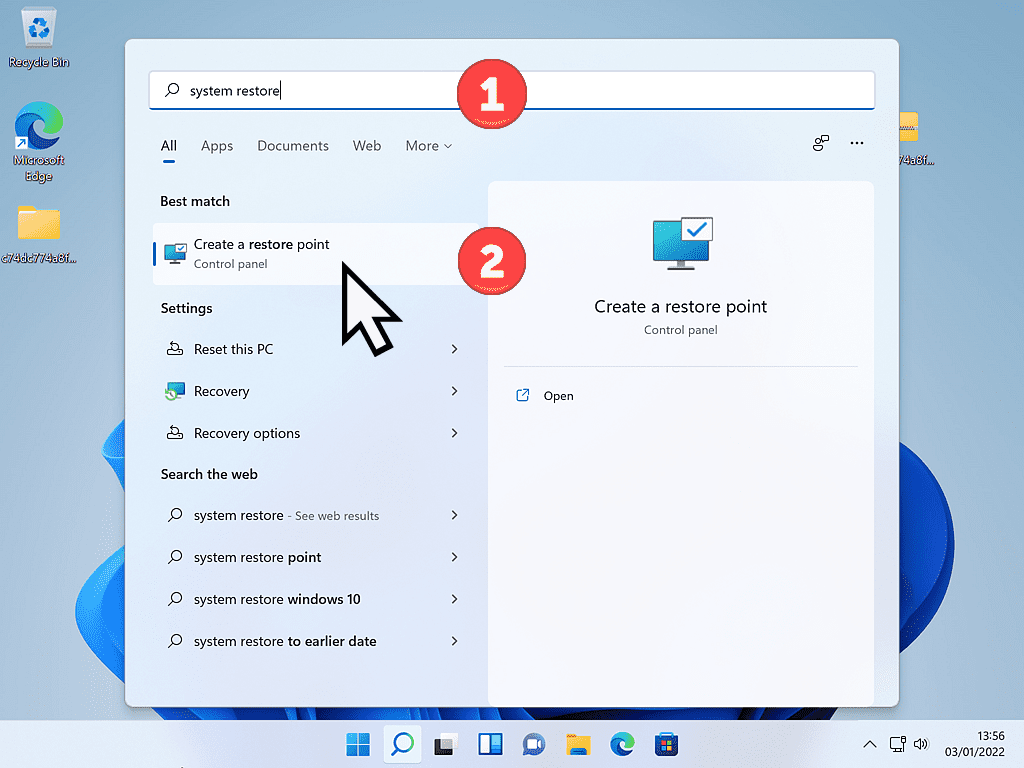
In both Windows 10 and Windows 11, you can access System Restore by clicking the START button and then typing “system restore“.
Click CREATE A RESTORE POINT (Control Panel) at the top of the list.
System Protection Settings.
The System Properties window opens.
From here you can turn System Restore on or off, set how much disk space should be used, manually create a restore point and use restore points to return your computer to an earlier time.
If the system protection is turned off, or to set how much disk space to use, click the CONFIGURE button.
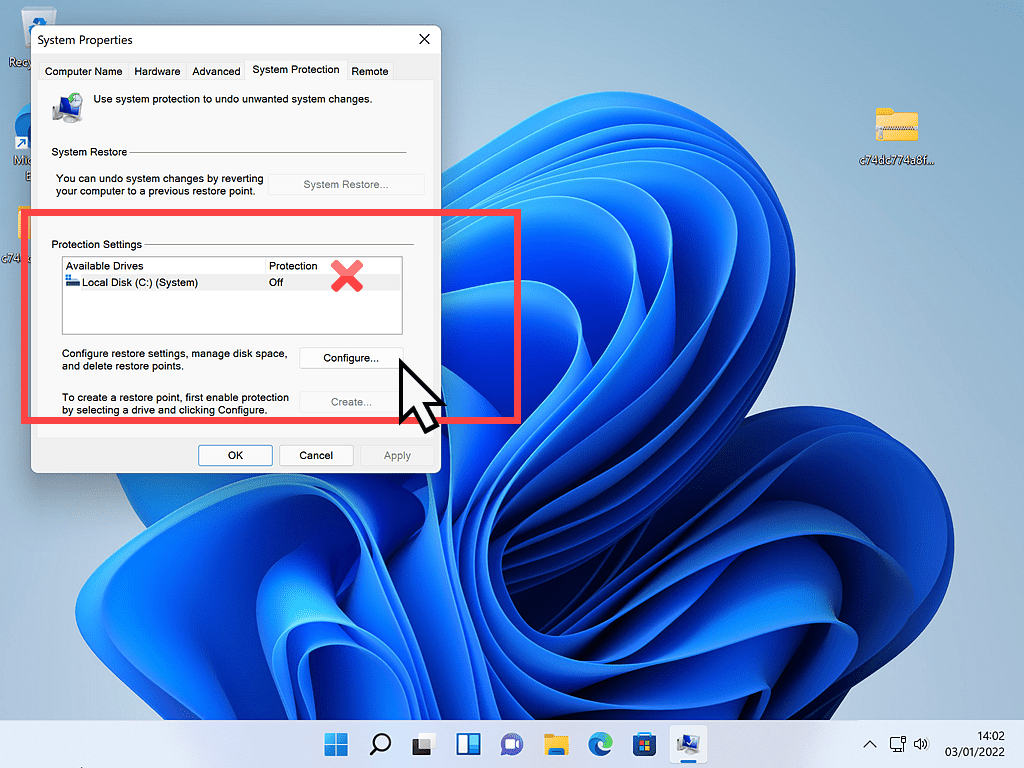
Select The System Drive
Note, if you have got more than one hard drive installed on your computer, you’ll need to select your system drive first. It’ll usually be the C: drive. Simply left-click it once and then click the CONFIGURE button.
Turning On System Protection.
On the Restore Settings page, click the button next to “Turn on system protection”.
Below you can set how much disk space is used for the restore points by moving the slider accordingly.
Generally, something around 1Gb to 5GB will be sufficient, but that will depend greatly on the capacity of your hard drive.
Personally, I would leave it as whatever it is unless you’ve got a reason to change it. Click the APPLY button when you’re done.
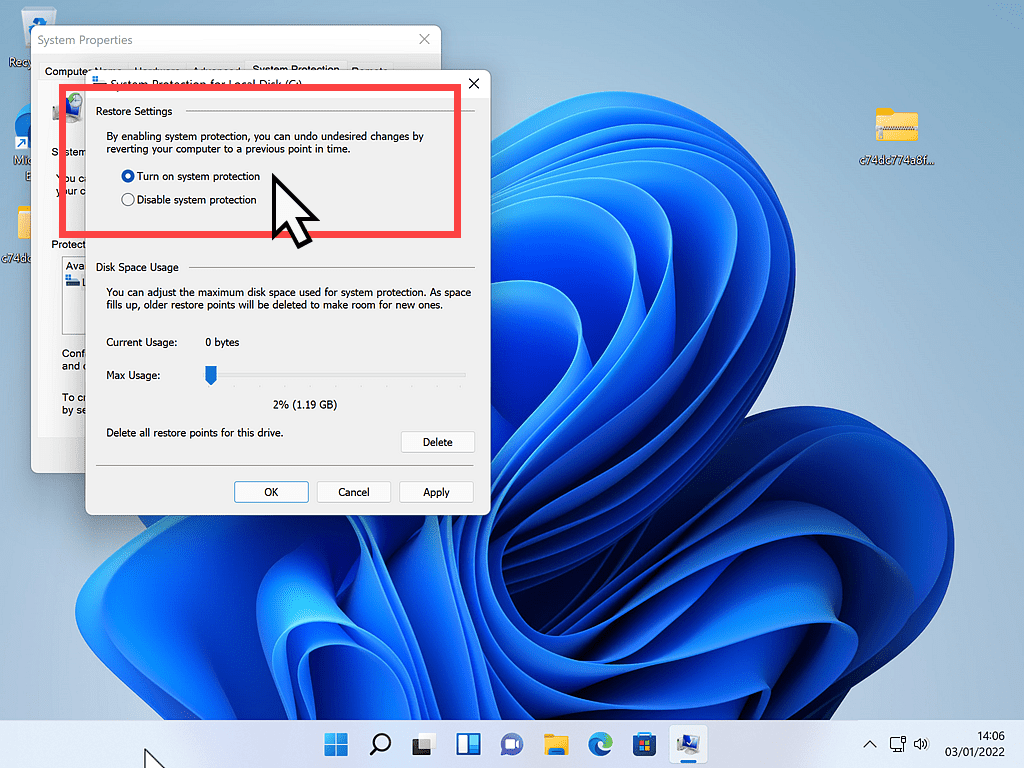
Disk Space.
As the allotted space is used up, older restore points are deleted to make way for newer ones. Although with most types of backup it’s a good idea to keep as many as possible, with System Restore things are a little different.
Restore points that are too old probably won’t actually work, or won’t work properly, when you come to use them.
For this reason, there’s not much point in having a large number of older restore points.
How To Create A New System Restore Point.
Restore points are created automatically by Windows itself. However you can create one manually at any time.
To manually create a restore point, open System Restore and then click the Create button.
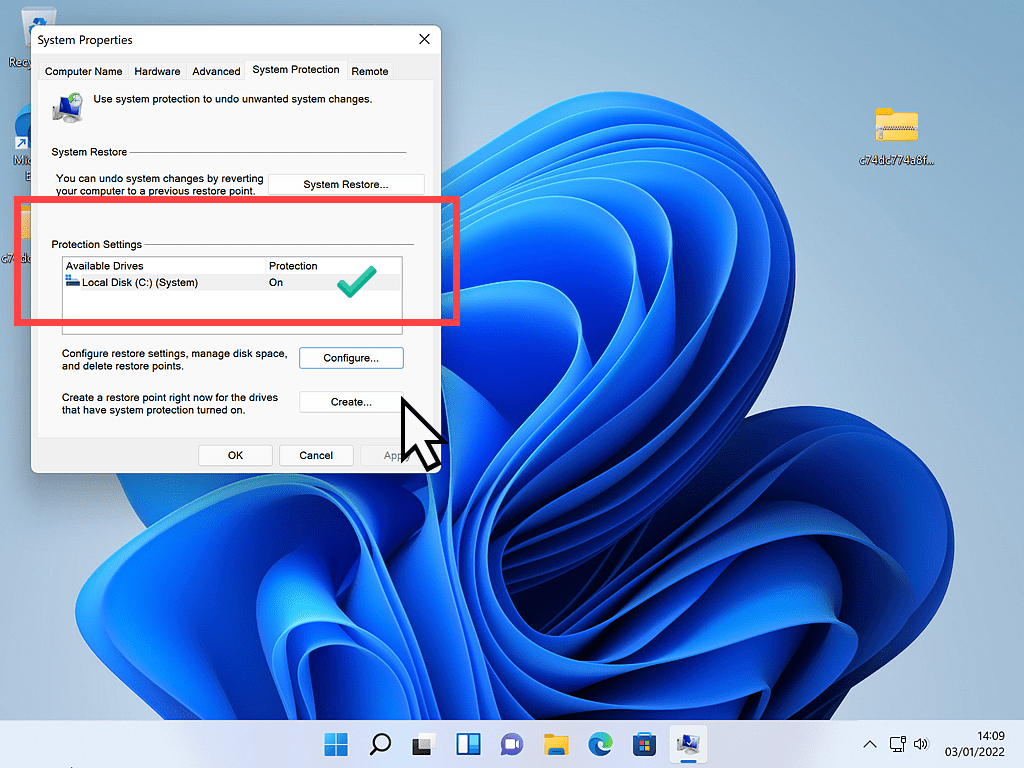
Type a name for your restore point into the box and then click the CREATE button.
You can name your restore point just about anything you like, but it’ll obviously help you later if you use something descriptive of what you’re actually doing or intending to do.
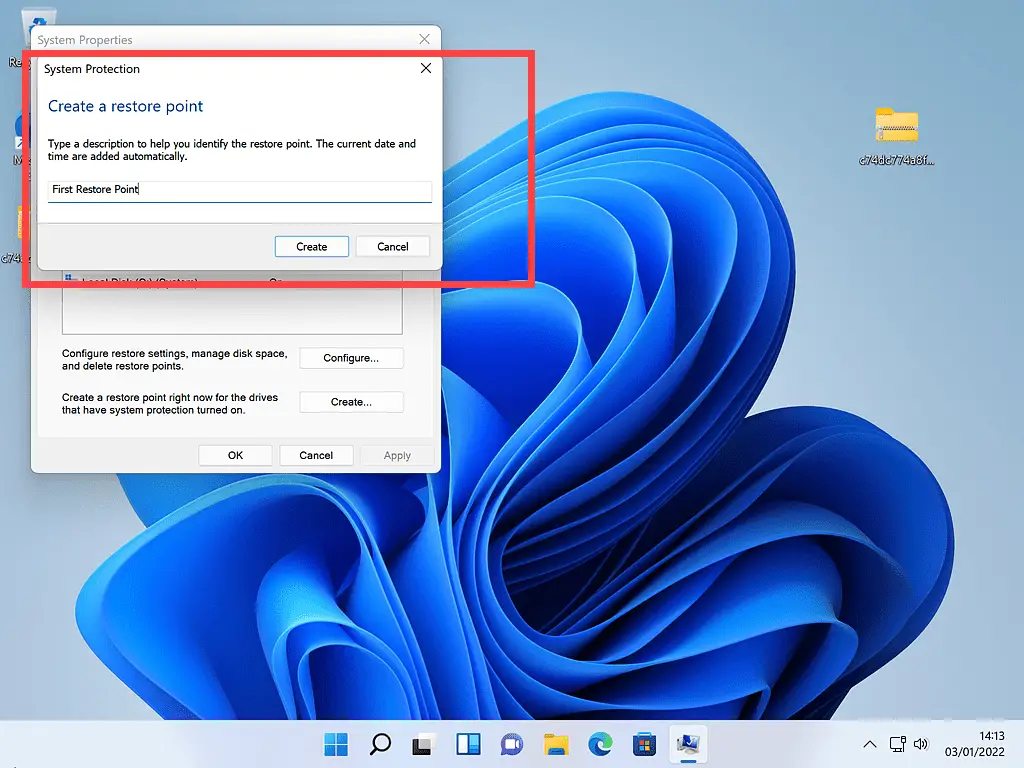
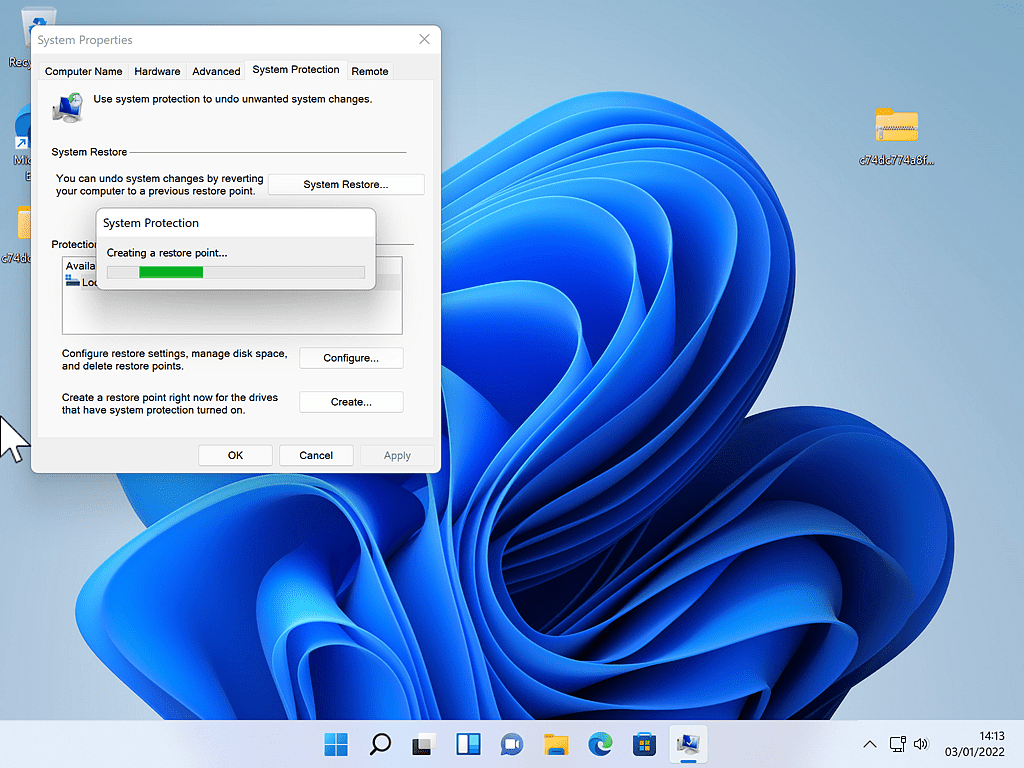
Windows will then create your first System Restore point.
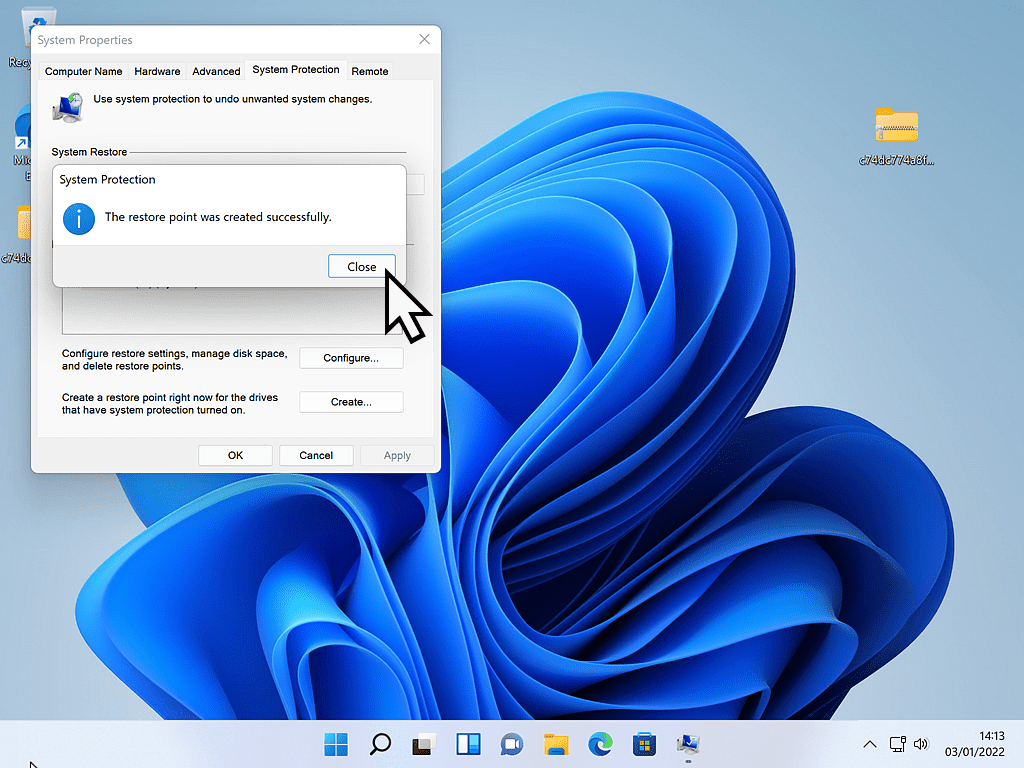
It may take a little time to complete, it all depends on your computer and how much you’ve got installed on it. But eventually, you’ll get a “created successfully” message.
Click the CLOSE button. After that, you can close the System Properties window by clicking the OK button.
How To Restore Your Computer To An Earlier Date.
When things have gone wrong with your computer, you can use System Restore to take your computer back to an earlier date. Roll it back to when it was working properly.
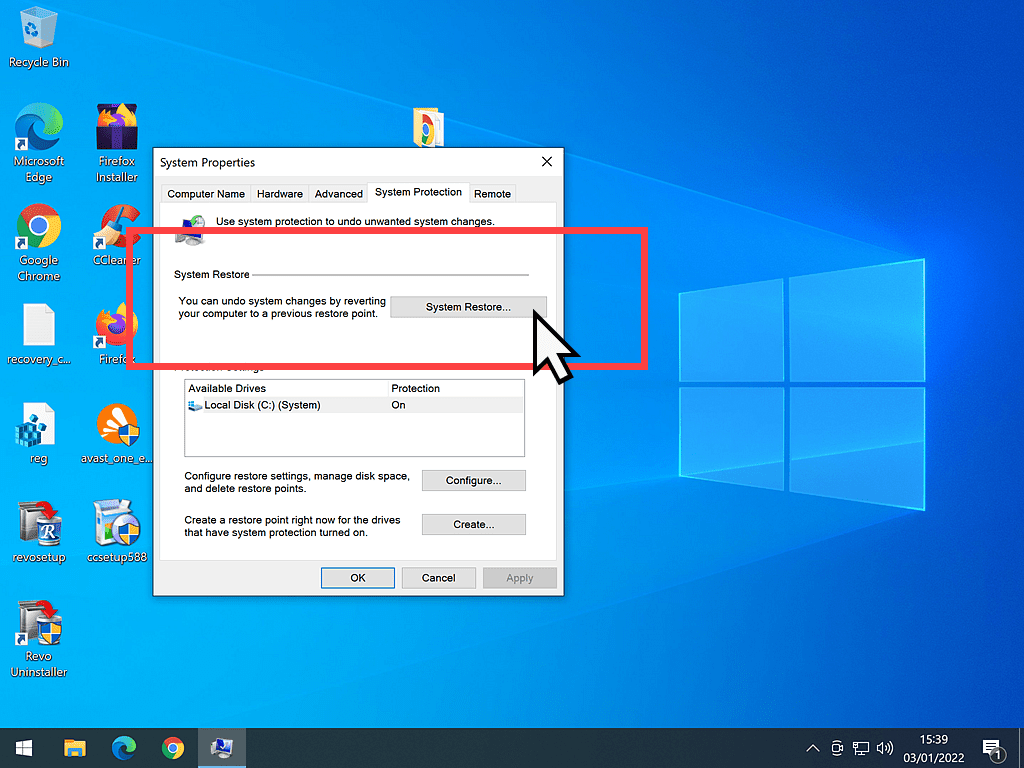
To restore the computer to an earlier time, open System Restore.
Then click the System Restore button.
Select A Restore Point.
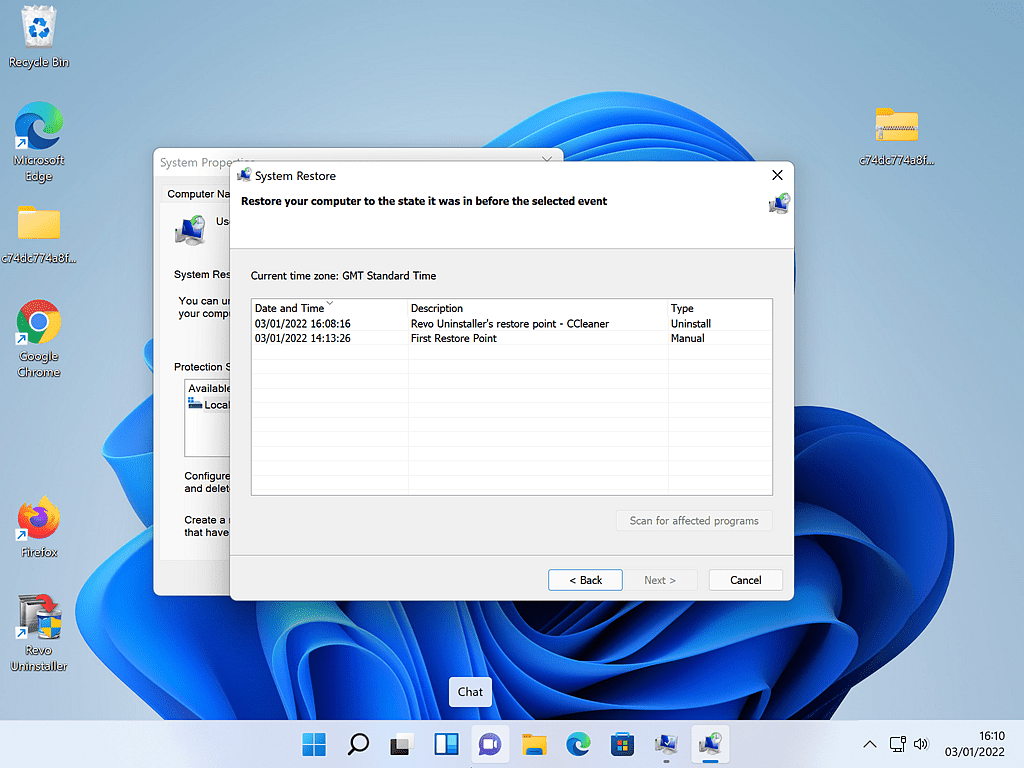
Next you’ll see a list of the available restore points on your computer. The list will include
- The time and date that the restore point was created
- A description of what created the point. It’s here that the name you gave to manually created restore points will appear.
- And finally the type field will give a little information as to what triggered the creation of the restore point.
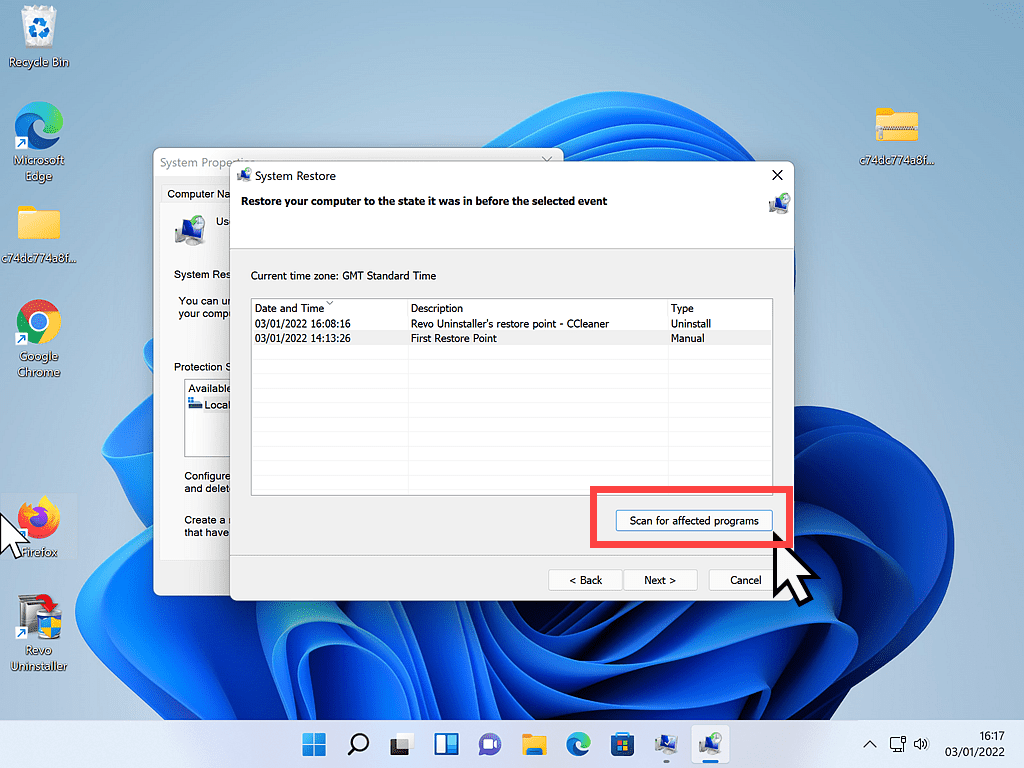
Scan for Affected Programs.
Select a restore point and then click the SCAN FOR AFFECTED PROGRAMS button to see what will be affected.
You don’t have to do this, but it’s a good idea to check that you’re not going to lose something that you actually want to keep.
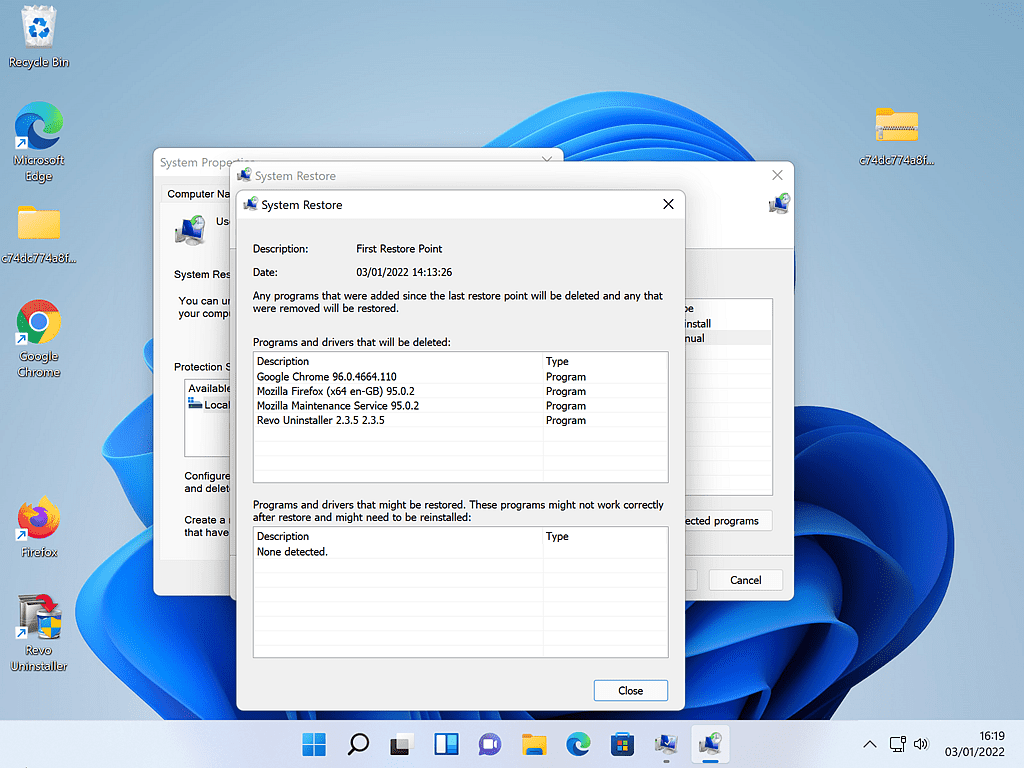
What you’ll see next is a list of programs that will affected by using that particular restore point.
The top half of the window details all the programs that will be deleted.
Whilst the bottom half details programs that will be restored.
When you’re ready, click the CLOSE button to continue.
A Couple Of Quick Notes.
Firstly, programs that are going to be deleted may not be totally deleted and programs slated to be restored may not be restored properly.
As I said right at the top of this guide, System Restore is not a replacement for a true backup. Its primary focus is the Windows registry and as such, it’s mainly the registry entries of these programs that will either be deleted or restored.
That means that the files and folders of programs deleted may still remain on your computer and restored programs might not work correctly.
Secondly, the scan is not always accurate. Sometimes it does get things wrong. Sometimes things will either disappear or reappear that you just weren’t expecting.
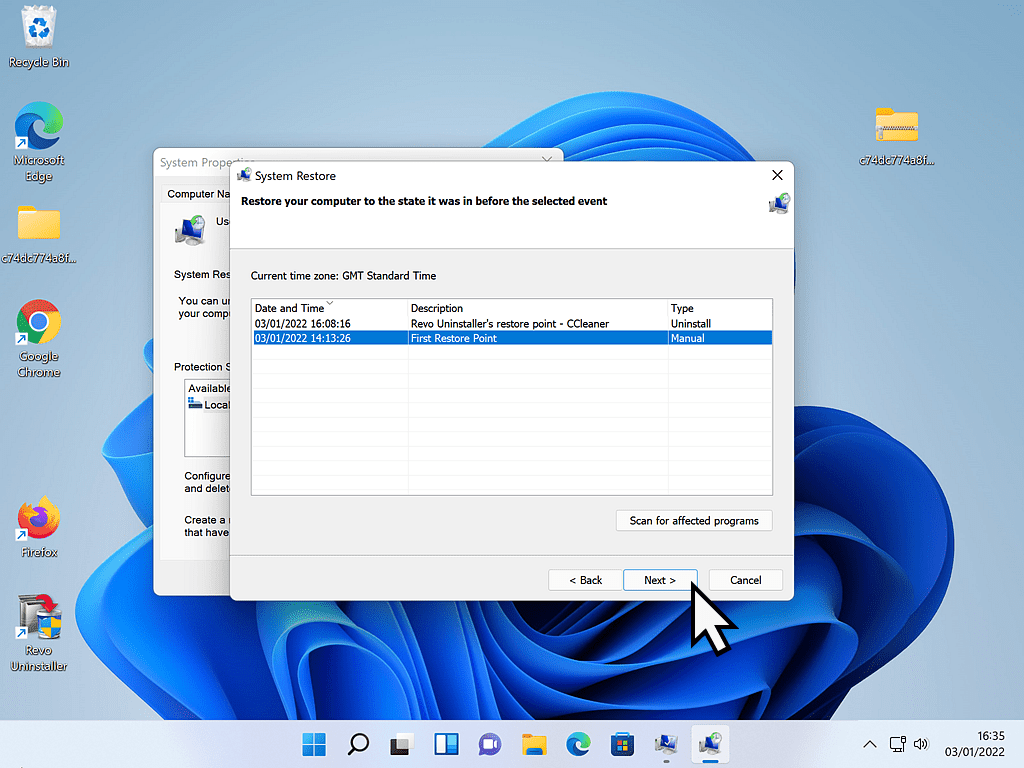
With all that taken on board, select the restore point that you want to return your computer to and then click the NEXT button.
Confirm Your Restore Point.
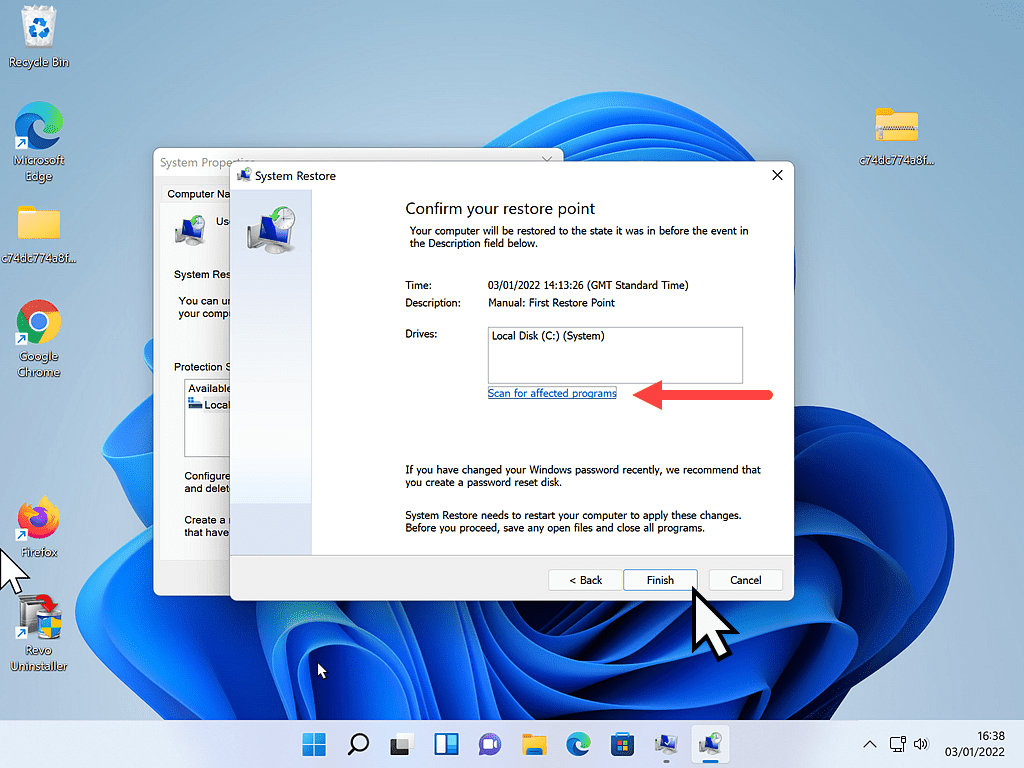
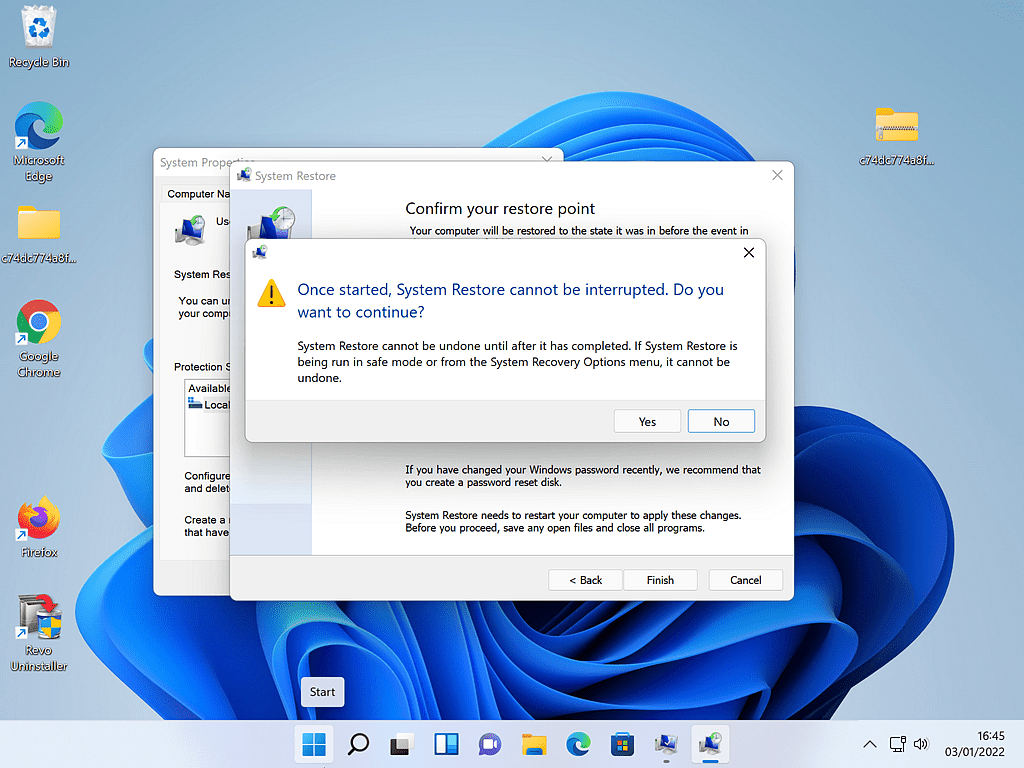
Next, you’ll see a confirmation window appear. The window details the restore point you’re using and the drive on which it is to be applied (normally it would be the C: system drive).
You’ll have just one more chance to scan for any programs that will be affected by the restore (assuming you didn’t do this earlier).
When you’re ready, click the FINNISH button.
A pop-up window will appear warning you that “Once started, System Restore cannot be interrupted. Do you want to continue”.
It means exactly what it says. Once its running you can’t turn off your computer, so be sure that you have enough time to allow it to complete.
Also, if you’re running your computer from a battery (ie, a laptop), be sure that it’s plugged into the power supply.
Ready, click the YES button.
Restoring Your System.
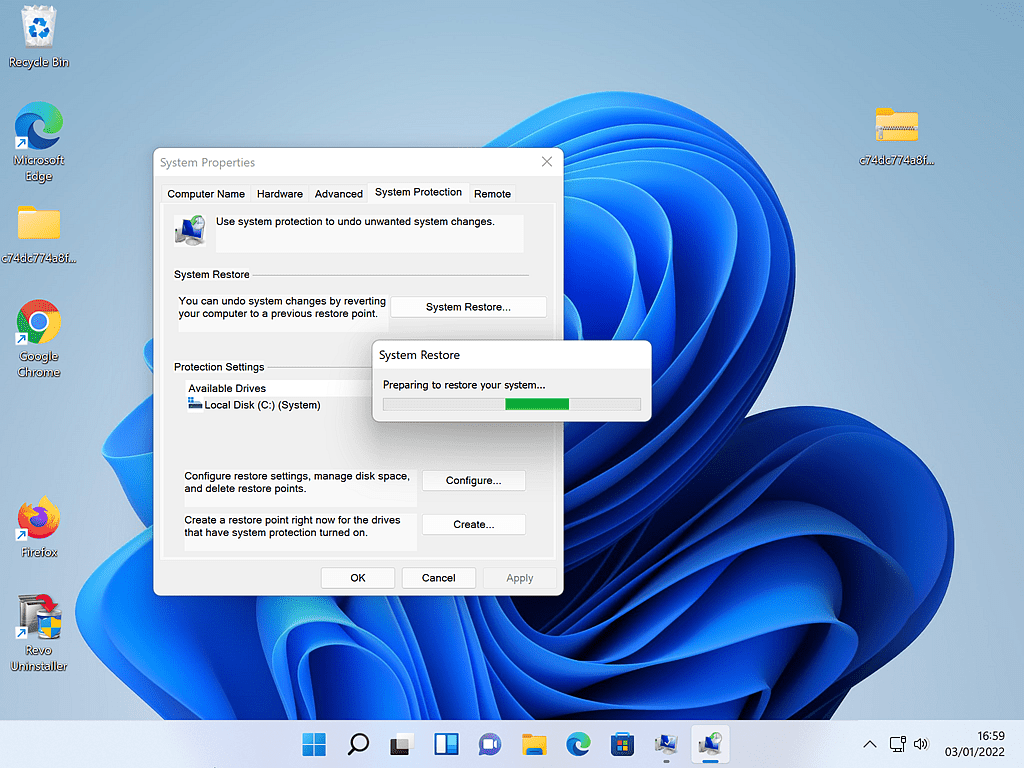
As System Restore goes about its work, you’ll see a series of screens, and your computer will restart.
There isn’t anything for you to do except make sure that your machine stays powered on.

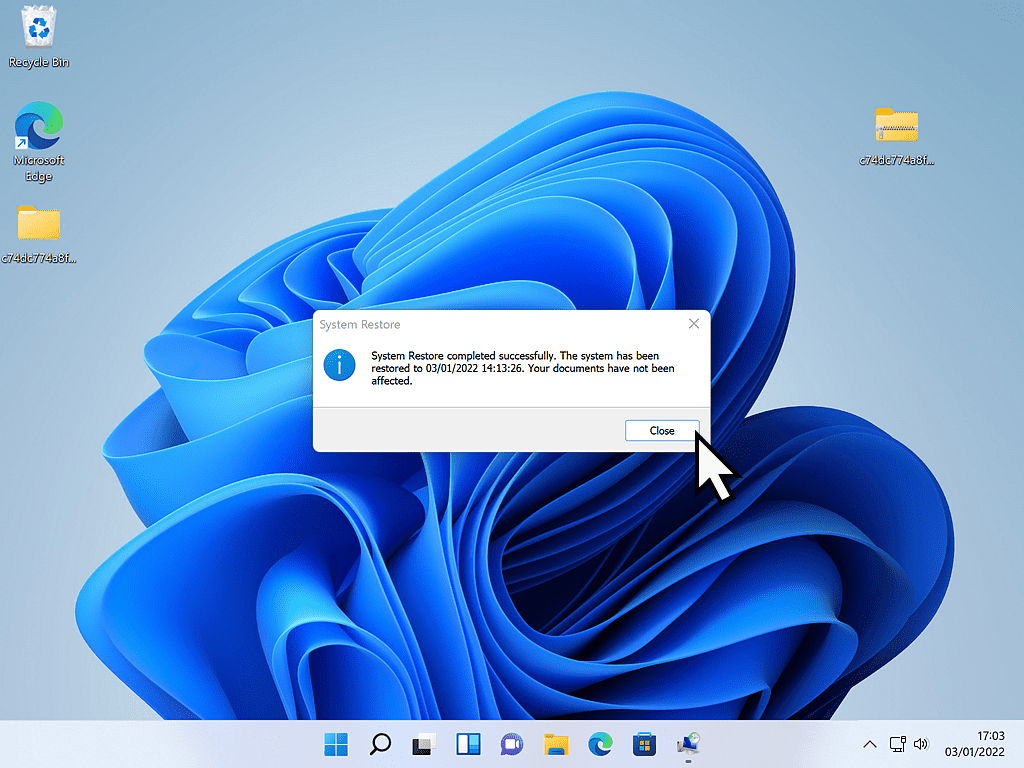
Finally, your computer will restart and you’ll see the message “System Restore completed successfully”.
Click the CLOSE button and you should be good to go.
Can You Undo A System Restore?
Yes, you can. Sometimes you’ll use System Restore and it won’t actually solve the problem you were trying to sort out. Equally it may also cause you further, unexpected problems.
In either case, you can use an older restore point or undo the present one to continue troubleshooting.
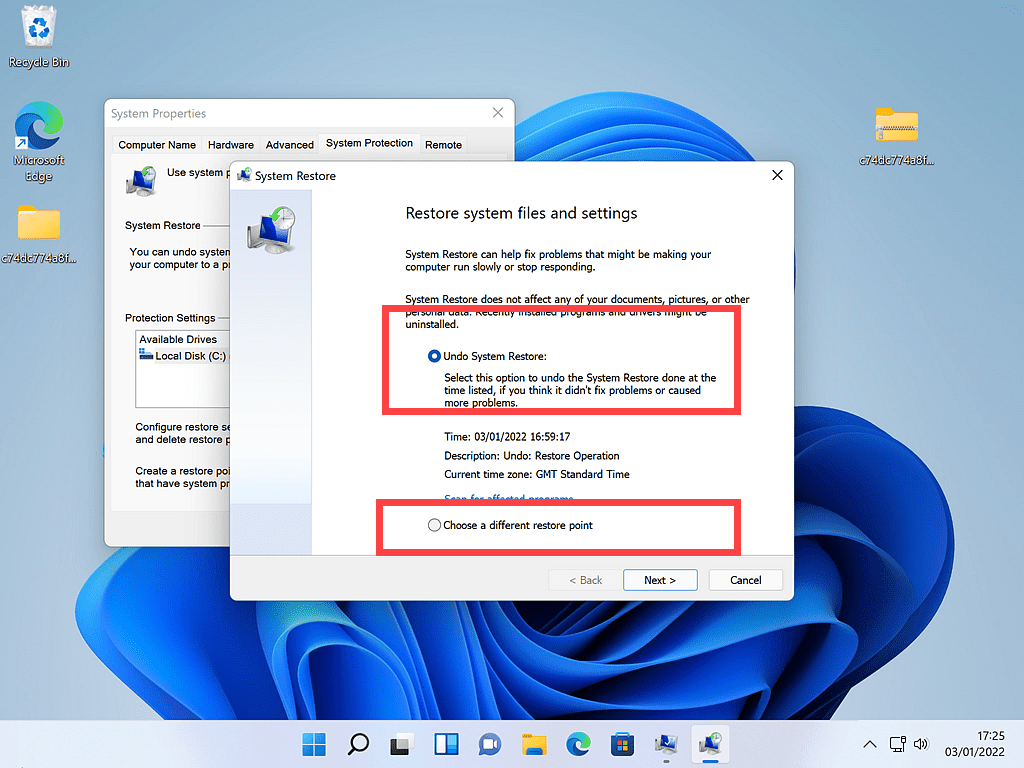
To undo a system restore, open the System Restore and click the system Restore button.
On the Restore System Files And Settings page, you’ll have the option to either :-
- Undo System Restore or
- Choose a different restore point.
Does System Restore Backup Personal Files And Folders?
No, absolutely not. System restore shouldn’t, and I repeat, shouldn’t, touch your personal files and folders (Documents, Pictures, Videos, etc).
Whether you’re creating a restore point or restoring to your computer from one, your files and folders should be unaffected, but, and there’s always a but, I have known things to disappear.
They shouldn’t, but sometimes they do. No backup solution is completely fool proof, so my advice is to, at the very least, save your most important stuff onto a USB stick before restoring your computer.
Does It Protect Against Ransomware?
This is important to note, no it doesn’t.
Ransomware will encrypt your personal files (Documents, Pictures, etc) and, as stated above, they aren’t included in a System Restore point.
The only real protection that you have against being infected by ransomware is to keep your antivirus updated and make regular backups of your computer.
Should You Enable System Restore On Other Drives?
If you’ve got more than one hard drive installed in your computer, should you turn System Restore on for those drives? Not normally.
System Restore is not a real backup solution. Its primary focus is on creating a snapshot of your Windows configuration, which would normally be your system drive (C: drive).
Keep Up With Home Computer Guides.
All the latest guides and articles published on At Home Computer delivered to your inbox.
No account needed, just add your email address.

