
Somebody sends you a screenshot of a phone number. An error message pops up with a code you need to search for. A menu at a restaurant is a photo rather than a page. A scanned letter arrives as a picture of a letter.
In every one of those, the words are right there on your screen, and you can’t select them. So you squint at them and type them out by hand, and get one digit wrong.
You don’t have to. Windows can read the words in a picture and put them on your clipboard, ready to paste. It’s free, it’s already on your PC, and once you’ve seen it work you’ll use it constantly.
I’ll show you three built in ways to do it, and one free add on for the jobs the built in ones can’t manage. If you’re on Windows 10, skip ahead to the PowerToys section, because the built in tools I cover first are Windows 11 only.
Nothing leaves your computer
All of the methods on this page do the reading on your own PC. Your picture isn’t uploaded to a website and nothing is sent to Microsoft. That matters if what you’re copying is a bank statement or a letter from the doctor.
Table of contents
- The Quickest Way to Copy Text From Your Screen
- How to Copy Text From a Screenshot You Already Have
- How to Copy Text From an Image Saved on Your PC
- PowerToys Text Extractor, for Windows 10 and for Tables
- Which One Should You Use?
- How to Copy Text Out of a Scanned PDF
- What It Can’t Do, and Why You Must Proofread
- Troubleshooting
- There’s No Text Button on the Snipping Tool Bar
- Text Actions Is Missing Too
- Windows Key + Shift + T Opens the Wrong One
- Nothing Happens at All When I Press It
- It Says No Possible OCR Languages Are Installed
- The Pack Is Installed but It Still Won’t Work
- It’s Reading the Wrong Language
- The Text Came Out as Nonsense
- The Line Breaks Are All in the Wrong Place
- I Can’t Find Scan Text in the Photos App
- Frequently Asked Questions
- Summary
The Quickest Way to Copy Text From Your Screen
If you’re on Windows 11, there’s a keyboard shortcut that does the whole job. No screenshot, no app to open first, nothing to save afterwards.
- Get the picture, the message or the web page on screen so you can see the words you want.
- Press Windows key + Shift + T.
- Drag a box around the words.
- Click Copy all text, or drag across just the part you want and copy that. The words are copied to your clipboard.
- Now open a text editor (like Notepad) or a word processor and press Ctrl + V to paste.
That’s it. The words are on your clipboard and there’s nothing to tidy up.
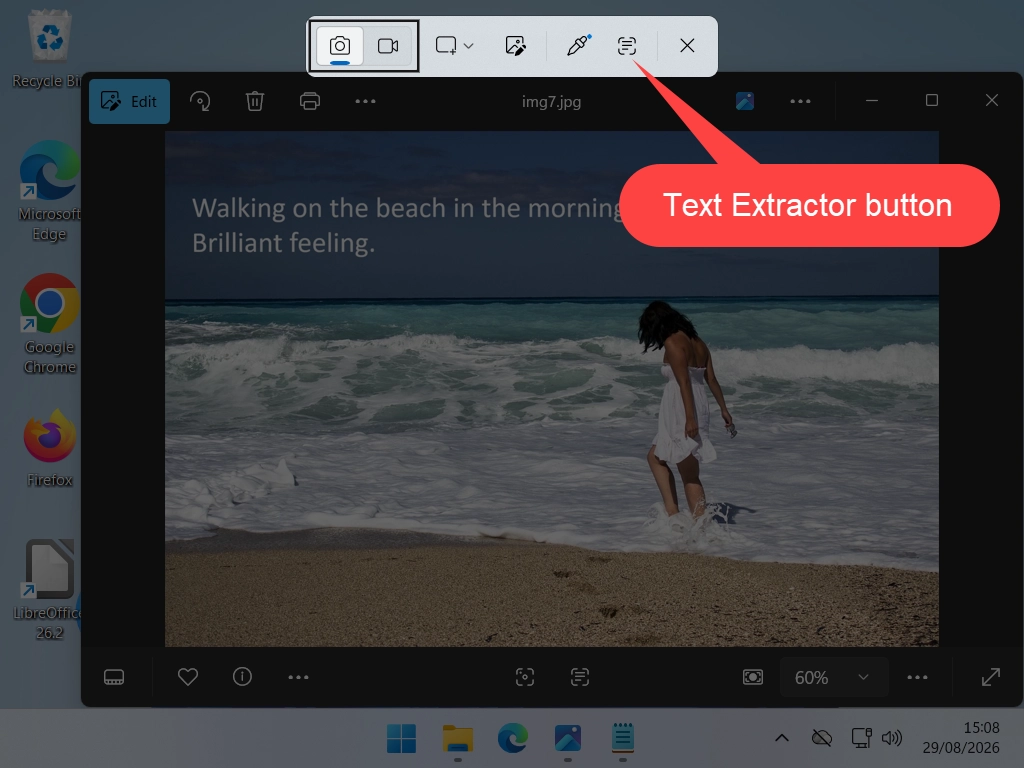
If you’d rather not remember another shortcut, there’s a second way into exactly the same thing. Press Windows key + Shift + S, the one you already use for screenshots, and click the text extractor button on the bar that appears along the top. Select the text area and then click Copy all text on the toolbar.
If you only want a couple of lines out of a long block, don’t drag a tight box around them. Grab the whole area, then select the lines you want from the text it finds. Reading a wider area usually gives the software more to work with and a better result.
How to Copy Text From a Screenshot You Already Have
Sometimes the picture already exists. Somebody has emailed you a screenshot, or you took one earlier and saved it.
Snipping Tool will read that too, and this version gives you a couple of extras the quick method doesn’t.
- Right click the picture file and choose Open with, then Snipping Tool.
- Click Scan Text. Every word it can read gets highlighted.
- Click Copy all text to take the lot.
- Or drag across just the words you want, right click them and choose Copy text.
- Paste wherever you need it with Ctrl + V.
The same buttons appear on any screenshot you’ve just taken, before you save or close it. So if you’ve grabbed something with a normal screenshot and then realised you want the words out of it, you don’t need to start again.
Hiding Email Addresses and Phone Numbers Before You Share
This is the bit I like, and almost nobody mentions it.
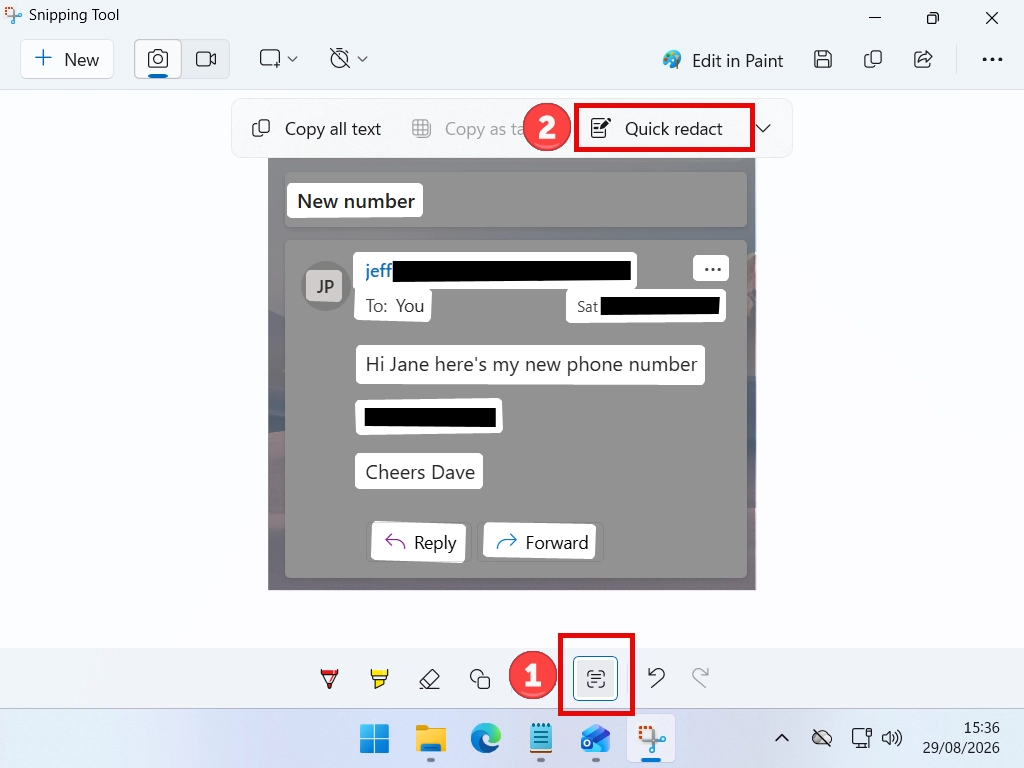
Once Text actions is switched on, there’s a Quick redact button next to it. Click it and Windows blacks out every email address and phone number it can find in the picture, automatically.
There’s a small arrow beside it if you want to choose, email addresses only, phone numbers only, or both.
If you’ve ever posted a screenshot of an email to a forum and then panicked about what else was in the picture, that button is worth knowing about on its own.
Check it, don’t trust it
Quick redact finds things that look like an email address or a phone number. It won’t find a name, an account number, a postcode or a date of birth. Have a proper look at the picture before you send it anywhere.
How to Copy Text From an Image Saved on Your PC
If the picture is a photo or an image file sitting in a folder, the Photos app does the job without you having to snip anything.
- Double click the picture to open it in Photos.
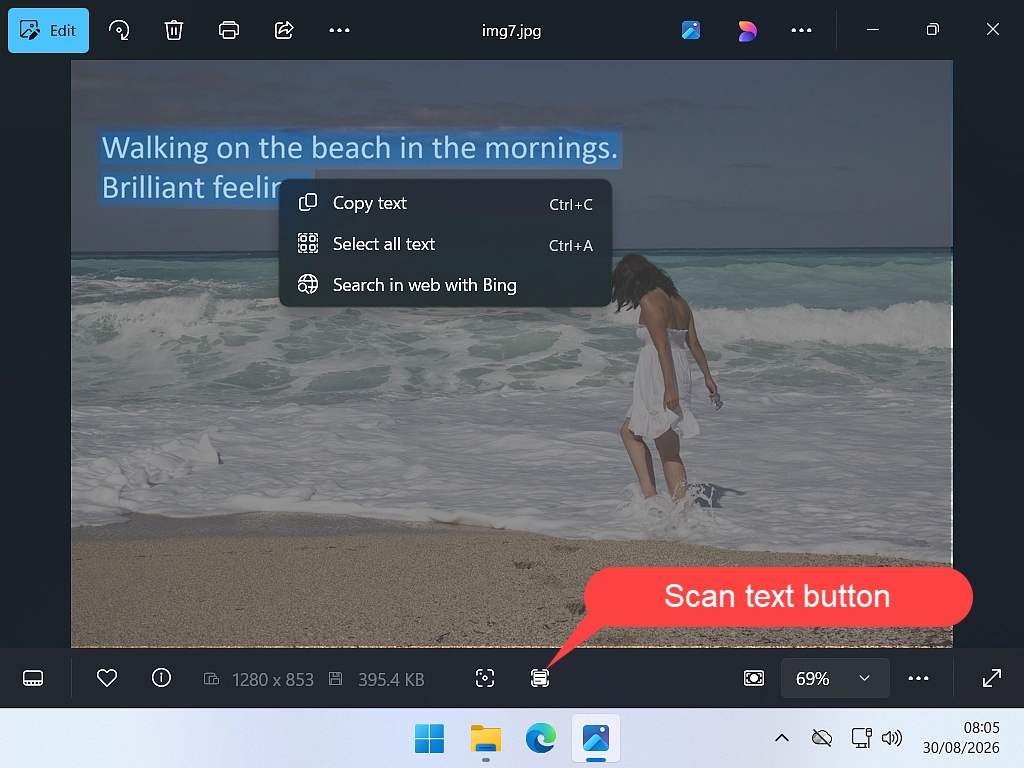
- Click Scan text along the bottom of the window. It’s the small button with lines of writing on it, next to the visual search button.
- Photos will highlight everything it can read.
- Right click and choose Select all text, then right click again and choose Copy text.
This is the one to use for a photo you’ve taken of a document, a sign or a page of a book. You can zoom into the picture first if the writing is small, and the text stays selectable while you zoom.
My advice is to use Photos when the picture is a file, and Snipping Tool when the words are just on your screen somewhere. Neither is better, they’re for different jobs.
PowerToys Text Extractor, for Windows 10 and for Tables
Microsoft PowerToys has its own version of this, called Text Extractor. It came first, and for years it was the only way to do this on a Windows PC. Windows 11 has since caught up, and the built in one is now good enough for most people.
There are still three good reasons to have it:
- You’re on Windows 10. The Photos app in Windows 10 works exactly the same as Windows 11 allowing you to extract text from images, but the Snipping Tool is missing. Instead Windows 10 has Snip & Sketch, which doesn’t extract text.
- You want to copy a table. Text Extractor can keep the rows and columns so it lands properly in a spreadsheet. The built in tool can’t.
- You copy codes and serial numbers. It can strip out the line breaks that stop a pasted code working.
If none of those three is you, and you’re on Windows 11, you already have everything you need. Skip this section with a clear conscience.
Text Extractor is one of the tools inside Microsoft PowerToys, a free bundle of extras made by Microsoft themselves. It isn’t a third party download and there’s nothing to pay.
Getting Text Extractor
You’ll need PowerToys on your PC first. I’ve written a separate guide on how to install PowerToys, including whether it’s safe, which takes about five minutes.
Once it’s installed:
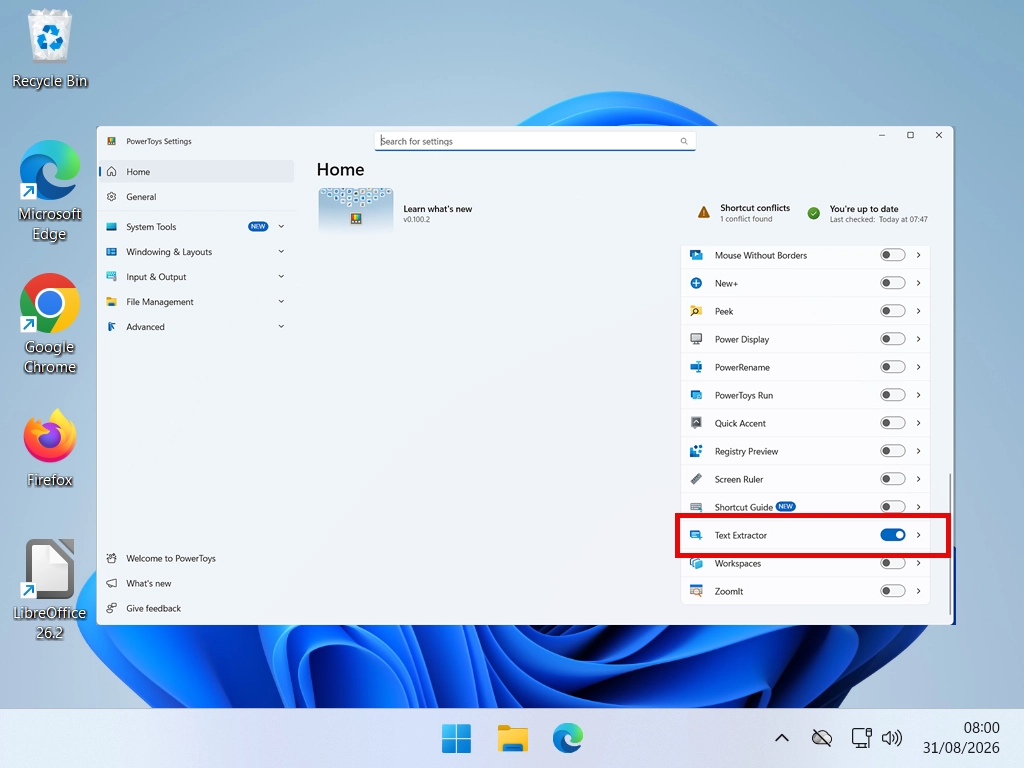
- Open PowerToys Settings.
- Find Text Extractor in the list down the left hand side.
- Turn the Enable Text Extractor switch on.
That’s the whole setup. There’s no window to keep open and nothing sits in your way.
Using It
- Get the words on screen.
- Press Windows key + Shift + T. The screen dims.
- Hold the left mouse button down and drag a box around the words.
- Let go.
The text is on your clipboard and the dimming disappears. Paste it with Ctrl + V.
If you start dragging and the box is in the wrong place, hold Shift and the box moves instead of resizing. Let go of Shift and you’re back to resizing. Press Esc if you want to give up on the whole thing.
Copying a Table Into a Spreadsheet
Here’s the trick that makes Text Extractor worth having even if you’re on Windows 11 with everything built in.
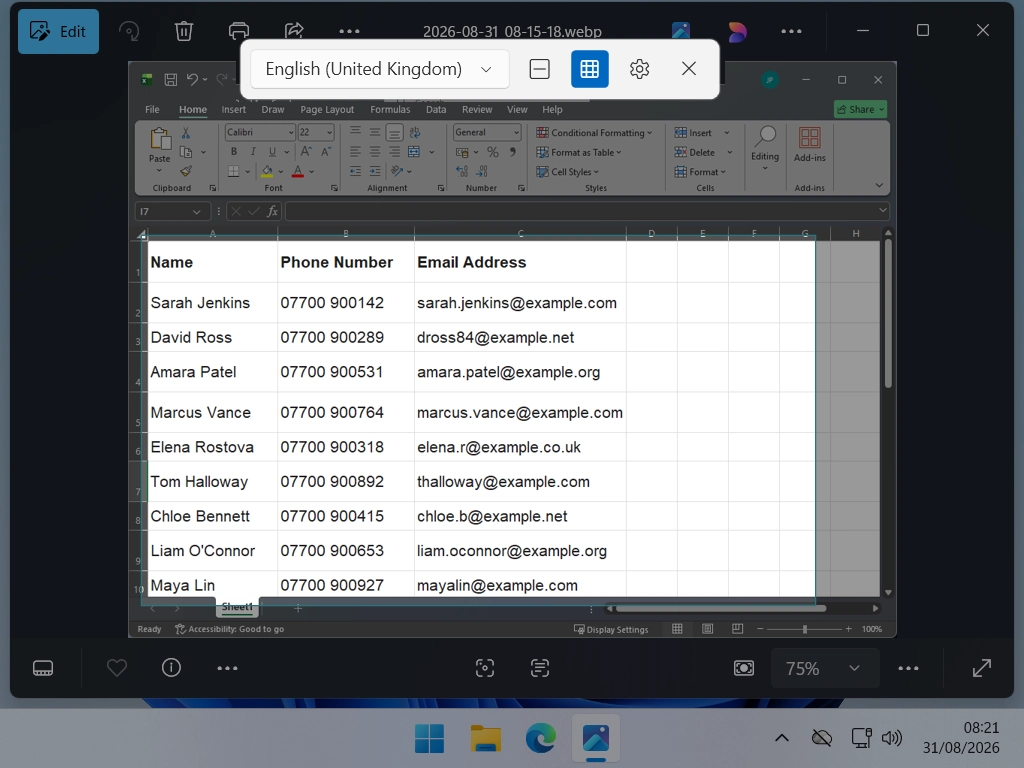
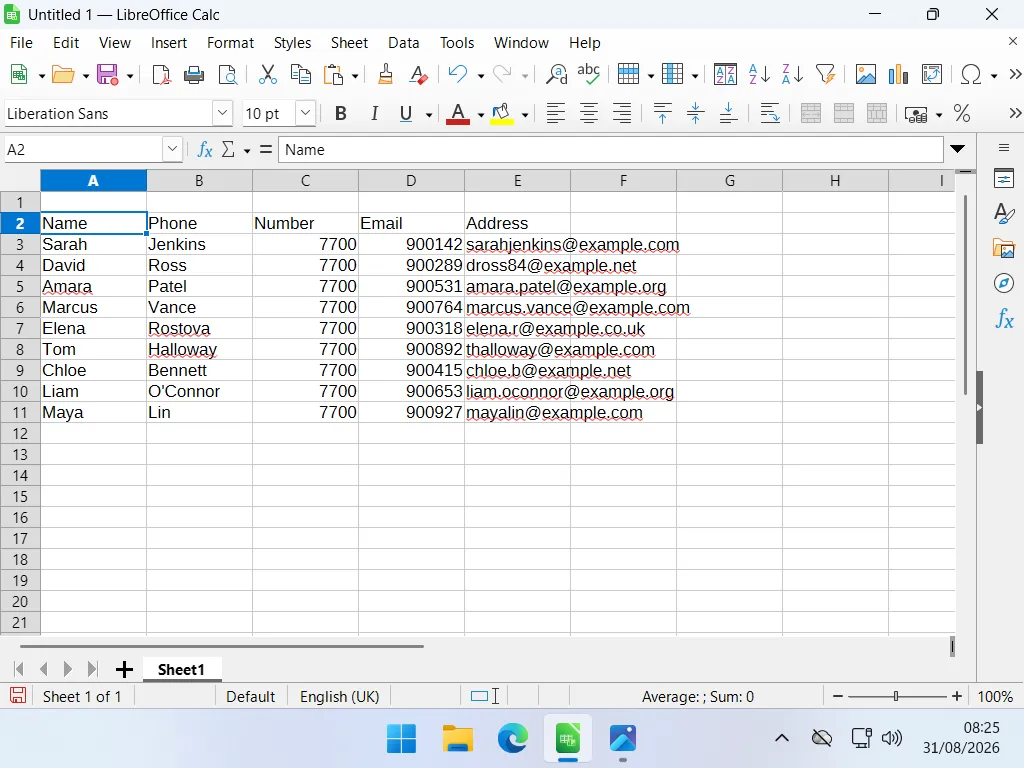
Ordinary text copying flattens a table into a jumble. Rows run into each other, columns disappear, and you spend twenty minutes sorting it out.
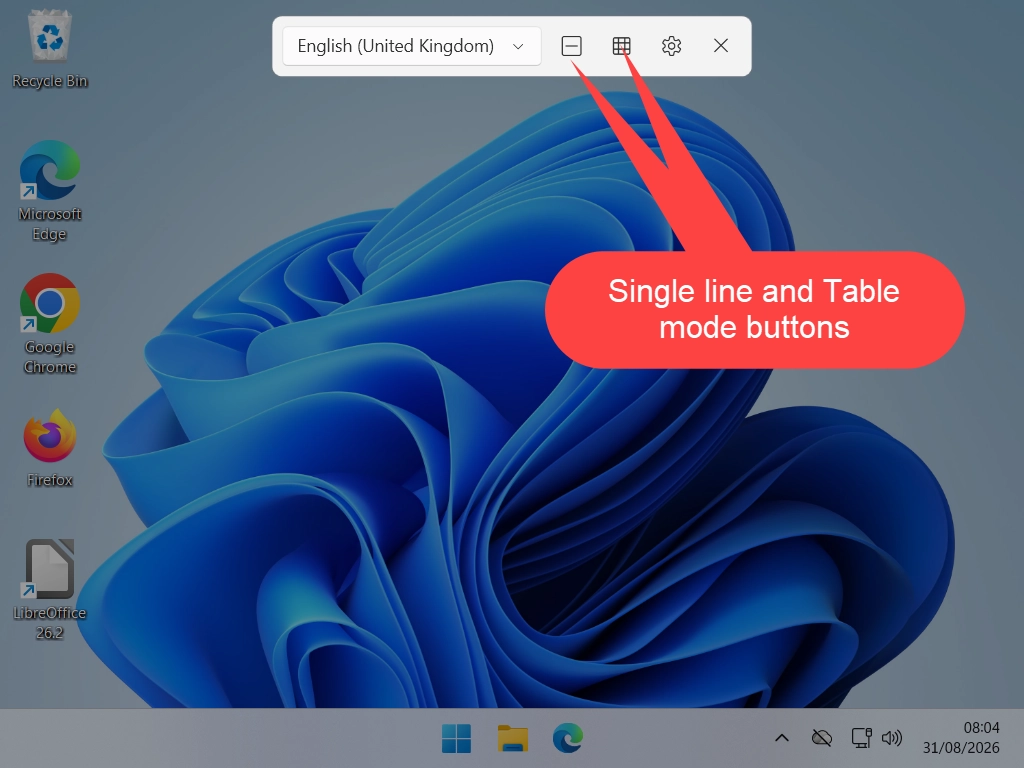
Text Extractor has a Format result as table mode. Switch it on before you drag your box and it does its best to keep the rows and columns, so what you paste into a spreadsheet lands in separate cells rather than one long line.
Useful for a price list in a photo, a spec table in a paused video, or a statement you only have as a picture.
Two things to know. It’s a best effort, not magic, so check the result before you rely on it. And it forgets, the setting switches itself back off after each grab, so you have to turn it on again every time.
Copying a Serial Number or a Long Code
The opposite problem. A licence key or a serial number printed across two lines comes out with a line break in the middle of it, and then it doesn’t work when you paste it in.
There’s a Format result as a single line option on the same toolbar. It joins everything into one continuous line with the breaks taken out, which is exactly what you want for a code.
Which One Should You Use?
Four methods is three more than most people need, so here’s the short version.
- On Windows 10: To grab text from an image use the Photos app, otherwise use PowerToys Text Extractor. It’s the only one of the four that works. Everything else on this page needs Windows 11.
- Words on your screen, right now: Windows key + Shift + T. Nothing to install, nothing to open first.
- A picture file in a folder: open it in Photos and use Scan text.
- A screenshot you want to share with the personal bits hidden: Snipping Tool, Text actions, then Quick redact.
- A table you want in a spreadsheet, or a serial number split across two lines: PowerToys, it’s the only one that can keep the table style or remove dashes between numbers.
Windows key + Shift + T covers nearly everything, and I reach for Snipping Tool’s Text actions when I want to tidy a picture up before sending it.
You can have both PowerToys and the built in tools installed together since it is a Microsoft program and there shouldn’t be any compatibility issues.
How to Copy Text Out of a Scanned PDF
This one catches people out, so it’s worth explaining what’s actually going on.
There are two completely different things both called a PDF. One is a proper document, where the text is text, and you can select it and copy it in the normal way. The other is a picture of a document, which is what you get when something has been scanned. It looks identical on screen, but there’s nothing to select.
Try dragging your mouse across a line of it. If nothing highlights, it’s a picture, and you’re in the right place.
A Page or Two
Open the PDF, zoom in until the writing is comfortably readable, and use any method on this page. Windows key + Shift + T is the quickest. Do one page at a time.
Zooming in first genuinely helps. The bigger and clearer the letters are on screen, the fewer mistakes you get back.
A Whole Document
Twenty pages of that would be miserable. For anything longer than a few pages, use Google Drive instead. It’s free and it reads the whole document in one go.
- Upload the PDF to Google Drive.
- Right click it in Drive and choose Open with, then Google Docs.
- Drive reads every page and hands you a document with the text in it.
The layout comes out rough, and pictures inside the document get shuffled about. But the words are all there and you can select every one of them, which is the hard part done.
Scanning it yourself?
If you’re about to scan a letter and you know you’ll want the words out of it, scan it at a higher quality than you think you need. A crisp scan reads almost perfectly. A grey, low quality one is where all the mistakes come from.
My guide to Windows Fax and Scan walks through the settings if you’re not sure.
What It Can’t Do, and Why You Must Proofread
All of this works by looking at the shapes on screen and guessing which letters they are. It’s called OCR, and it’s a guess, a very good one, but a guess all the same.
Microsoft say so themselves in their own documentation, and they’re right. Always read back what you pasted. Don’t just trust it blindly.
The mistakes are predictable, which makes them easy to catch once you know what you’re looking for. Numbers and letters that look alike are where nearly all of them happen:
- Zero and capital O
- One, lower case L and capital I
- Five and capital S
- Eight and capital B
- rn read as m
Which is exactly why a bank account number, a licence key or a phone number needs checking digit by digit, and a paragraph of ordinary English usually doesn’t.
Things it will struggle with, whichever method you use:
- Handwriting. Don’t bother, none of these tools are built for it.
- Fancy or decorative fonts. Logos, headings and anything joined up.
- Photos taken at an angle. A photo of a page taken from the side reads badly. Take it square on.
- Pale text on a pale background, or white writing over a busy photo.
- Small or blurry writing. Zoom in before you grab it, every time.
Zooming in is the single most useful habit here. Most bad results are just small letters, and making them bigger on screen before you grab them fixes it.
Troubleshooting
There’s No Text Button on the Snipping Tool Bar
Open the Microsoft Store, go to Library, and update Snipping Tool. It’s updated through the Store rather than with Windows itself, so it can sit years out of date on a PC that’s otherwise fully up to date.
The same update brings the Windows key + Shift + T shortcut, so if one is missing the other usually is too.
If it’s still not there after updating, take a screenshot the normal way and use Text actions in the editor instead. Same result, one extra click.
Text Actions Is Missing Too
Text actions needs Snipping Tool version 11.2308.33.0 or newer, and it needs Windows 11.
Being honest with you, some people have a newer version than that and still don’t see the button. Microsoft rolls features out gradually and it doesn’t always land everywhere at once.
If that’s you, don’t waste an afternoon on it. Install PowerToys and use Text Extractor, it works on every Windows 11 and Windows 10 PC regardless.
Windows Key + Shift + T Opens the Wrong One
If you wanted PowerToys Text Extractor and got the Snipping Tool, that’s expected. Both use that shortcut and the Snipping Tool takes priority.
Give PowerToys its own shortcut instead. There’s a section further up that walks through it.
Nothing Happens at All When I Press It
On Windows 10, or if you’ve given PowerToys its own shortcut and that one does nothing, work through these in order:
- Check PowerToys is actually running. Look for its icon in the tray by the clock, and click the little arrow to see the hidden ones.
- Open PowerToys Settings and check the Enable Text Extractor switch is on. It’s off until you turn it on.
- Check nothing else has claimed your new shortcut. Screen recorders and note taking apps are the usual culprits. Change it to something else and try again.
If PowerToys isn’t running at all, set it to start with Windows. Otherwise you’ll be doing this again after every restart.
On Windows 11, if nothing happens when you press Windows key + Shift + T and you haven’t got PowerToys, your Snipping Tool is out of date. Update it in the Microsoft Store.
It Says No Possible OCR Languages Are Installed
Windows reads text using a language pack, and if there isn’t one for your language then there’s nothing to read with.
This is more technical than most things on this site, but it’s just copying and pasting. Take it slowly and you’ll be fine.
Click Start, type Windows PowerShell, right click it and choose Run as administrator. It has to be Windows PowerShell, not the newer PowerShell 7.
To see which packs you could install, paste this in and press Enter:
Get-WindowsCapability -Online | Where-Object { $_.Name -Like 'Language.OCR*' }You’ll get a list. Anything marked Installed is ready to go. Anything marked NotPresent is available but not on your PC yet.
To install British English, paste in these two lines:
$Capability = Get-WindowsCapability -Online | Where-Object { $_.Name -Like 'Language.OCR*en-GB*' }
$Capability | Add-WindowsCapability -Online
For American English, swap en-GB for en-US. Give it a few minutes, it looks like nothing is happening for a while.
Then restart PowerToys and try again.
The Pack Is Installed but It Still Won’t Work
There’s an odd one that catches out anyone whose Windows isn’t on the C drive.
Text Extractor looks for the language files on C, no matter where Windows actually lives. So if your Windows is on D, it finds nothing and tells you no languages are installed even though they are.
The fix is to copy the folder across. Open File Explorer, go to the drive Windows is on, open the Windows folder and find the folder called OCR. Copy it, then paste it into the Windows folder on your C drive.
Almost nobody hits this, because almost everybody has Windows on C. If that’s you, ignore this entirely.
It’s Reading the Wrong Language
Text Extractor uses whatever your Windows keyboard language is set to, which is usually right but not always.
There’s a Preferred language setting in PowerToys Settings under Text Extractor, and a language dropdown on the toolbar when you’re actually grabbing something. Either will do. You can only pick a language you’ve got a pack installed for.
The Text Came Out as Nonsense
Nine times out of ten the writing was too small on screen. Zoom in on the picture first, then grab it. That alone fixes most of it.
If it’s still poor, look at what you’re asking it to read. Handwriting, a fancy font, a photo taken at an angle or pale writing on a pale background will all give you rubbish, and no setting will fix it.
The Line Breaks Are All in the Wrong Place
Perfectly normal. It keeps the lines where they were in the picture, so text from a narrow column comes out chopped into short lines.
For a code or a serial number, use the single line option on the Text Extractor toolbar and the breaks come out.
For a paragraph you’re pasting into a document, it’s quicker to just tidy it up afterwards.
I Can’t Find Scan Text in the Photos App
Two things to check. Update Photos in the Microsoft Store, same as Snipping Tool. And make sure the window is wide enough, because the buttons along the bottom get hidden when the window is narrow. Maximise it and have another look.
Frequently Asked Questions
Q1. Is there a free way to copy text from a picture in Windows?
Yes, and you almost certainly already have it. Windows 11 can do it in three different places, the Snipping Tool, the Photos app and the screen capture bar, with nothing to install and nothing to pay. On Windows 10 you need Microsoft PowerToys, which is also free and also made by Microsoft.
Q2. How do I copy text from an image without any software?
Press Windows key + Shift + T, drag a box around the words and choose Copy all text. That uses the Snipping Tool that comes with Windows 11, so there’s nothing extra to download and nothing to open first.
Q3. Can I copy text from a picture on Windows 10?
Yes, use the Photos app, but you’ll need the very latest version. Install Microsoft PowerToys and use Text Extractor, press Windows key + Shift + T and drag a box around the words.
Q4. Does it work without an internet connection?
Yes. Every method on this page reads the picture on your own PC. Nothing is uploaded and nothing is sent to Microsoft, so it works offline and it’s safe to use on private documents. The one exception is the Google Drive method for long scanned PDFs, which does upload the file.
Q5. Can I copy text from a video?
Yes. Pause the video on the frame you want, then grab the text the same way you would from anything else on screen. It works on YouTube, on a video call and on a recording you’ve been sent.
Q6. Why is some of the copied text wrong?
The software is recognising letter shapes, so it occasionally guesses wrong. Zeros get read as capital O, ones as lower case L, fives as capital S. Zoom in on the picture before you copy it and you’ll get far fewer mistakes, but always read back anything with numbers in it.
Q7. Can I copy text out of a scanned PDF?
Yes. For a page or two, zoom in and grab it off the screen like any other picture. For a longer document, upload it to Google Drive and open it with Google Docs, which reads the whole thing in one go and gives you a document you can edit.
Q8. Is PowerToys Text Extractor safe to install?
Yes. PowerToys is Microsoft’s own free add on for Windows, not a third party download. Get it from the Microsoft Store or Microsoft’s official GitHub page and avoid any other site offering it.
Q9. Can it read handwriting?
No, not reliably. All of these tools are built for printed text. A neatly printed capital might come through, but joined up handwriting will not.
Q10. Where does the text go after I copy it?
Onto your clipboard, the same place anything else goes when you copy it. Press Ctrl + V to paste it wherever you want. If you’re copying several things one after another, turn on clipboard history first and press Windows key + V to get at all of them.
Summary
Typing out words you can already see on screen is one of those jobs the computer should have taken off you years ago. Now it has.
On Windows 11, press Windows key + Shift + T and drag a box around the words. One shortcut, one drag, and they’re on your clipboard. For a picture file in a folder, open it in Photos and click Scan text.
On Windows 10 none of that exists, so install PowerToys and use its Text Extractor on the same shortcut. It’s free and it’s Microsoft’s own.
Whichever you use, zoom in before you grab it and read back anything with numbers in it. Those two habits are the difference between this being useful and being annoying.
Now that the words are on your clipboard, you might want a look at copying and pasting text in Windows if you’re not confident with that side of it.
Reset a Forgotten Windows Password
You’ve forgotten your Windows password and can’t remember the answers to the security questions. In effect, you’re locked out of your own computer.

In this guide I’ll show you how to reset the Windows password without losing any data.
You can find this and other related step by step guides in – At Home Computer Guides