
Windows doesn’t have an easy way to encrypt a single folder. You could use BitLocker on Windows Pro, or Device Encryption on some Home PCs, but they both encrypt the whole drive.
To lock one folder and the files in it with a password, you need a program such as VeraCrypt. It’s free, open source, and works on Windows 11 and Windows 10, Home or Pro.
VeraCrypt creates an encrypted virtual drive, a vault, on your PC. Anything you put in it is encrypted automatically, and it only opens with the password you set.
The Short Version
- Download VeraCrypt from veracrypt.io and install it.
- Click Create Volume, choose Create an encrypted file container and Standard VeraCrypt volume.
- Pick where to save the vault, set a size and a password, then move your mouse until the bar turns green and click Format.
- To open it: Select File, pick a drive letter, click Mount and type the password.
- To lock it: click Unmount.
What Is VeraCrypt?
VeraCrypt is free encryption software for Windows, Mac and Linux. It’s the successor to TrueCrypt, which was abandoned in 2014.
It’s open source, so anyone can check how it works, and it has been independently audited twice: by Quarkslab in 2016, and by Fraunhofer for the German government’s security agency (BSI) in 2020. The problems the first audit found were fixed straight away.
There’s no catch and nothing to pay. It’s about as trusted as free encryption gets.
Folders, Volumes and Containers
In VeraCrypt a folder is called a container or a volume. There are a few technical differences, but to you and me they’re the same thing.
Download and Install VeraCrypt
Download VeraCrypt from its official site: https://veracrypt.io/en/Downloads.html
- Download the latest EXE Installer for Windows.
- Run the installer from your browser, or from wherever you saved the download.
- Choose Install and follow the steps.
- When the installation has finished, launch VeraCrypt.
Only Download It from veracrypt.io
Search for “VeraCrypt download” and you’ll find plenty of other sites offering it, some of them in adverts. Stick to the official site so you know you’re getting the real thing.


How to Encrypt a Folder with VeraCrypt
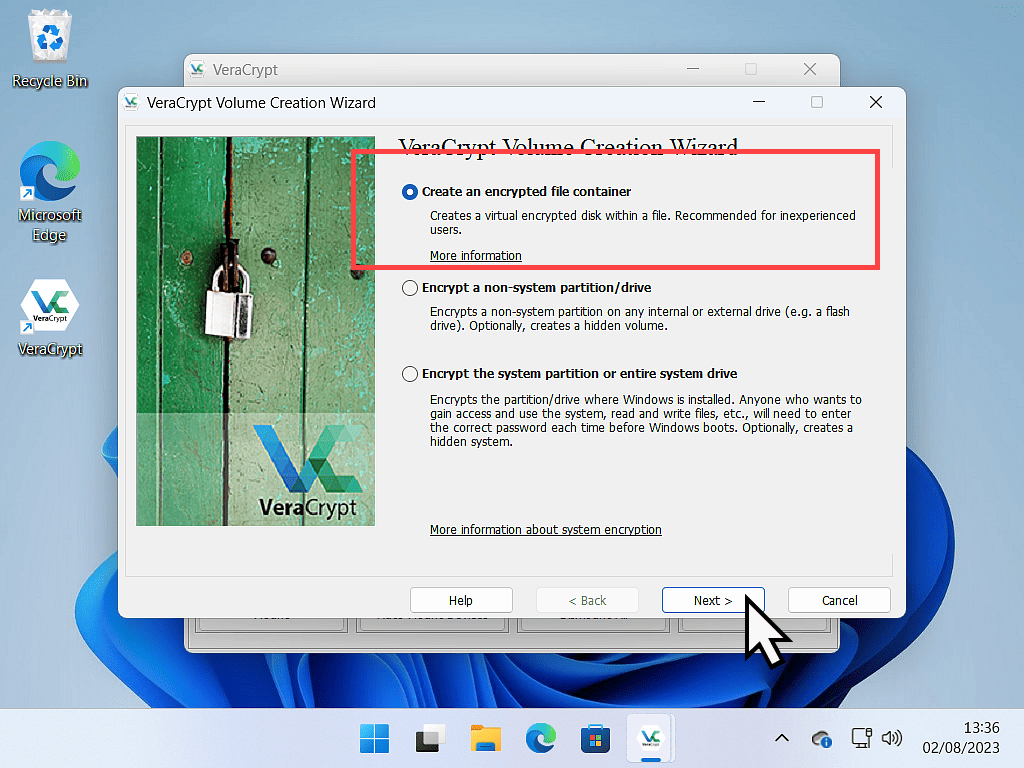
When VeraCrypt opens, click the Create Volume button. That opens the Volume Creation Wizard.
VeraCrypt can encrypt whole hard drives, even your system drive, in much the same way BitLocker does. For this guide we’re only encrypting a folder.
Select Create an encrypted file container (if it isn’t already) and click Next.

Encrypted Volume Type
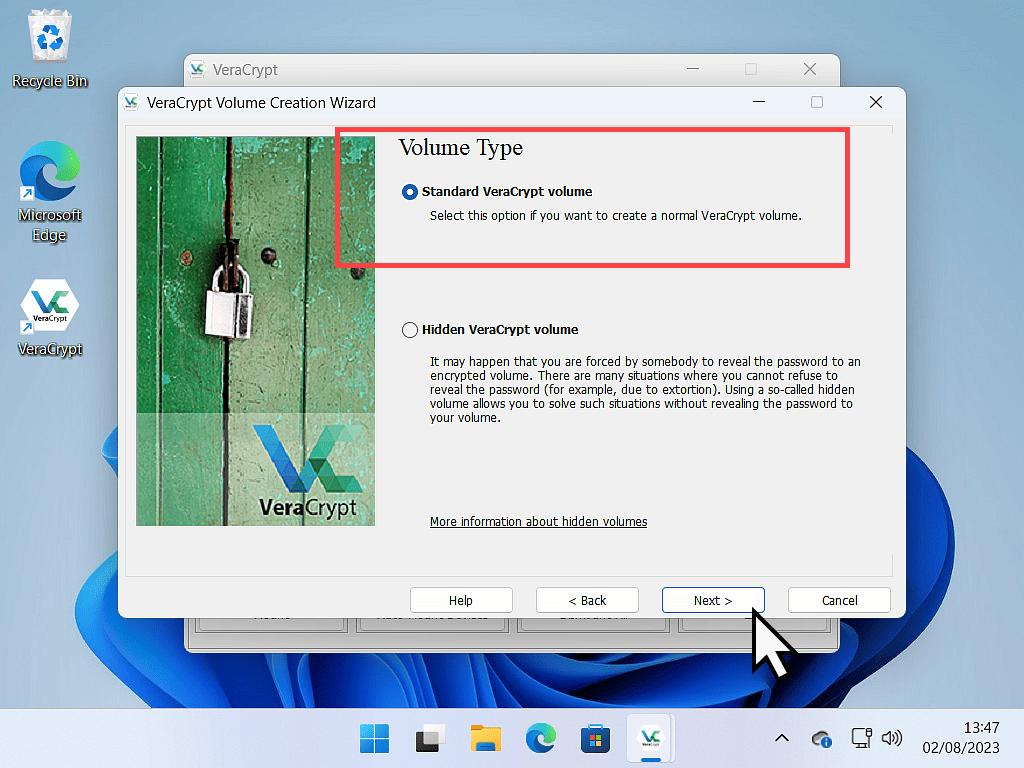
Your encrypted folder can be a standard volume or a hidden volume.
- Standard VeraCrypt volume: the normal choice for protecting your files and folders, and the one we’ll use here.
- Hidden VeraCrypt volume: VeraCrypt creates a second, hidden volume inside the normal one. It’s for advanced users, so skip it for now.
Select Standard VeraCrypt volume and click Next.
Encrypted Folder Location
Now decide where to keep your encrypted folder. You can save it in any folder, the same way you’d save any other file.
Click Select File. On the next screen, give the file a name and save it anywhere on your computer.
The vault appears as an ordinary file with whatever name you give it. Pick something dull that won’t attract attention from anyone else who uses your computer.


You’ll see the file path appear in the location box. Click Next.

VeraCrypt Encryption Options
On this screen you choose the type of encryption VeraCrypt uses to protect your files. It supports plenty, and if you have a specific need you can pick one from the drop-down menu.
Personally, I’d leave it on the default, AES, with a hash algorithm of SHA-512. Click Next.

Set the Encrypted Volume Size
This is one of the differences between a folder and a volume. A normal Windows folder doesn’t need a size, it just grows as you add files.
Your VeraCrypt folder is different. It isn’t really a folder, it’s a virtual hard drive, and like any drive it needs a set size.
How big to make it depends on how much you plan to keep in it, and how much free space you have. You can set the size in kilobytes, megabytes, gigabytes or terabytes. Not sure? See what kilobytes, megabytes, gigabytes and terabytes are.
For this example I’ll make a 1 GB drive. Click Next when you’re ready.

Password Protecting an Encrypted Folder
Now add the password you’ll use to unlock the folder. The longer and more complicated it is, the stronger it is.
Don’t forget it. Once your files are encrypted in VeraCrypt, they can’t be opened without the right password. There’s no back door and no reset.

Format the Volume
Next, choose a file system for your virtual drive. VeraCrypt supports FAT, exFAT, NTFS and ReFS.
- NTFS: the standard for Windows drives. Fast, and handles large files. My choice for a vault you’ll only use on Windows.
- FAT: works almost everywhere, but no single file can be bigger than 4 GB, which rules out long videos.
- exFAT: a good choice if you’ll also open the vault on a Mac, and it doesn’t have the 4 GB limit.
With the file system set, move your mouse around the window at random. VeraCrypt uses the movements to create a unique encryption key for your folder.
- Select the file system, then move your mouse around. You can see your progress at the bottom of the window.
- Keep going until the bar turns green, then click Format.
- Click OK, then Exit.


Your Encrypted Folder
Your encrypted folder now sits on your computer as a single file, with the name you gave it, in the place you saved it.
The only clue that it’s anything special is its size. Right-click the file and select Properties, and you’ll see it’s exactly the size you set earlier.


How to Unlock Your Encrypted Folder
Remember, your encrypted folder is really a virtual drive. To use it you need to mount it first.
- Open VeraCrypt and click Select File.
- Find your file, select it and click Open.
- The path to your file appears in the box. Pick a drive letter from the list above it and click Mount.
- Type the password you set earlier and click OK.


The Folder Is Unlocked
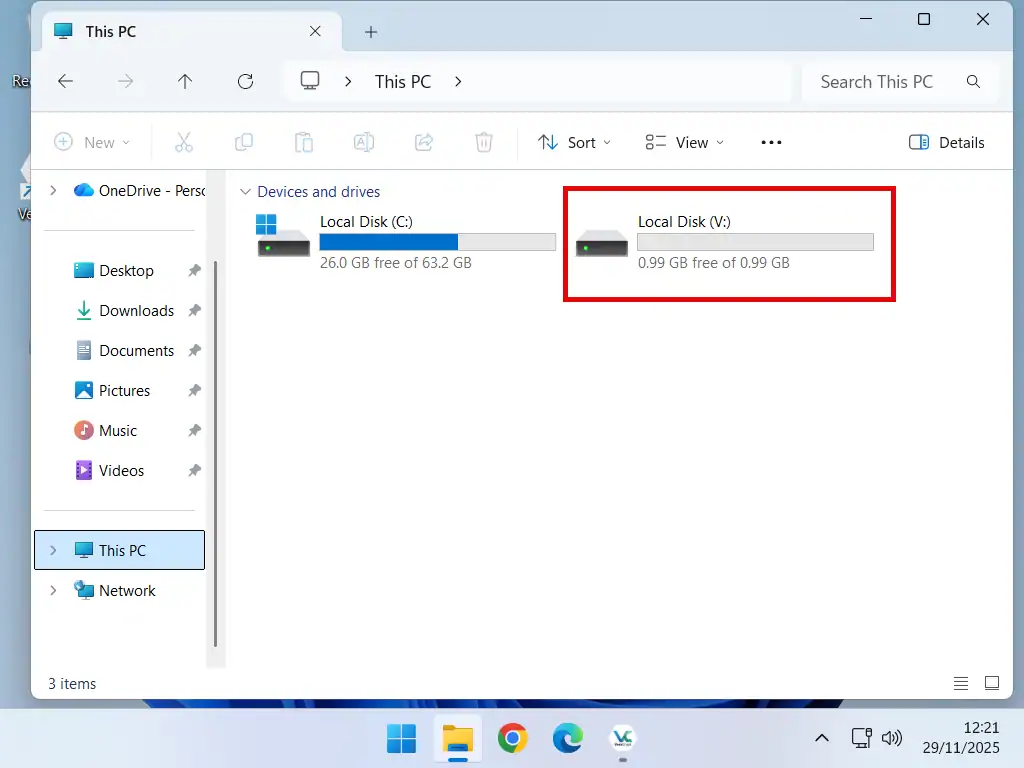
With the right password, VeraCrypt unlocks your folder ready to use, under the drive letter you picked. You can leave VeraCrypt open or close it.
Open File Explorer and you’ll find the drive under This PC. Use it exactly like any other drive: copy and paste files in, drag and drop, save straight into it, open, edit or delete files.
To Lock the Drive Again
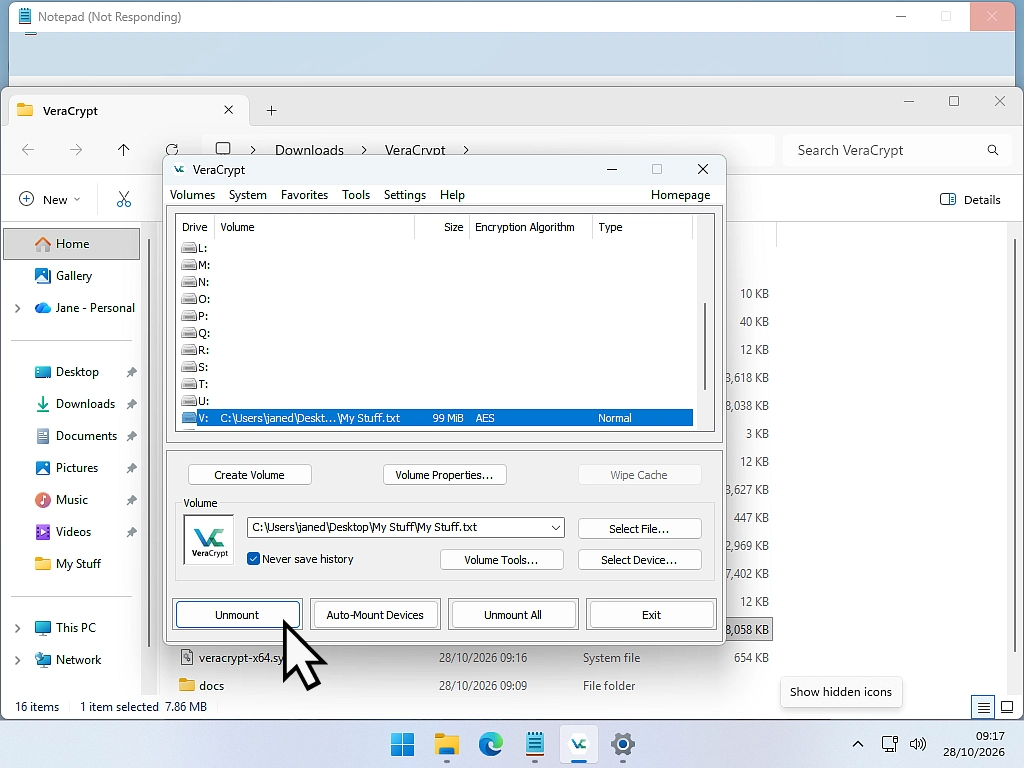
When you’ve finished with the files, lock the drive again. Open VeraCrypt, select the drive and click Unmount. The drive is locked and disappears from File Explorer.
If you shut down or restart your PC, VeraCrypt unmounts it for you.

How to Change Your VeraCrypt Password
You can change the password at any time, and your files aren’t touched. VeraCrypt only re-locks the key that opens the vault, so it takes a few seconds.
- Open VeraCrypt and click Select File, then choose your vault.
- Click the Volumes menu and choose Change Volume Password.
- Type your current password at the top.
- Type your new password twice underneath and click OK.
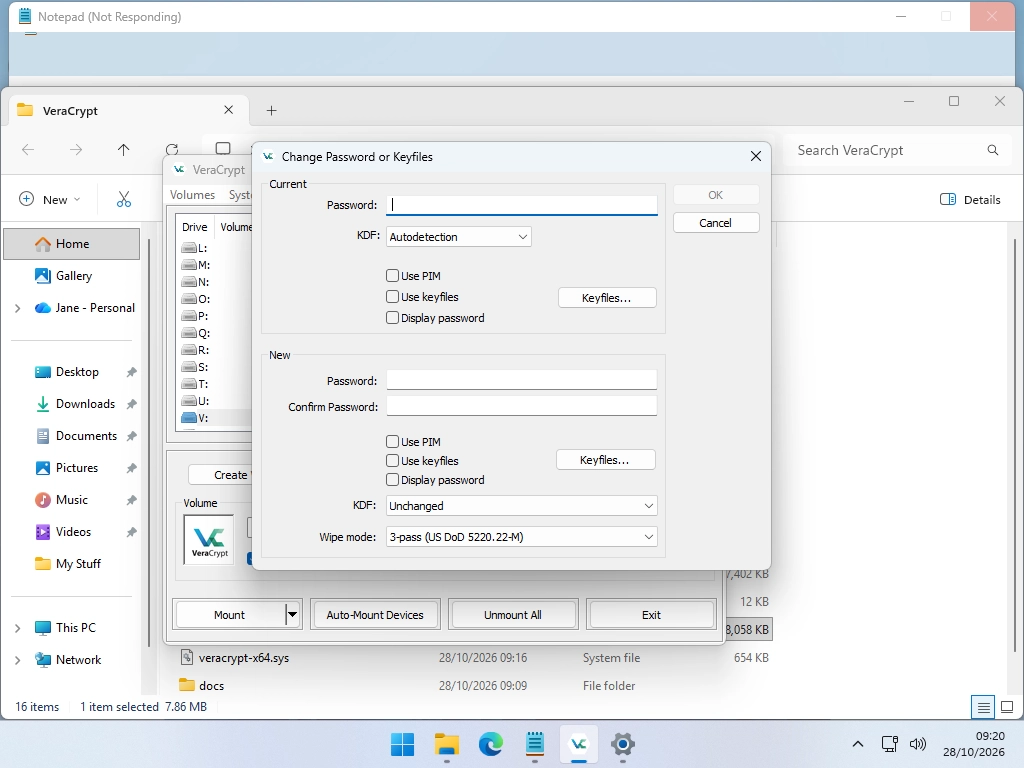
If VeraCrypt asks you to move your mouse around, do that until the bar fills, the same as when you created the vault.
How to Open Your Vault on Another Computer
Your vault is just a file, so you can take it with you. Copy it to a USB stick, an external drive or cloud storage, and open it on any computer that has VeraCrypt.
- Unmount the vault on your own PC first.
- Copy the vault file to the USB stick or wherever it’s going.
- On the other computer, open VeraCrypt, click Select File and choose the vault.
- Pick a drive letter, click Mount and type your password.
VeraCrypt runs on Windows, Mac and Linux. If you’ll open the vault on a Mac, choose exFAT when you create it.
Carry VeraCrypt on a USB Stick
If the other computer doesn’t have VeraCrypt installed, you can take a portable copy with you.
- Run the VeraCrypt installer.
- Choose Extract instead of Install.
- Pick the USB stick as the place to extract it to.
- On the other computer, open the stick and double-click VeraCrypt.exe.
Portable VeraCrypt still needs administrator rights on the computer you run it on, so it won’t work on a locked-down work PC.
VeraCrypt vs BitLocker
Both are strong encryption. The difference is what they lock and where they work.
| VeraCrypt | BitLocker | |
|---|---|---|
| Price | Free | Included with Windows Pro |
| Windows Home? | Yes | No, Home only gets Device Encryption |
| What it locks | A vault file, a USB stick or a whole drive | A whole drive or USB stick |
| Mac and Linux? | Yes | No |
| Forgotten password | No way back in | A recovery key gets you in |
My advice: for one private folder, VeraCrypt. To protect a whole laptop in case it’s stolen, BitLocker. For a USB stick on Windows Pro, BitLocker To Go is the easier of the two.
Troubleshooting
VeraCrypt Says the Password Is Incorrect
Check Caps Lock first, then check you’ve selected the right file. VeraCrypt can’t tell you which is wrong, because it can’t read anything in the vault without the right password.
VeraCrypt Won’t Unmount Because Files Are in Use
Close any files you have open from the vault, and any program using them, then click Unmount again.
If VeraCrypt offers to force it, save your work in other programs first.
My Vault Is Full
The simplest fix is to create a new, bigger vault, mount both, and move your files across. Then delete the old vault file.
VeraCrypt also comes with a tool called VeraCrypt Expander that can make an existing vault bigger. Back up your files before you use it.
I’ve Forgotten My Password
There’s no way back in. That’s what makes VeraCrypt secure. If the files matter, keep the password written down somewhere safe, away from the PC.
FAQ
Q: Is VeraCrypt free?
A: Yes. VeraCrypt is free and open source, for Windows, Mac and Linux. There’s no paid version.
Q: Is VeraCrypt safe?
A: Yes. It has been independently audited twice, by Quarkslab in 2016 and by Fraunhofer for the German government’s BSI in 2020. Only download it from veracrypt.io.
Q: Can VeraCrypt encrypt an existing folder?
A: Not in place. VeraCrypt creates a vault, and you move the folder’s files into it. Then delete the originals and empty the Recycle Bin.
Q: Does VeraCrypt work on Windows 11 Home?
A: Yes. Unlike BitLocker, VeraCrypt works on every edition of Windows 11 and Windows 10.
Q: Can VeraCrypt encrypt a USB stick?
A: Yes. In the Volume Creation Wizard, choose Encrypt a non-system partition/drive instead of a file container. Copy anything important off the stick first.
Q: What happens if I forget my VeraCrypt password?
A: Your files are gone for good. There’s no reset and no back door, so keep the password somewhere safe.
Summary
It’s a shame Windows doesn’t have an easy way to password protect a single folder, but with VeraCrypt it can be done, for free.
We keep more and more personal information on our computers, so it makes sense to control who can see it. With your files in a VeraCrypt vault, they’re protected even if your computer is lost or stolen.
Related Posts
How to Password Protect a Folder in Windows 11 and 10
Other ways to password protect a folder, including 7-Zip and BitLocker.
How to Keep Files Private on a PC
Seven ways to keep files private, from hiding them to locking the whole drive.
How to Use 7-Zip to Password Protect Files
Lock files with a password before you send them to someone.
Beware of Device Encryption on Windows 11 Home
Device Encryption is silently being enabled on all Windows 10 and Windows 11 Home editions that meet the hardware requirements and you’re signed in with a Microsoft account.
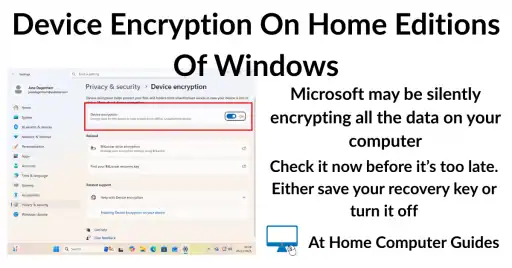
It’s very important that you check whether or not device encryption is enabled on your computer and if it is, then you MUST either disable it or find your recovery key. I’ll show you how to do both.
You can find this and other related step by step guides in – At Home Computer Security Guides
Written by Jeff Porter. I’ve been fixing Windows PCs since 2010 and I’m CompTIA Network+ certified. More about me