
Copy and paste is one of the most important computer skills for beginners to learn.
It’s a simple way of duplicating a file (like a document, a picture or a video) or a whole folder, and putting that duplicate somewhere else on your computer.
For example, if you want to put some holiday pictures onto a USB stick but still keep the originals on your computer, you copy and paste them. I’ll show you that exact job later in the beginner course.
Think of it like a photocopier: the original stays exactly where it is, and you walk away with an identical copy to put somewhere else.
In this lesson I’ll show you how to copy and paste files and folders in Windows 11 and Windows 10, using the mouse, the toolbar and the keyboard shortcuts.
The Short Version
- Click the file once to select it.
- Press Ctrl + C to copy it.
- Open the folder where you want the copy to go.
- Press Ctrl + V to paste it.
The original stays where it was, and you now have two.
Step 1: Find and Select Your File
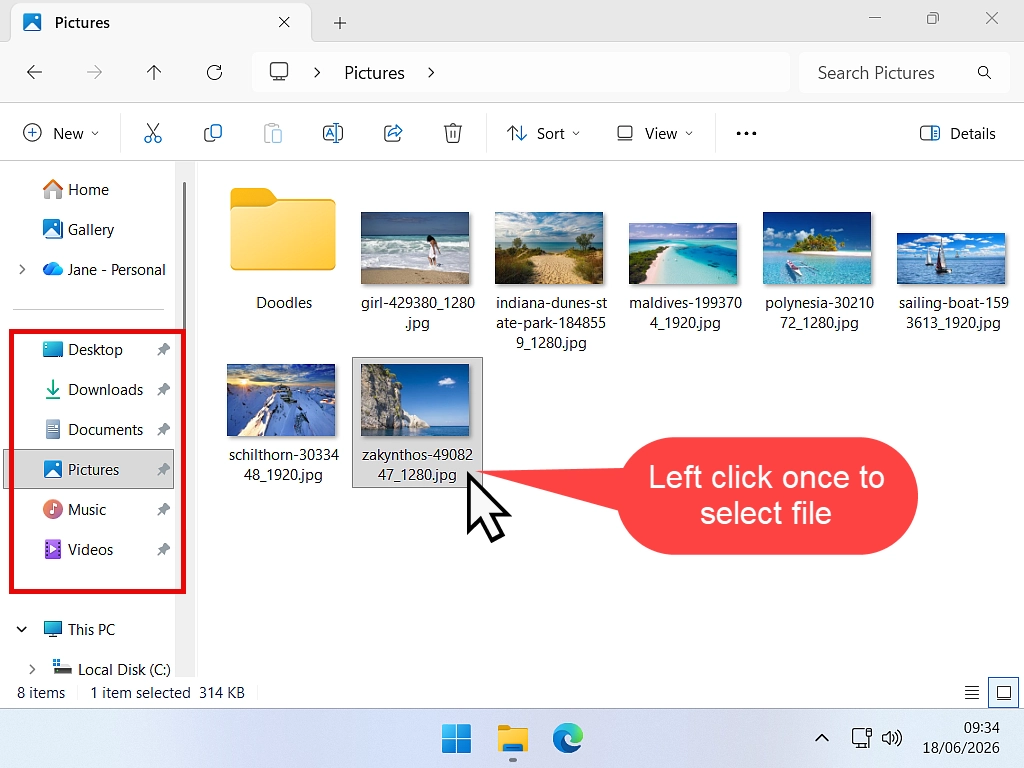
Before you can copy anything, you have to tell Windows exactly what you want to copy. For this example I’ll copy a picture from the Pictures folder. Use File Explorer to find your file.
- Open File Explorer and go to the file you want to copy. For this example, click your Pictures folder on the left side of the window.
- Find the picture you want to copy.
- Left-click the file once. A coloured highlight appears around it, which means the file is selected and ready.
Copying More Than One File?
You can copy lots of files in one go. Hold down Ctrl and click each file you want, or press Ctrl + A to select everything in the folder. I’ll cover that in more detail over the next few lessons.
Step 2: How to Copy a File in Windows
Copying a file works very slightly differently in Windows 10 and Windows 11, so I’ll show you both.
Once your file is selected, you have a few ways to make a copy. Use whichever feels most comfortable.
Option A: You’re Using Windows 11
Windows 11 has a clean, simple toolbar along the top of every folder window. With your file highlighted, you can copy it in three ways:
- The toolbar: click the Copy icon (it looks like two small sheets of paper, one on top of the other) on the toolbar at the top of the window.
- The right-click menu: right-click your highlighted file. A small menu pops up. Click the Copy icon in the row of icons at the top or bottom of that menu.
- The keyboard shortcut: this is the quickest way. Hold down the Ctrl (Control) key, tap the letter C once, then let go of both.

What the Copy and Paste Icons Look Like in Windows 11
Windows 11 swapped the words in the right-click menu for a row of small icons, and that confuses a lot of people. If you’re not sure which one is Copy, here’s what each icon looks like:
- Cut: a pair of scissors.
- Copy: two sheets of paper, one on top of the other.
- Paste: a clipboard with a sheet of paper on it.
- Rename: a small box with a text cursor in it.
- Share: a box with an arrow coming out of it.
- Delete: a rubbish bin.
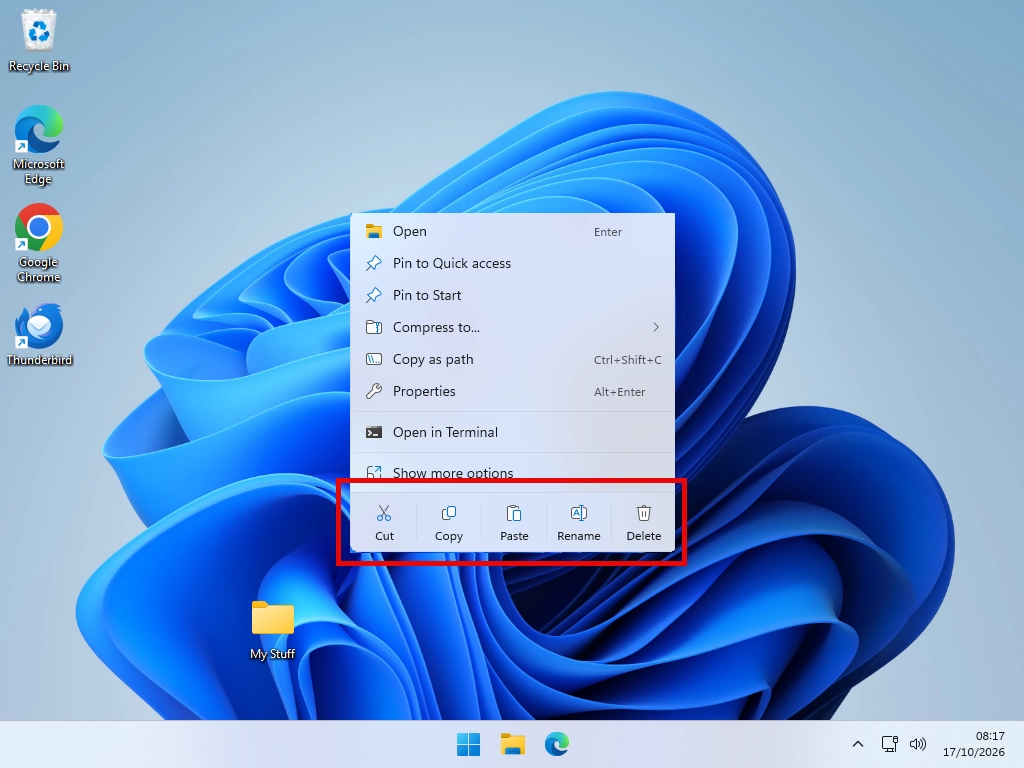
Not sure which is which? Hover your mouse pointer over an icon for a second. A small label pops up with its name and its keyboard shortcut.
The row of icons also moves about. Windows puts it as close to your mouse pointer as it can, so if the menu opens upwards, the icons sit at the bottom of the menu instead of the top.
If you’d rather see words, click Show more options at the bottom of the menu. That opens the older, Windows 10 style menu, where Copy is written out in full. I also explain how to make that older right-click menu the default.
Option B: You’re Using Windows 10
If your computer runs Windows 10, it’s just as easy:
- The right-click menu: right-click your highlighted file to open the menu, then click the word Copy.
- The ribbon: click the Home tab at the top of the window, then click Copy.
- The keyboard shortcut: exactly the same as Windows 11. Hold down Ctrl and press the letter C.

What Just Happened?
Nothing changes on your screen, but Windows has made a note of the file you want to copy and is holding it on the Clipboard, an invisible holding area.
This catches a lot of beginners out, because they expect some sort of message to say the file has been copied. There isn’t one. You just have to trust it.
Step 3: How to Paste the File
Now that your file is waiting on the Clipboard, you need to choose where its new home will be. Putting it there is called pasting, and you paste in Windows the same way in every folder on your PC.
For this example, I’ll paste the picture onto the Desktop (your main computer screen).
- In the navigation pane down the left side of File Explorer, click Desktop. (If you wanted the copy on a USB stick or in your Documents folder, you’d click that instead.)
- Look at the main area of the window. This is called the File View area, and it shows what’s inside the folder you just opened.

Option A: Pasting in Windows 11
- The toolbar: click the Paste icon (a small clipboard with a sheet of paper on it) on the toolbar at the top of the window.
- The right-click menu: right-click any empty space in the File View area. On the menu that appears, click the Paste icon.
- The keyboard shortcut: hold down Ctrl and tap the letter V.

Option B: Pasting in Windows 10
- The right-click menu: right-click any empty space in the File View area, then click the word Paste.
- The ribbon: click the Home tab, then click Paste.
- The keyboard shortcut: hold down Ctrl and tap the letter V.

You’ve Done It! Understanding the Result
Look at your screen. You should now see your file sitting safely in its new home, which in this example is the Desktop.
Because you used copy and paste, you made a true duplicate. If you go back to your Pictures folder, the original file is still there, completely untouched. You now have two identical files in two different places on your computer.
Try to get used to the keyboard shortcuts for copy and paste: Ctrl + C to copy and Ctrl + V to paste.
I know from experience that as a beginner it feels much easier to rely on the mouse, but believe me, the keyboard shortcuts really do speed things up and make life a lot easier.


The same method works for single files, music tracks, videos and even big folders holding hundreds of items. A large folder can take a minute or two, and Windows shows a small progress box while it copies, so wait until that box closes.
Practise it a few times using the keyboard shortcuts. It’s a computer skill that’ll save you hours.
If Copy and Paste Isn’t Working
Copy and paste is very reliable, but a few things trip people up. Here’s what they mean and what to do.
Paste Is Greyed Out
Paste only lights up when there’s a file waiting on the Clipboard. If it’s greyed out, Windows has nothing to paste.
The Clipboard holds one thing at a time, so copying anything else (even a single word of text) replaces your file. Restarting the PC empties it too. Go back, select the file and copy it again.
Windows Added the Word Copy to the File Name
If you paste into the same folder the file came from, Windows can’t have two files with the same name, so it adds Copy to the end. For example, Holiday.jpg becomes Holiday - Copy.jpg.
Nothing is wrong. If you didn’t mean to do it, delete the extra copy. If you did, you can rename it the same way you rename a folder.
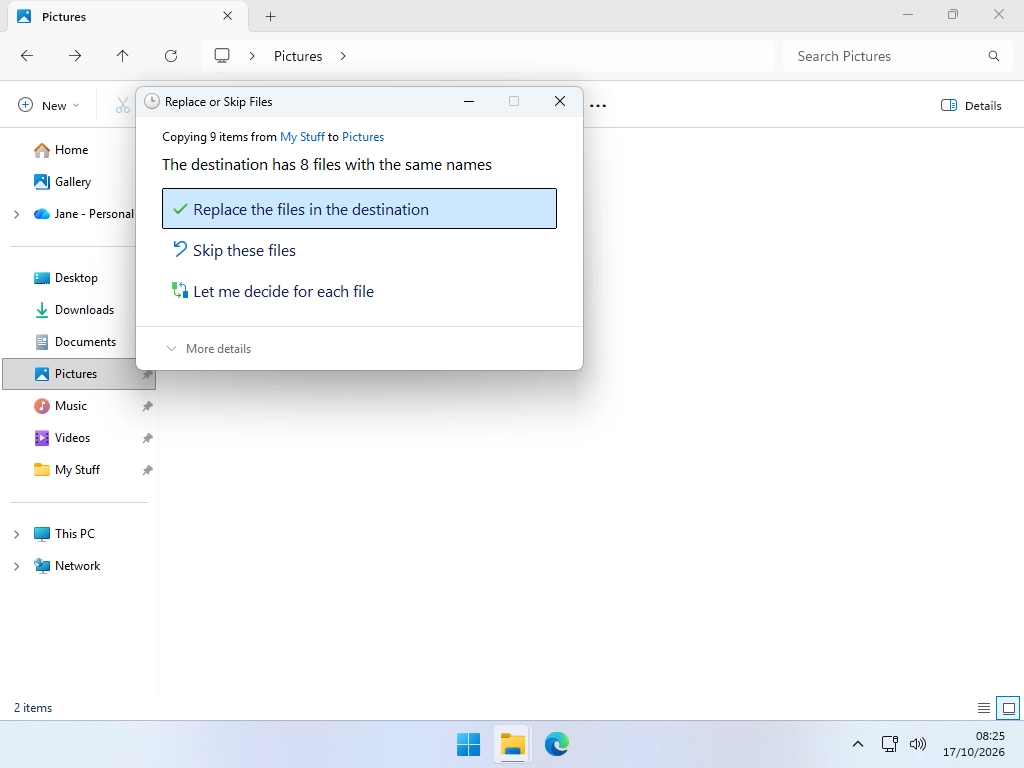
Windows Asks to Replace or Skip Files
This box appears when the folder you’re pasting into already has a file with the same name. You get three choices:
- Replace the file in the destination: the file already in that folder is swapped for the one you’re pasting.
- Skip this file: nothing is copied and nothing changes.
- Compare info for both files: shows you both files side by side. Tick both to keep them, and Windows adds a number to the new one’s name.
Quick Tip
If you’re not sure, click Skip this file. Nothing is lost. Replace really does overwrite the old file, and it doesn’t go to the Recycle Bin, so only choose it when you’re certain.
I Dragged a File and It Moved Instead of Copying
You can also copy by dragging a file into another folder, but Windows decides for you whether to copy it or move it:
- Drag it to a folder on the same drive (for example from Pictures to the Desktop) and the file is moved.
- Drag it to a different drive (for example a USB stick) and the file is copied.
To be sure you get a copy, hold down Ctrl while you drag. You’ll see a small plus sign and the words Copy to beside the file before you let go.
If a file has moved by mistake, press Ctrl + Z straight away to undo it. Moving files on purpose is called cut and paste, and it’s the next lesson in the course.
Summary
Learning how to copy and paste files comes down to four simple steps:
- Left-click the item once to highlight it (select it).
- Press Ctrl + C to copy it.
- Open the folder or drive where you want it to go.
- Press Ctrl + V to paste it.
On Windows 11 and can’t find Copy? It’s the icon that looks like two sheets of paper.
Next Lesson
How to Cut and Paste in Windows
Similar to Copy & Paste but with one very big difference.
Absolutely essential skill to have.
Course Progress – 11 of 37 done.
Part of the At Home Beginner Computer Course.
Previous Lesson
How to Open Files on a Windows PC
Opening files, sounds easy right? Just double left click and you’re done. But what about those times when you need the file to open in a different program?