Setting up a virtual machine (VM) takes time and effort. Whether you’re testing Windows 11, running an old copy of Windows XP or experimenting with a Linux distro, the last thing you want is to lose your progress because of a hard drive failure or a corrupted file.
In this guide, I’ll show you the best ways to backup VMware Workstation Pro virtual machines, how to restore a VM from a backup, why snapshots aren’t enough, and how to automate the process so you never have to worry about data loss again.
Snapshots vs. Backups: Know the Difference
One of the biggest mistakes home users make is thinking a snapshot is a backup. It isn’t.
- A Snapshot is like a “save point” in a video game. It’s great for jumping back five minutes if a software install goes wrong. However, it relies on the original virtual disk. If that disk file gets corrupted, your snapshot is useless.
- Snapshots use a lot of disk space. Creating multiple snapshots uses a huge amount of your host machine’s storage space. Starting with a virtual disk of, say 60GB, adding several snapshots can balloon that to over 250GB easily.
- Use a snapshot only as a temporary, short term restore point before making risky changes.
- A Backup is a complete, independent copy of your VM files stored in a different location (like an external hard drive). This is your only real safety net. Think of it as a system image backup.
- Backups allow you to quickly replace a virtual machine that’s become unstable, infected or just beyond repair.
The Manual Method: Copy and Paste (The “Easy” Way)
If you only use your VM occasionally, a manual backup is the simplest method. This involves copying the entire folder where your VM is stored and saving it to a different location. This can be on the same drive or on a separate drive (preferable).
Step 1: Shut Down the Virtual Machine
Before creating a backup you’ll need to properly shutdown the VM. You can’t get a clean backup while the VM is running or “Suspended.” Ensure the guest OS is completely powered off and VMware Workstation is closed.
Step 2: Locate Your VM Folder
By default VMware Workstation Pro stores all your virtual machines in a folder called “Virtual Machines” which is inside your Documents folder, e.g. C:\Users[YourName]\Documents\Virtual Machines. Of course you could have saved your VM to a different location.
Find your VM folder and open it. Inside you’ll see the virtual machine folders.
These folders contain everything that makes up the VM including any snapshots that you’ve made..

Step 3: Copy to an External Drive
Right-click the folder of the VM you want to save and select Copy. Navigate to your external hard drive or NAS and select Paste.
Always backup the entire folder. This includes your .vmx (configuration) and .vmdk (virtual hard disk) files. Without both, restoring the VM is much harder.
Pro Tip
Create a folder in your backup location with the date that you’re making the virtual machine backup. That makes it easier to:
- Have successive backups
- Quickly decide which backup to restore from
- Decide which backups can be deleted when running out of storage space.

The Pro Method: Automated VMware Backups
Copying and pasting manually is easy to forget. To truly protect your data, you should automate your VMware Workstation Pro backup.
Use a Simple Batch Script
- Open Notepad.
- Paste the following (replace the paths with your own).
- Save the file as BackupVM.bat. Now, you just double-click it to run a full backup.
You can even give the file a custom icon so you’ll find it easily.
@echo off
echo Closing VMware Workstation…
“C:\Program Files (x86)\VMware\VMware Workstation\vmrun.exe” stop “C:\Path\To\Your\VM.vmx” soft
echo Backing up files…
xcopy “C:\Path\To\Your\VM-Folder” “E:\Backups\My-VM-Backup” /E /I /Y
echo Backup Complete!
pause
Pro Tip
To quickly find the path of any folder, right click it to open the options menu, then left click Copy As Path.
How to Restore VMware Workstation Pro Virtual Machines From Backups
So your virtual machine has stopped working or you’ve made so many changes and just want to return the VM to the state it was in when you backed it up. Great, it’s so easy to do you won’t believe it.
Shutdown the VM and close VMware Workstation Pro then:
- Open the folder where your virtual machine is stored. By default that’ll be C:\Users[YourName]\Documents\Virtual Machines. Then delete the VM folder that you want restored from backup.
- Navigate to the location where you’ve stored your backups and Copy the backed up VM folder.
- Return to the folder where you’re storing your VM’s and Paste the backup folder.
- Restart Workstation Pro and launch the virtual machine. It’ll boot up as if nothing has happened. Although it’ll probably need updating.


VMware Workstation Pro Backups
What you’re doing is simply replacing the current virtual machine folder with the backed folder.
When you start VMware Workstation Pro it won’t know that the folders have been switched. All it needs to do is to find the your virtual machine folder in the correct location.
Frequently Asked Questions (FAQ)
Can I backup a running VM?
Technically yes, with expensive “enterprise” software, but for home users, it’s always best to power off the VM first to ensure “crash consistency.” However if you’re about to make a major change to the VM and just want a quick way back, then use a snapshot.
How often should I backup?
If you use the VM for work, daily is best but that will use up a lot a storage space. For me, I usually just create a first backup (after a clean install of the OS), and then about every couple of months. But that’ll very depending on how you use your virtual machine and how critical the data is that’s stored on it.
What is the best free VMware backup software?
For home users you can make use of any backup program. They can be setup to create entire system images of your PC (including your VMs) or you can run folder backups (specifying your VM folders). Veeam Agent for Microsoft Windows (Free Edition) is often recommended, as is EaseUS Todo Backup.
Summary
Whatever you use your virtual machines for, be it exploring the internet’s darker side, testing out new software or making system changes to your OS, at some point you’ll probably crash the VM beyond repair. After all that’s what they’re for. Having a quick and easy way to restore the VM and get back up and running is a real bonus.
Specifically for Windows based virtual machines, you may have bought a product key and activated it. That product key isn’t transferable between VMs. So protect your investment and back it up.
Related Posts
How To Backup A VirtualBox VM.
Are you using VirtualBox as well? You can easily backup VB Virtual machines too.
Convert A Physical PC To A Virtual Machine On Workstation Pro
Have you replaced an old computer recently? You can create a fully working virtual machine from it and import it into your new one. All your old apps and data will be still intact.
Types Of Computer Backup
If you’re completely new to computers, this might help.
Beware of Device Encryption on Windows 11 Home
Device Encryption is silently being enabled on all Windows 10 and Windows 11 Home editions that meet the hardware requirements and you’re signed in with a Microsoft account.
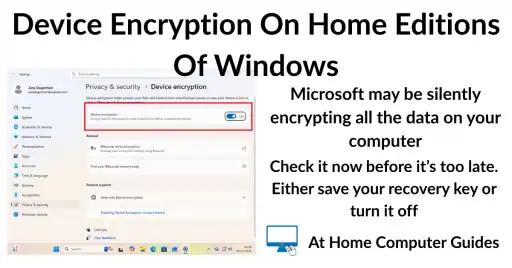
It’s very important that you check whether or not device encryption is enabled on your computer and if it is, then you MUST either disable it or find your recovery key. I’ll show you how to do both.
You can find this and other related step by step guides in – At Home Computer Security Guides
At Home Computer Step By Step Guides
![]() Easy to follow tutorials for users of Windows 10 and Windows 11 computers.
Easy to follow tutorials for users of Windows 10 and Windows 11 computers.
Gmail Storage Full? Here’s Why (and How to Fix it)
A Beginner’s Guide to File Formats and Filename Extensions
How to Protect Your Data When Sending Your PC in for Repair

Why I Use Virtual Machines and You Should Too
How to Install Windows XP as a Virtual Machine on VMware Workstation Pro
Is VMware Player Coming Back?

How to Setup OneDrive to Backup Your Files
OneDrive allows you to backup files to the cloud. It…
How to Share a Folder in OneDrive
One of the best features of OneDrive is the ease…
How to Setup RealTimeSync
RealTimeSync is a companion tool for the popular sync program…