How to setup (install) a Windows XP virtual machine using VMware Workstation Pro.
Windows XP was a terrific operating system but now it’s just too old and out of date to be used safely on the Internet (assuming it’ll work at all). But many of us still have software that won’t run on modern versions of Windows.
So for this guide, I’ll show you how to install Windows XP as a virtual machine on your current computer.
What You’ll Need To Install A Windows XP VM.
To install a Windows XP VM you’ll need to have a few things setup and ready.
- Virtualisation Enabled. You’ll need to have virtualisation enabled on your computer CPU. Either Intel VTx or AMD V/RVI. Usually it’ll be enabled by default, but it isn’t always so you should check your UEFI/BIOS. You can click this link if you’re not sure How To Enable Virtualisation On A PC.
- A Windows XP ISO Image or CD. If you have an old Windows XP installation CD, then that’s great, you can use that. If not, then you’ll need to have an ISO image file of XP. I’ll show you how to get one below if you don’t have either.
- VMware Workstation Pro installed on your PC. Workstation Pro is the software that runs your victual machines. It’s free to use on a home computer, but you’ll need to register for an account. How To Download VMware Workstation Pro For Free.
How To Download A Windows XP ISO Image File.
If you have a genuine Windows XP CD then you should use that to setup your virtual machine. You can be certain that it hasn’t been tampered with.
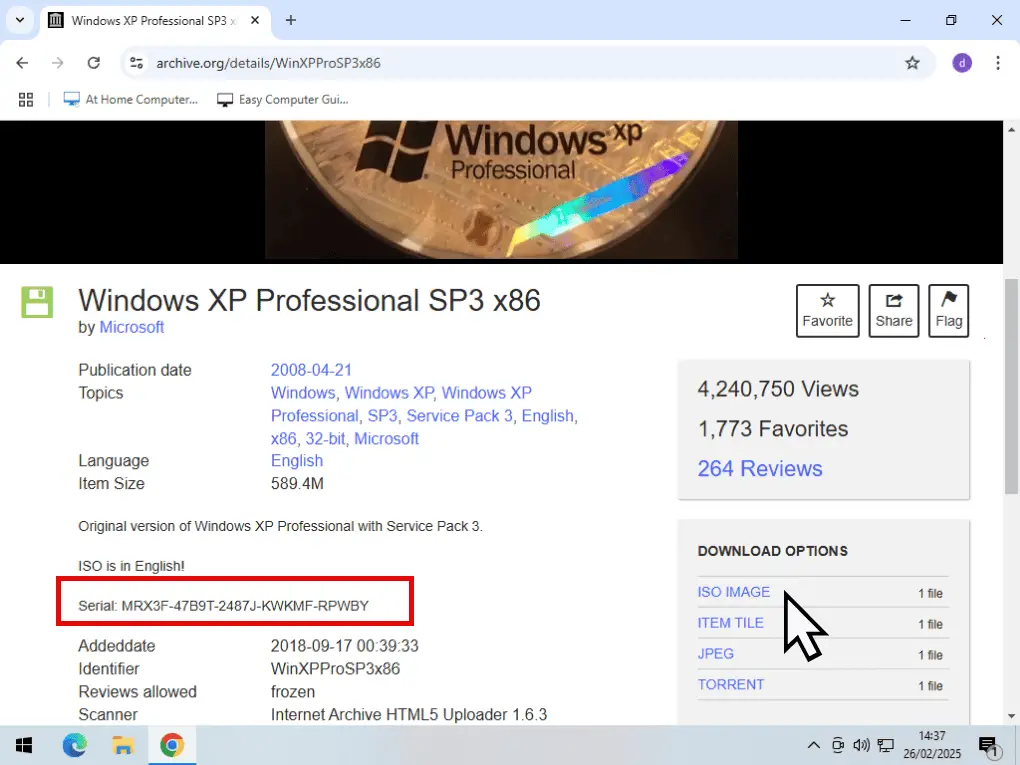
If you don’t have an original Windows XP CD available, then you can download an ISO image from the Internet Archive website.
https://archive.org/details/WinXPProSP3x86
Don’t forget to copy the serial number.
General Advice About Downloading Windows ISO files.
Generally speaking, I don’t advise downloading any Windows ISO file from anywhere other than Microsoft. You simply don’t know what, if anything, has been added to the file.
However you can’t download XP from Microsoft anymore. So if you don’t have a genuine CD, you’re out of luck. You simply have to look elsewhere.
I’ve tried out this ISO and it seems to be fine. But I certainly can’t guarantee it.
How To Create A Windows XP VM In Workstation Pro.
If you’re going to use a Windows XP CD to install the virtual machine, load it into your CD/DVD drive. Close any autoplay windows that appear.
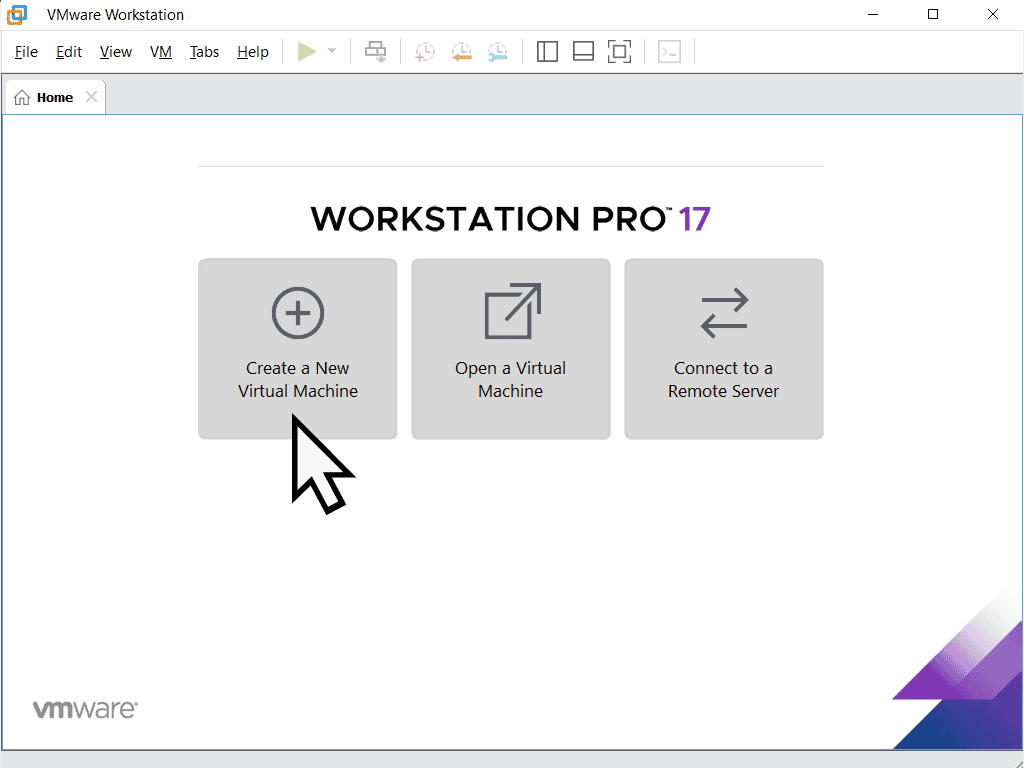
Start VMware Workstation Pro then click the Create a New Virtual Machine button.
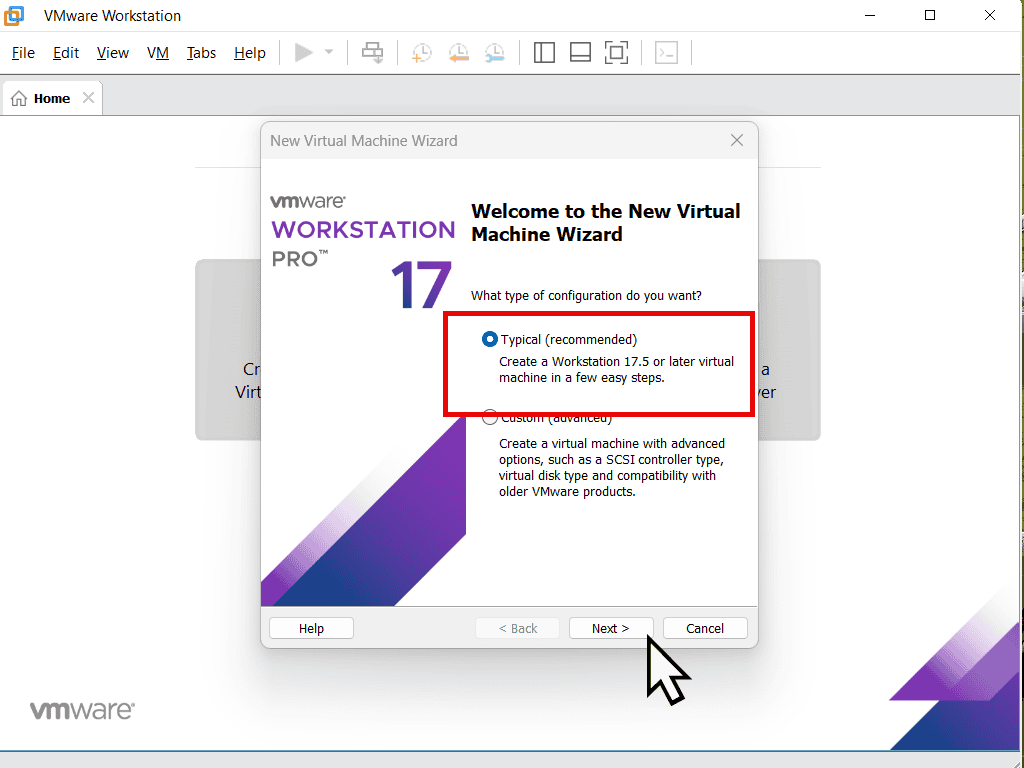
The New Virtual Machine Wizard will open. Select Typical (recommended) and then click the Next button.
Install From A Disc Or An ISO Image.
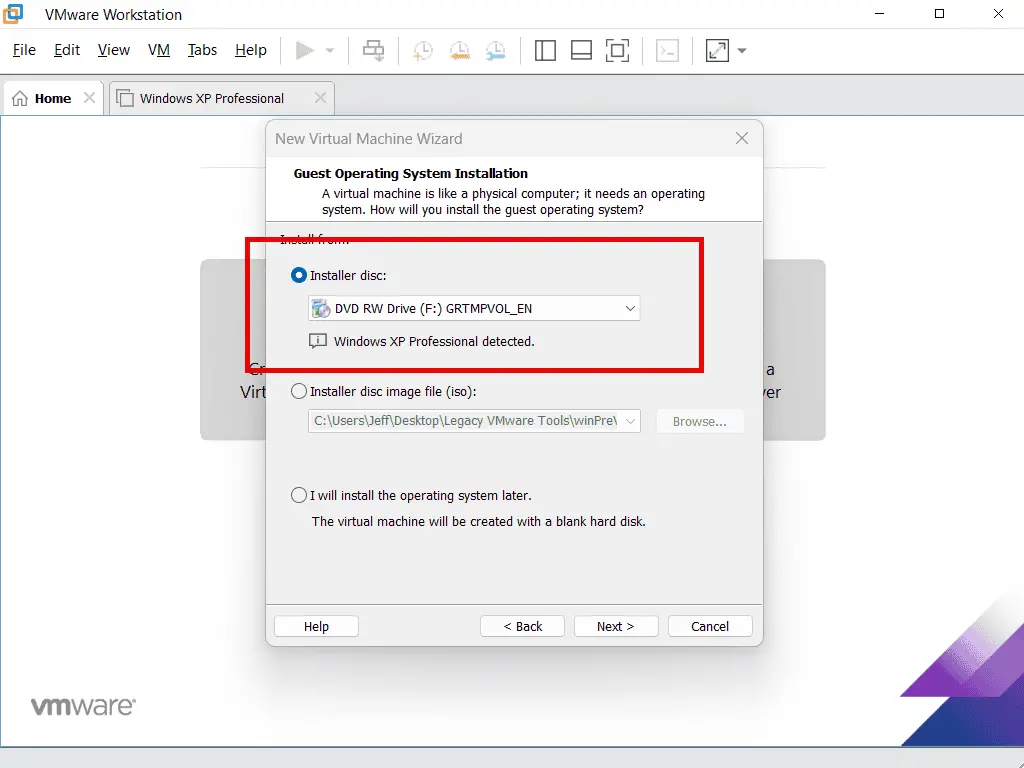
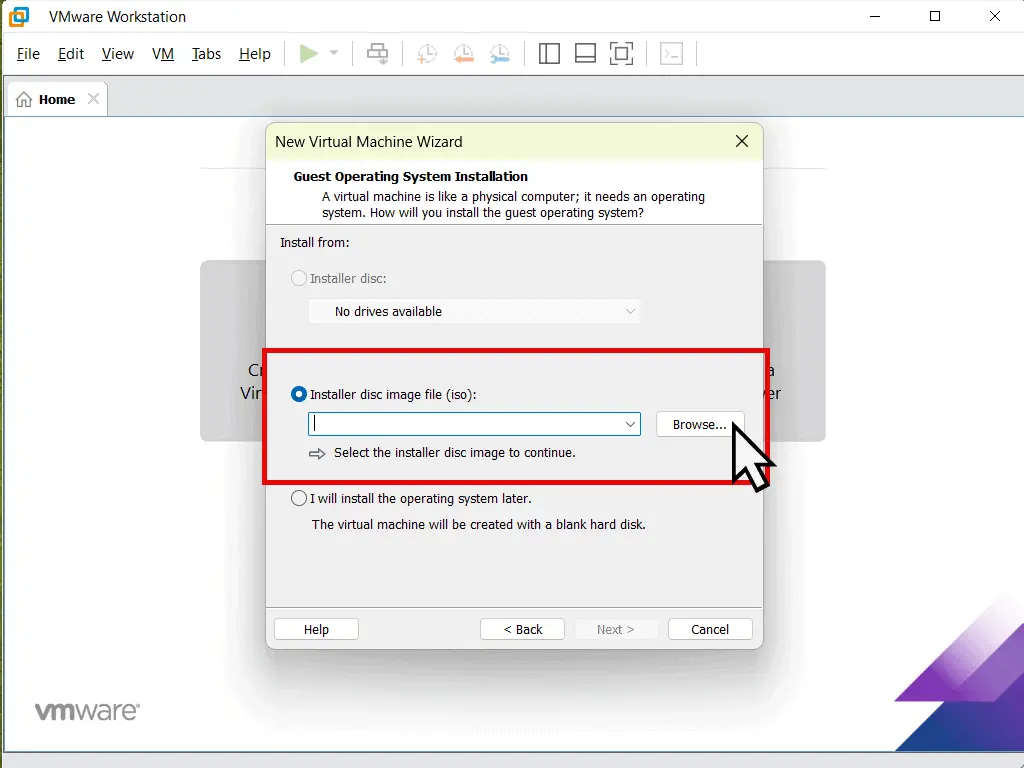
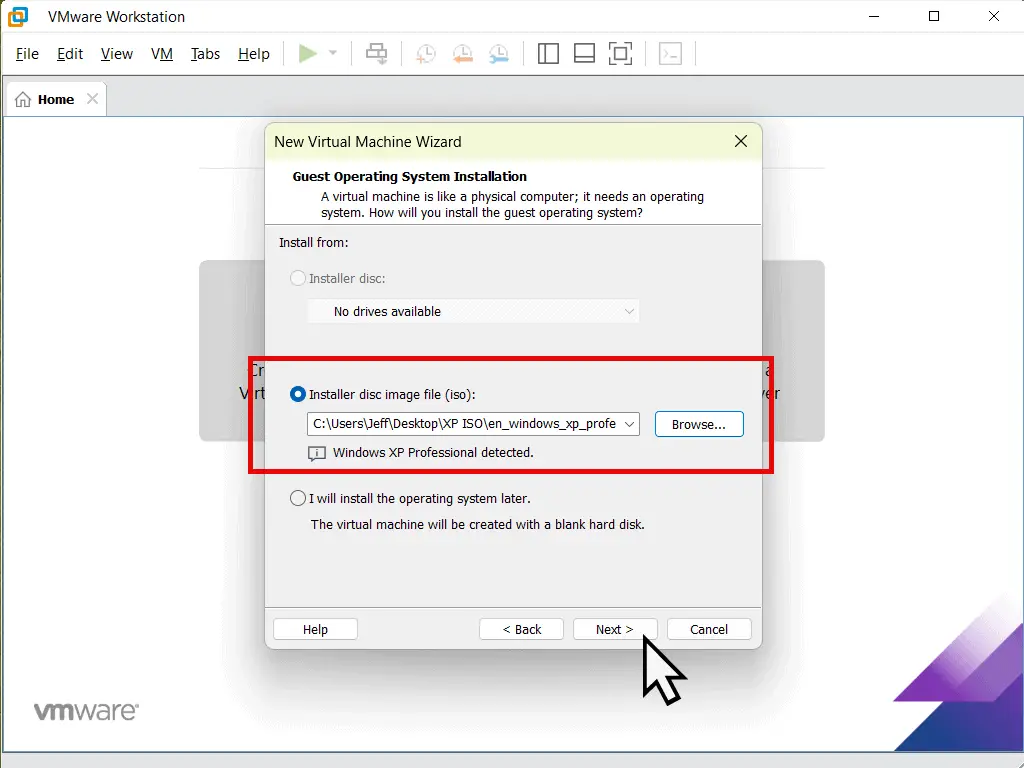
Workstation Pro can create a new virtual machine from either a CD, or from an ISO image file.
- If you’re installing from a CD, then Workstation Pro will auto detect it and identify it as a Windows XP disc. Click the Next button.
- To install XP from an ISO image, select “Installer disc image file (ISO)”. Then click the Browse button to navigate to and select your ISO file.
- When you’ve loaded the XP ISO file, click the Next button.
Name And Save Location For The VM.
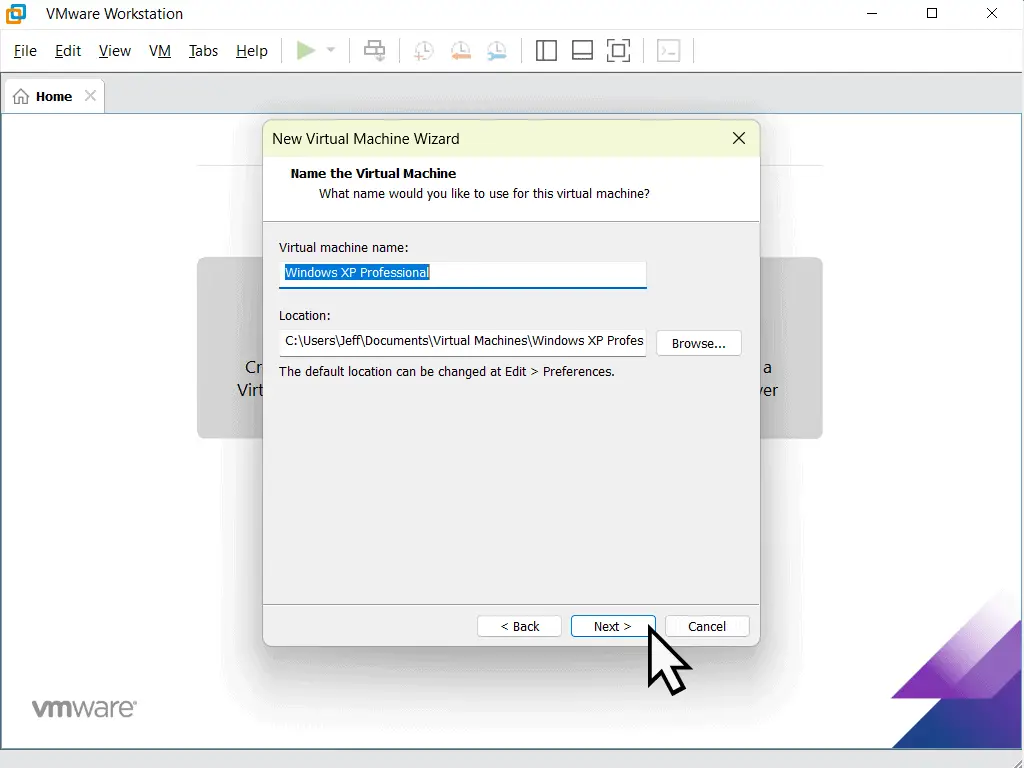
You can give your XP virtual machine a name if you want to. Naming VMs is handy if you intend to install more than one. It helps to identify them later.
By default Workstation Pro will save all the virtual machine files in Documents\Virtual Machines folder. But you can change that location if you wish.
Name the new VM and change the save location or accept the defaults.
Click the Next button to continue.
XP Virtual Hard Disk Capacity.
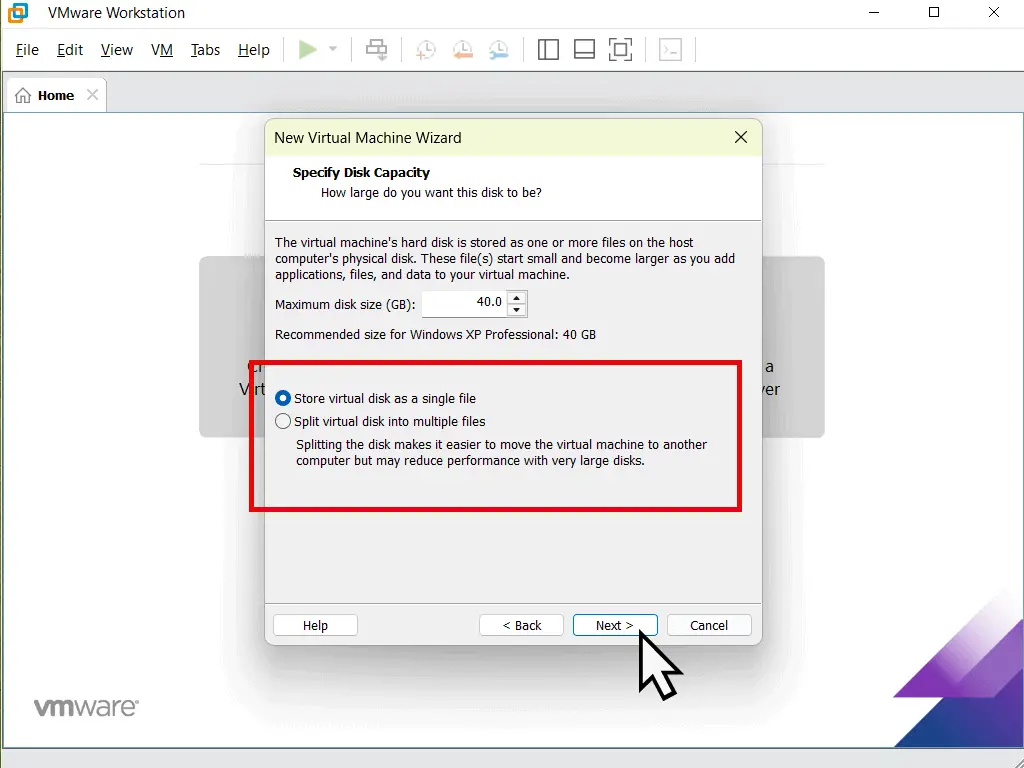
The new virtual machine will need to have a virtual hard drive to install an operating system onto..
On this screen you can set the maximum size of the drive. By default Workstation Pro will set it to 40GB, but you can change that if you want to.
You can also choose to store the virtual disk as either a single file or split into multiple files.
Personally I find that storing as a single file works best, but it’s entirely up to you.
Final Settings.
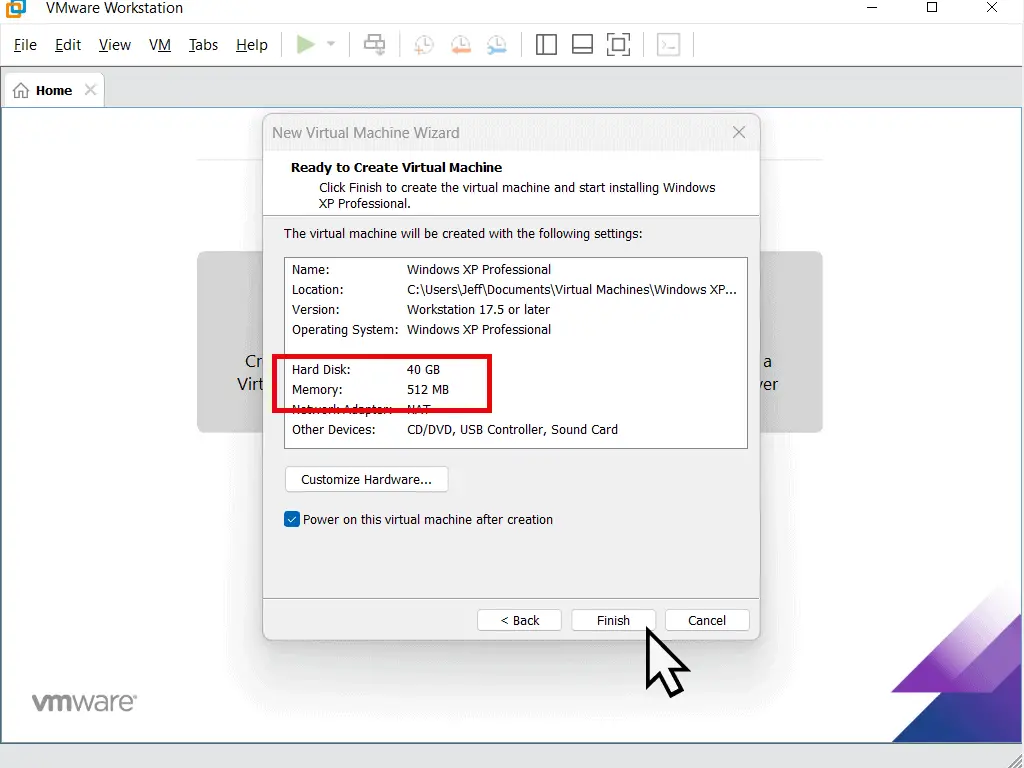
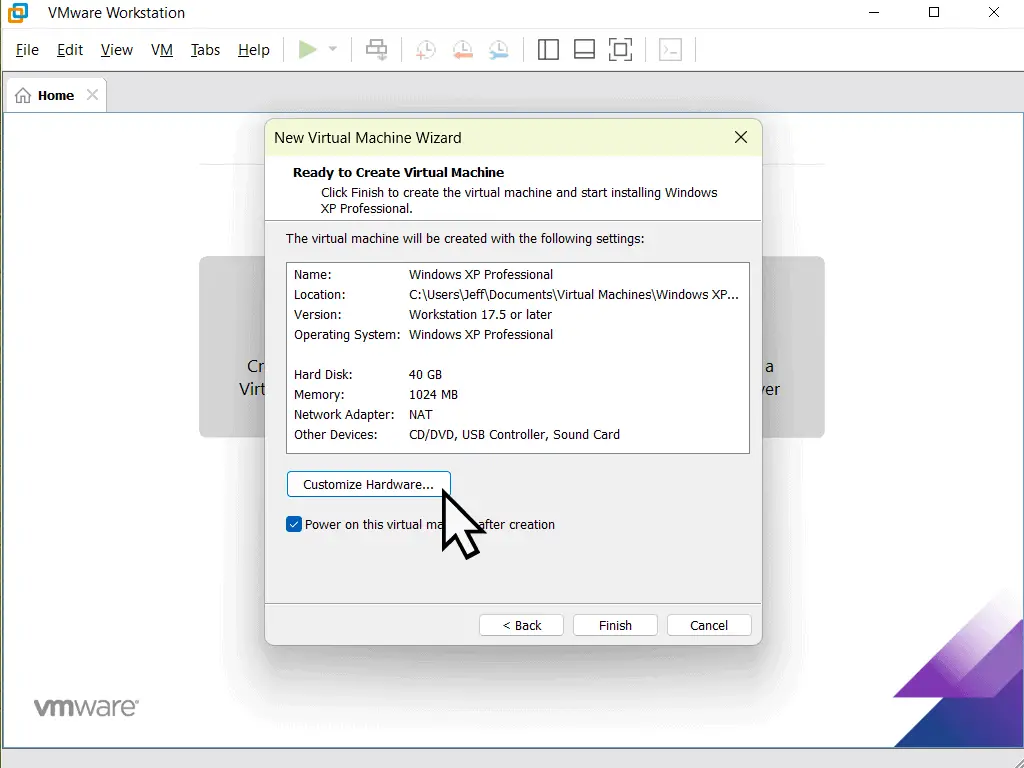
Then the Ready to Create Virtual Machine page will open. This is really just a final confirmation of your XP virtual machine settings.
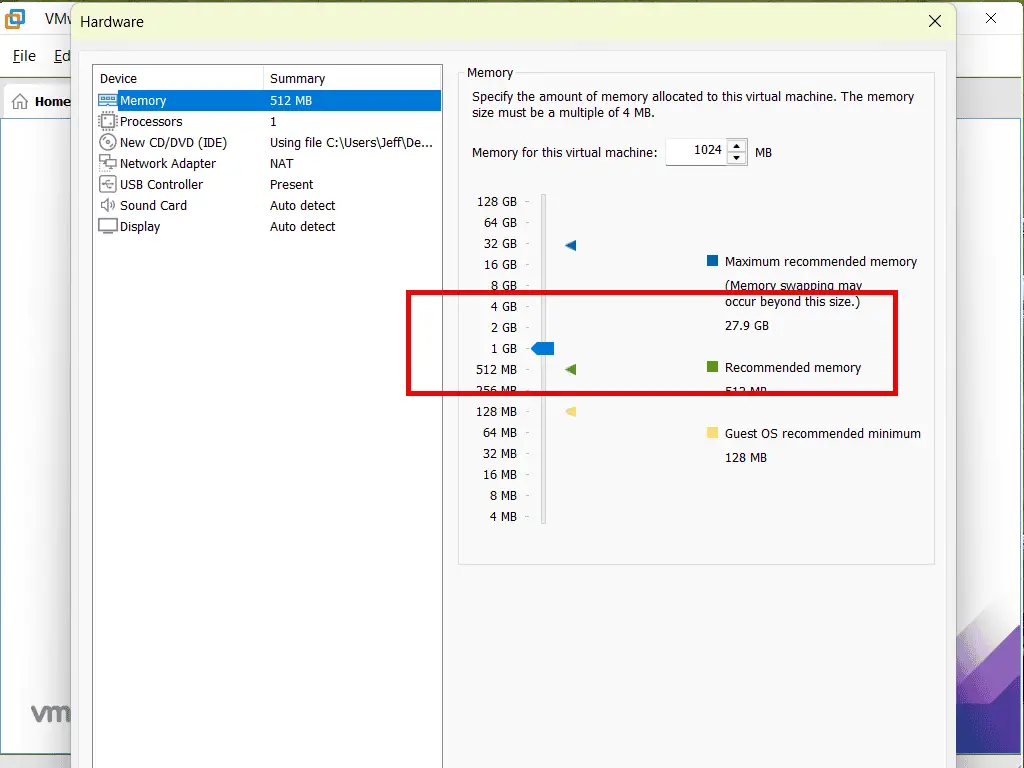
You’ll notice that Workstation Pro has assigned 512 MB of RAM (memory) to the virtual machine.
Windows XP doesn’t require anywhere as much RAM as later versions of Windows and will work quite well on 512 MB. But I’d give it a little more (assuming your host computer has enough to spare).
- To accept all the default settings for your XP virtual machine, click the Finish button.
- If you want to make any changes, click the Customize Hardware button.
- Make any required changes and then click the Close button, then click the Finish button.
Setup A Windows XP VM.
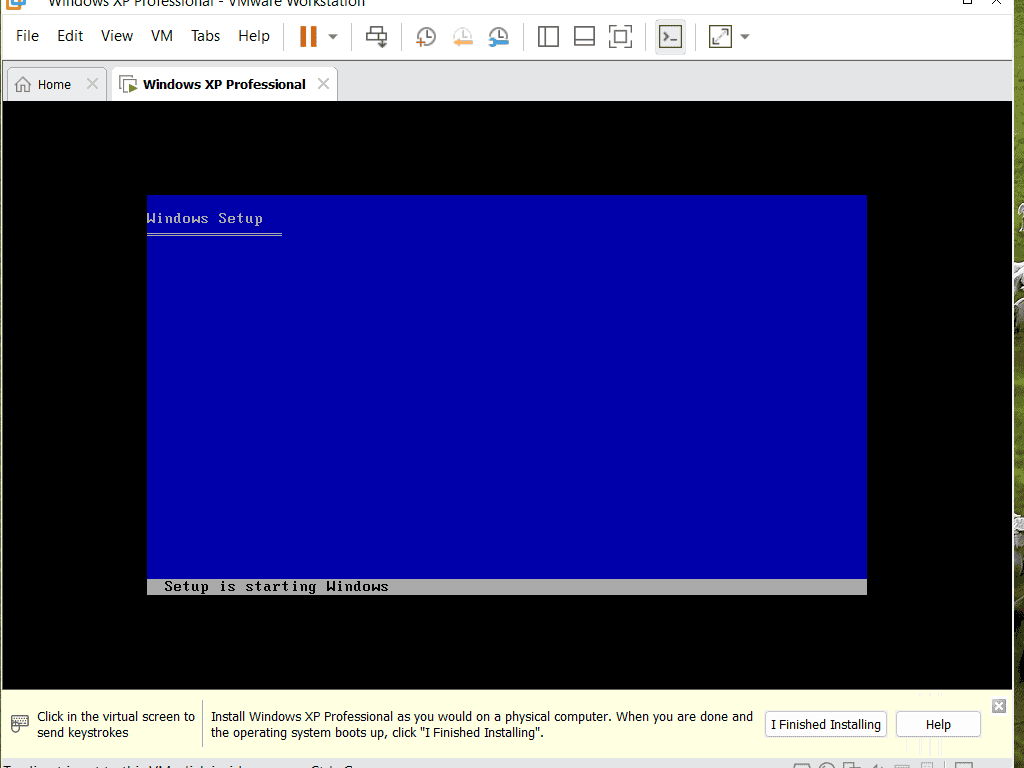
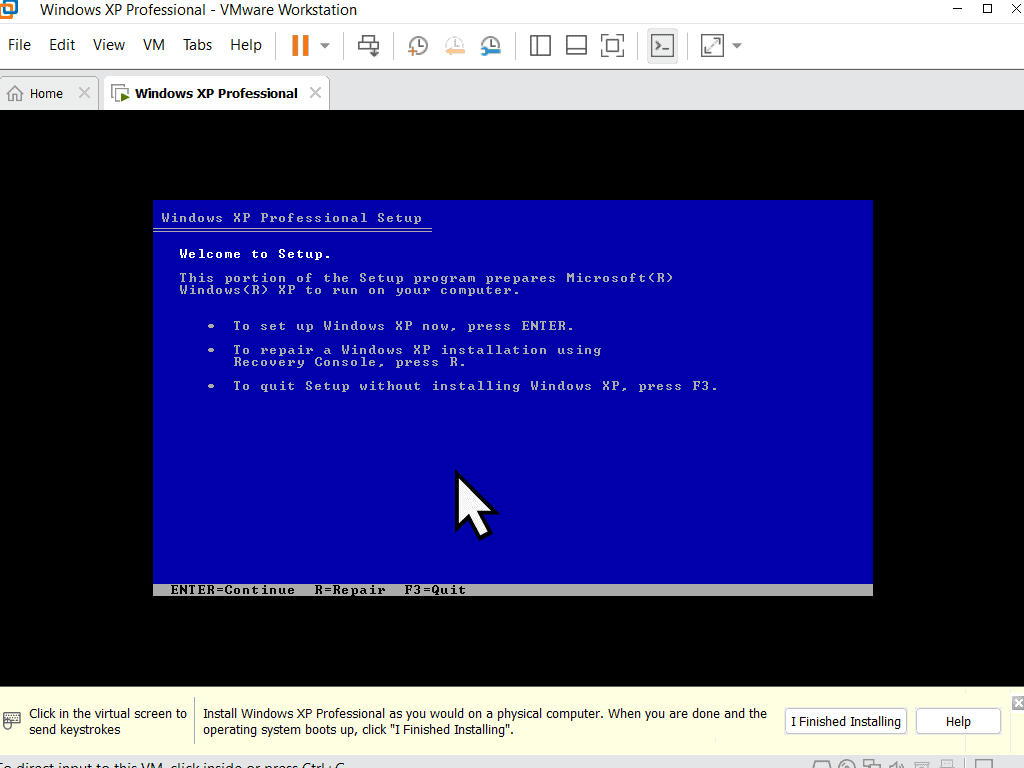
After clicking the Finish button, Workstation Pro will create the virtual hardware for your virtual machine. Once that’s done, it’ll boot the virtual computer from either the Windows XP CD or ISO image file.
Installing Windows XP (or any other operating system) onto a virtual machine is exactly the same as installing on to a “real” computer. So if you’re familiar with installing XP, you can skip this section and move to VMware Tools.
For those that need a little more guidance, here’s a complete step by step tutorial for installing Windows XP.
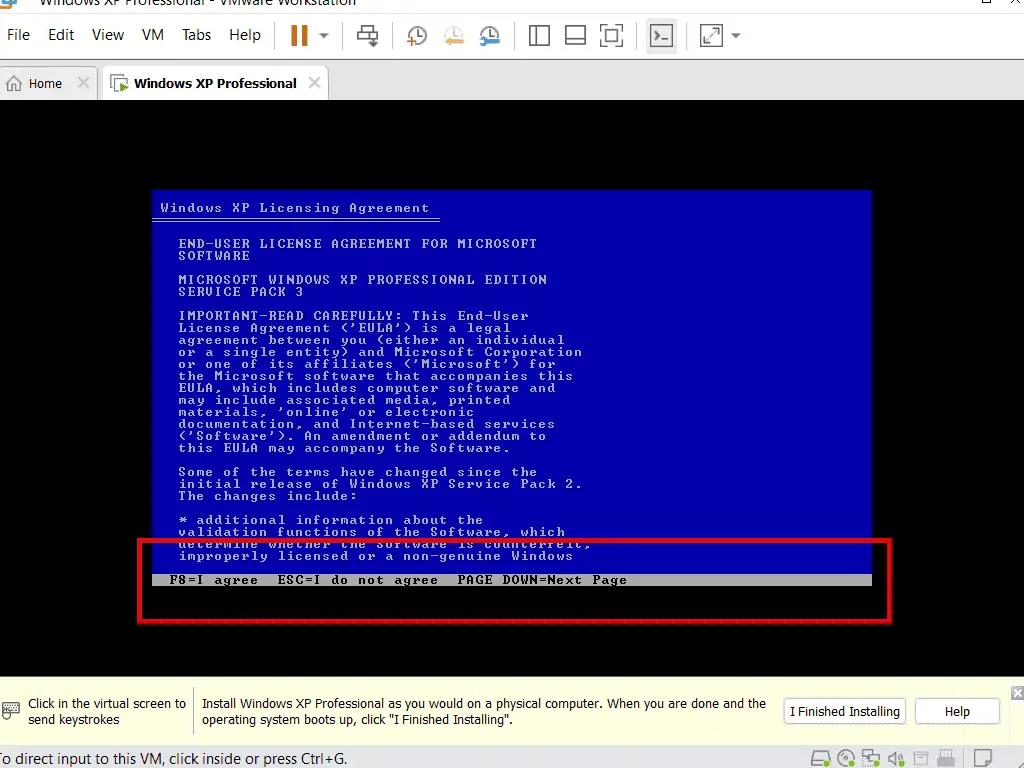
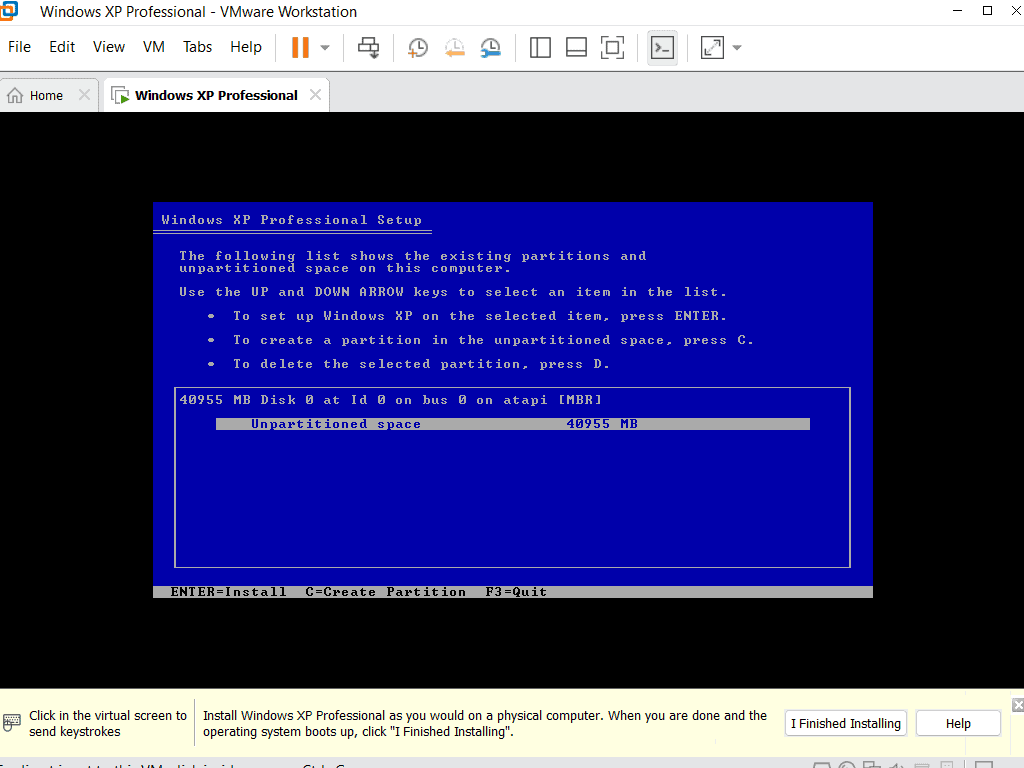
Guest And Host Keyboard and Mouse .
The virtual machine (guest) has to share the keyboard and mouse with the host (physical) computer.
To direct (or send) keystroke and mouse clicks to the guest (virtual machine), you need to left click onto the guest window.
To return mouse and keyboard control to the host (real) computer, press CTRL and Alt keys at the same time.
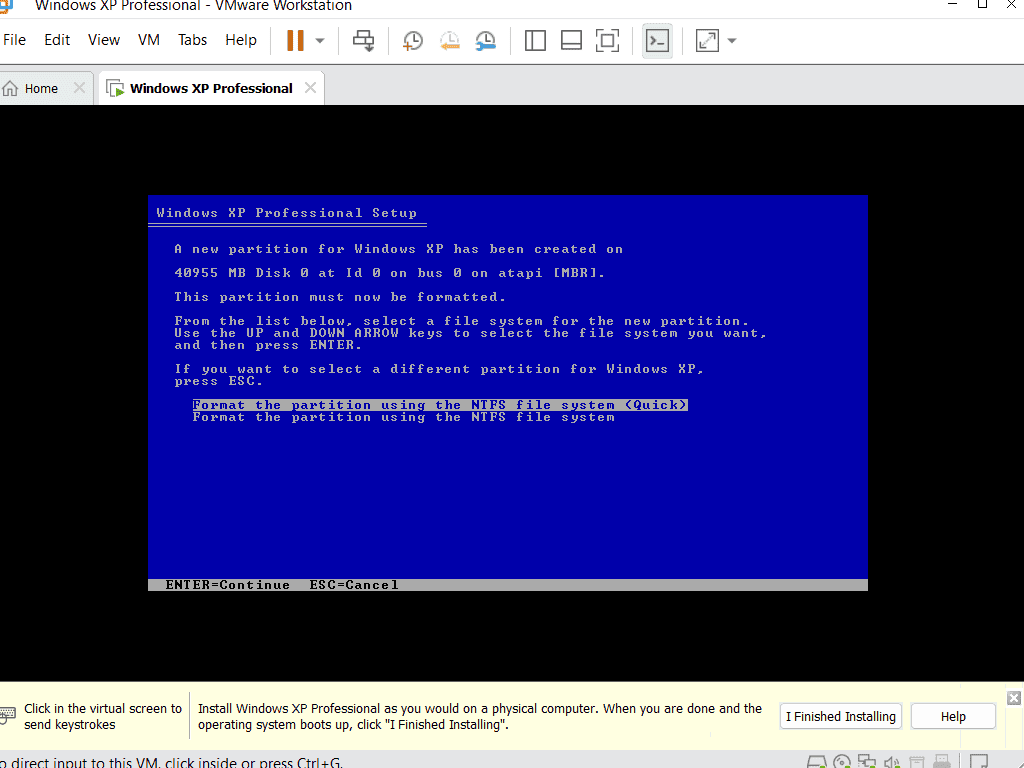
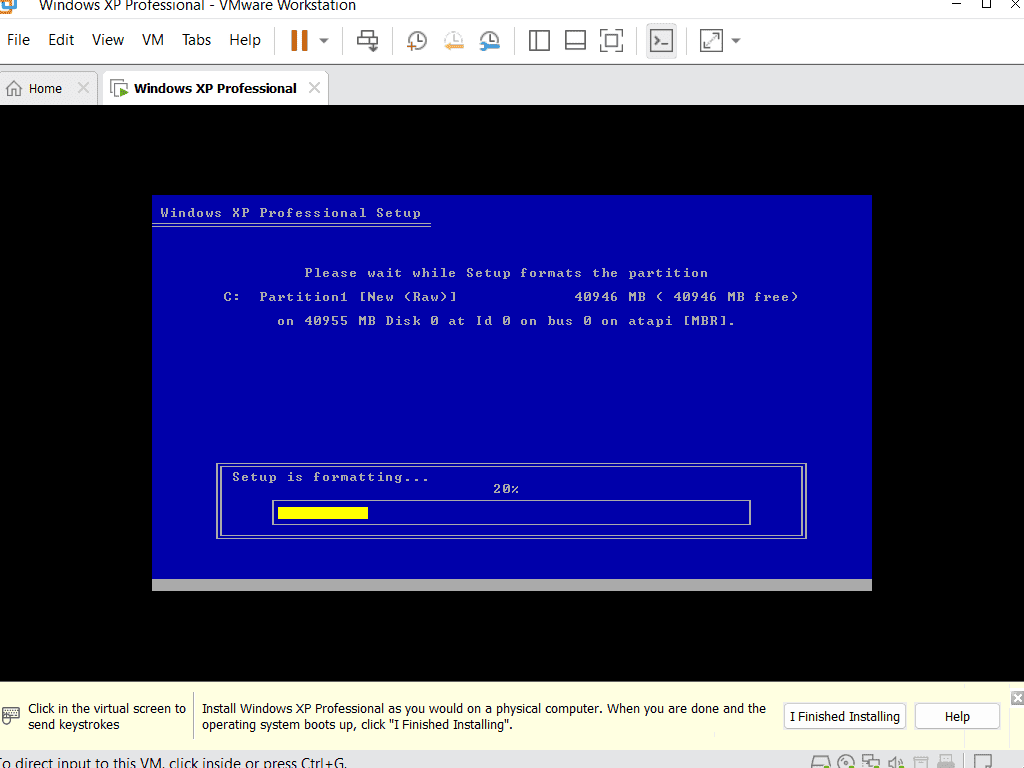
Windows XP will be installed onto the virtual hard disk that you created earlier using Workstation Pro. Even so, the disk still needs to be formatted.
Use the up and down arrows on your keyboard, select “Format the partition using the NTFS file system (Quick)”. Then press Enter.
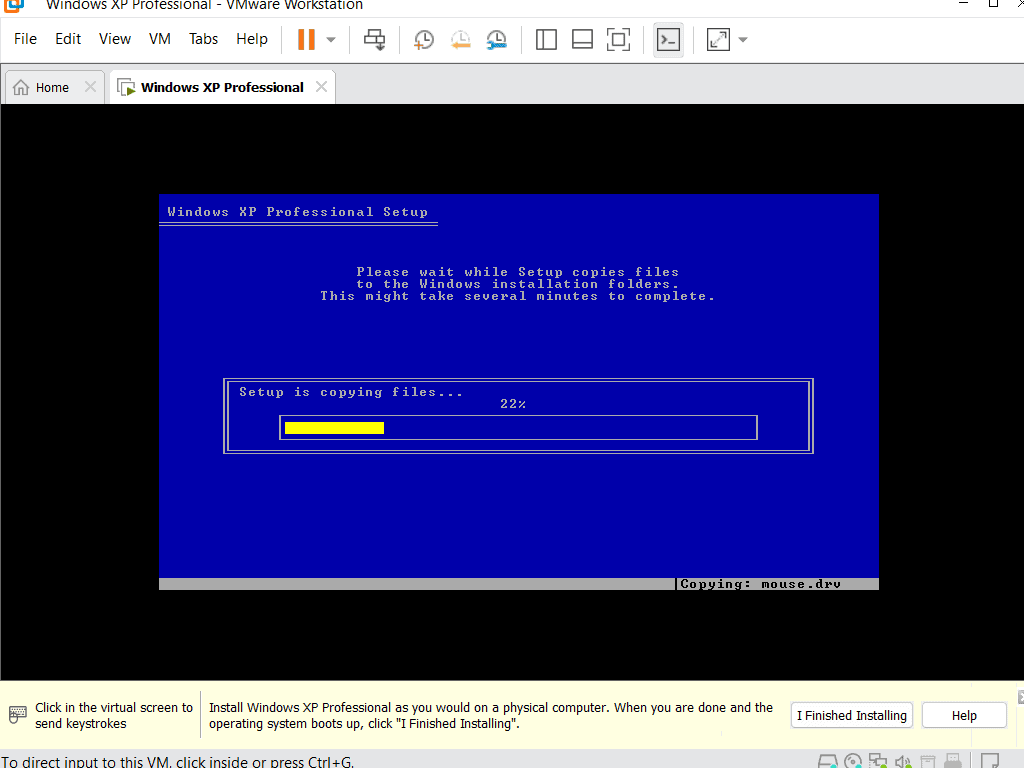
You’ll see the disk format progress indicator appear. It won’t take long to do. Then the setup will gather the files it needs.
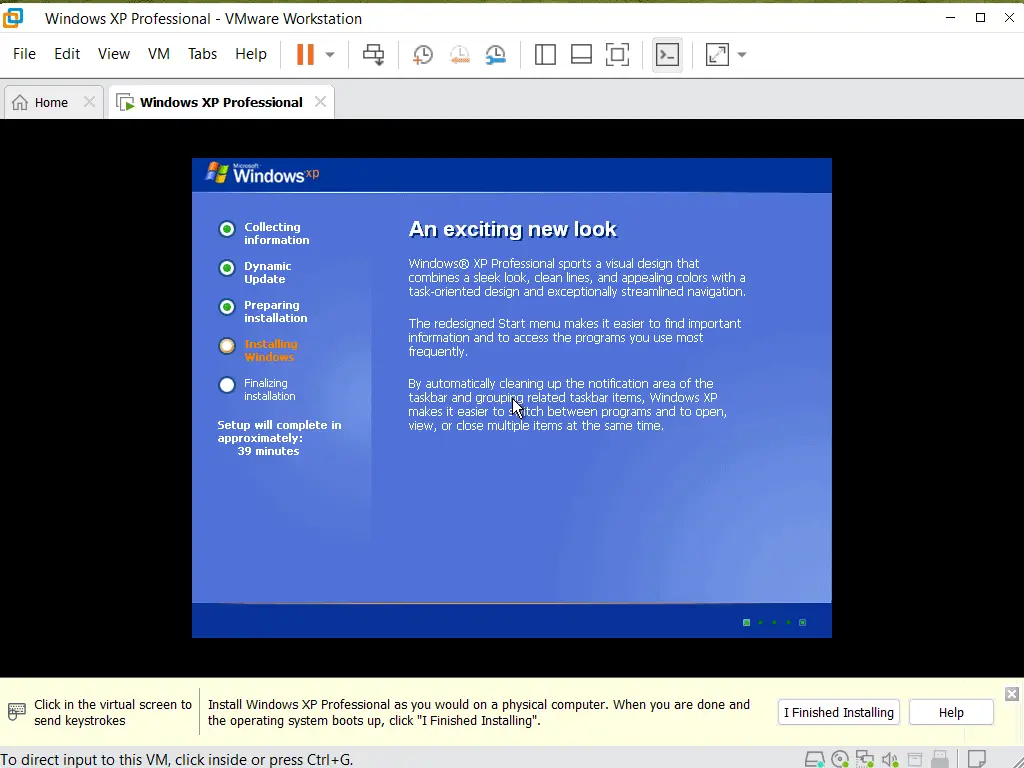
Regional And Language Options.
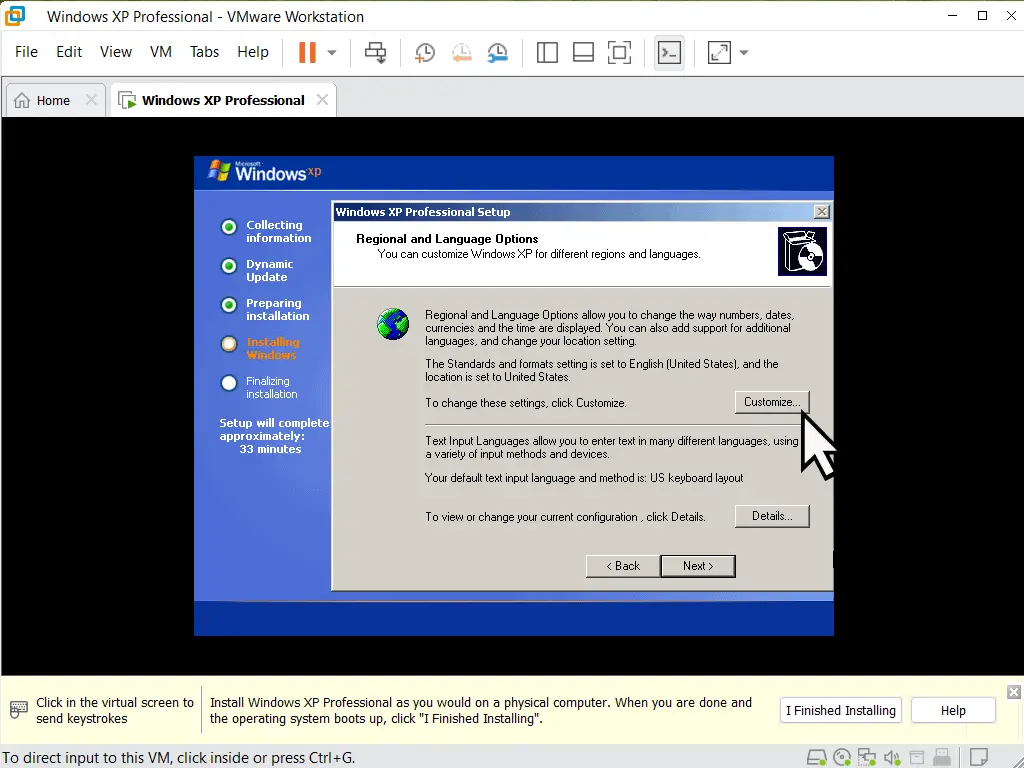
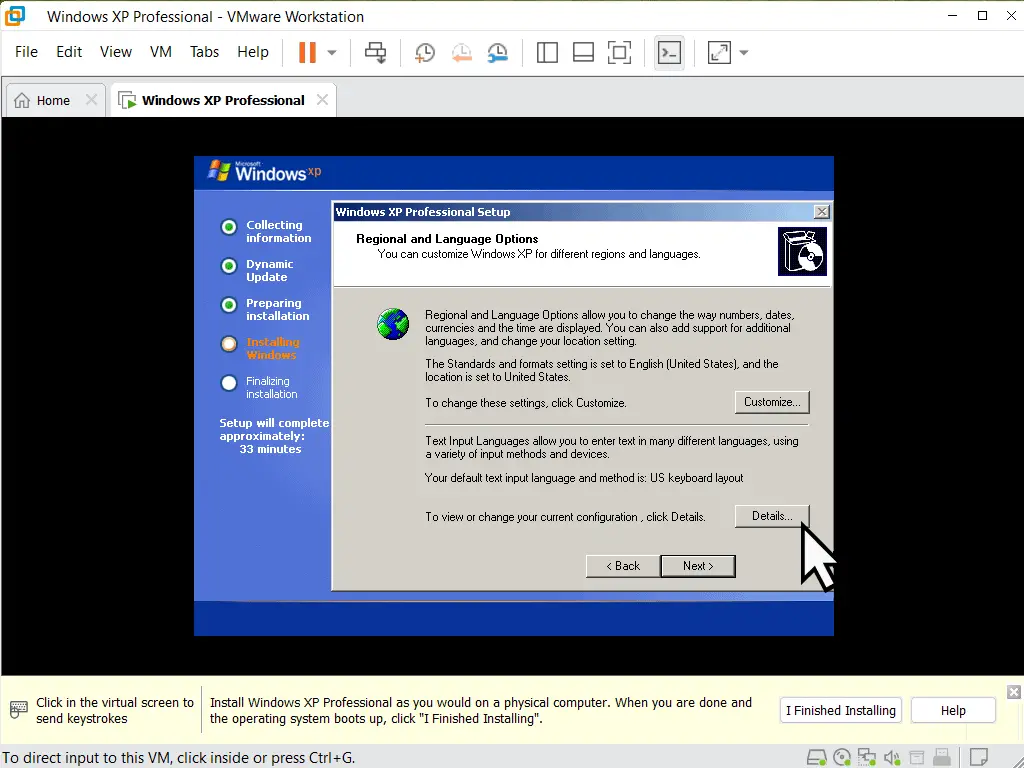
Before you can install Windows XP, you’ll need to set your regional and language options. By default English (United States) will be selected.
- To change your region, click the Customise button.
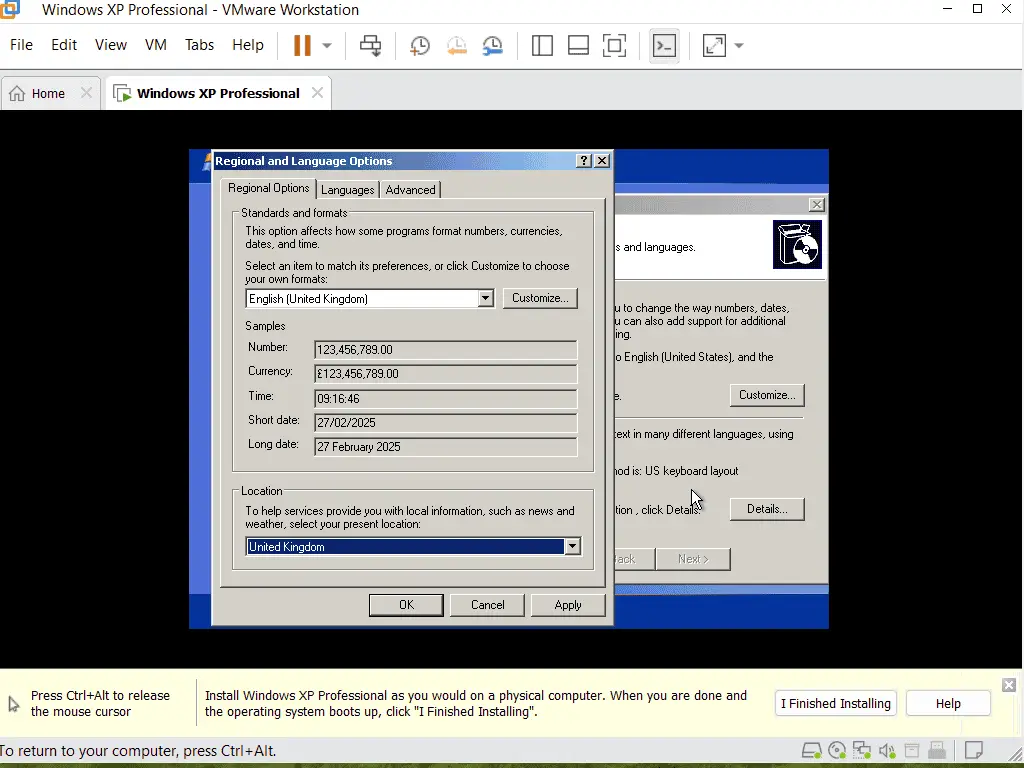
- Use the drop down arrowheads to change both the time and currency settings and the Location settings. Click OK when ready.
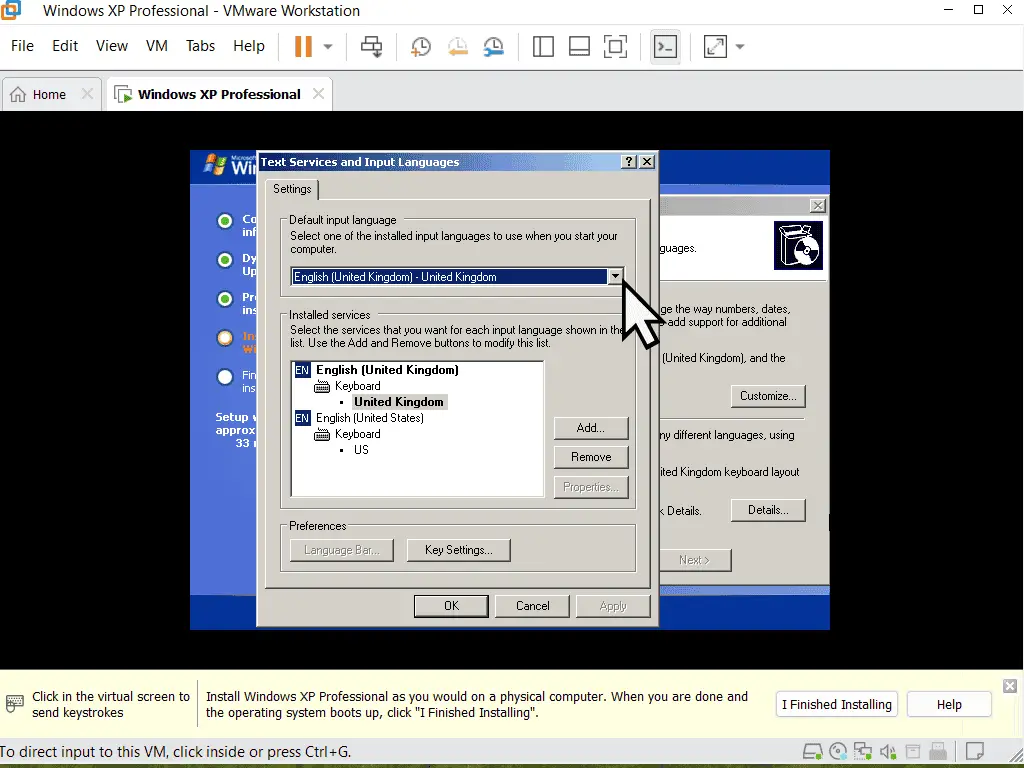
- Then click the Details button.
- Open the drop down menu and select your desired input language. Click OK. Then click the Next button to proceed.
XP Setup.
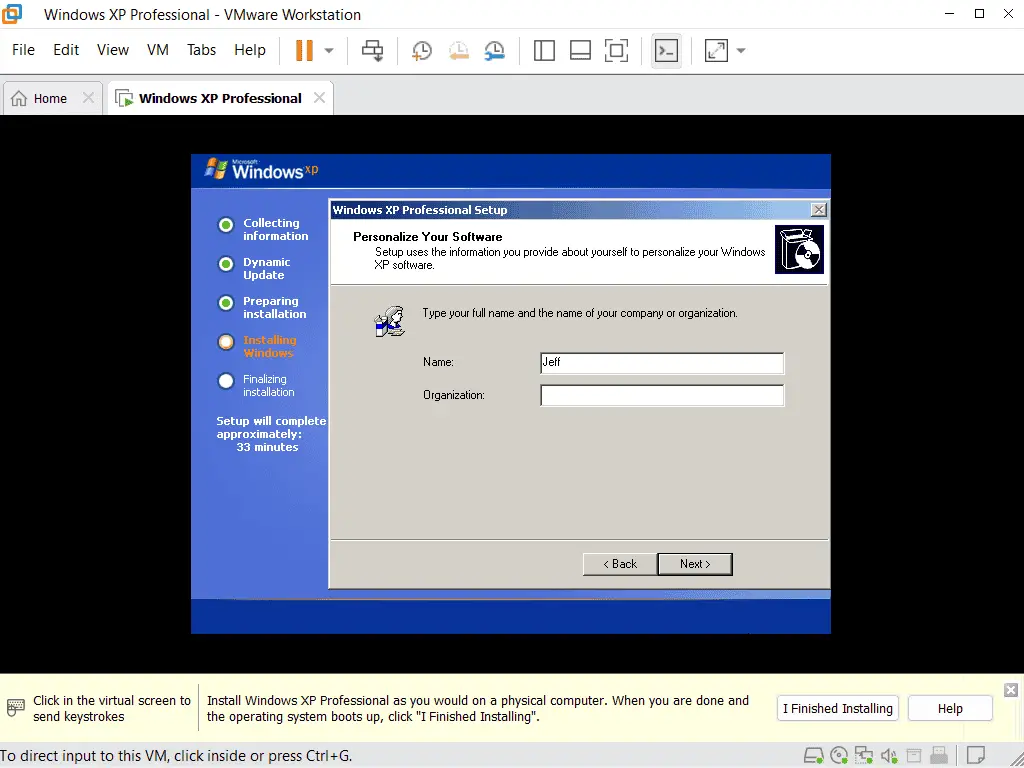
- Enter your username and click Next.
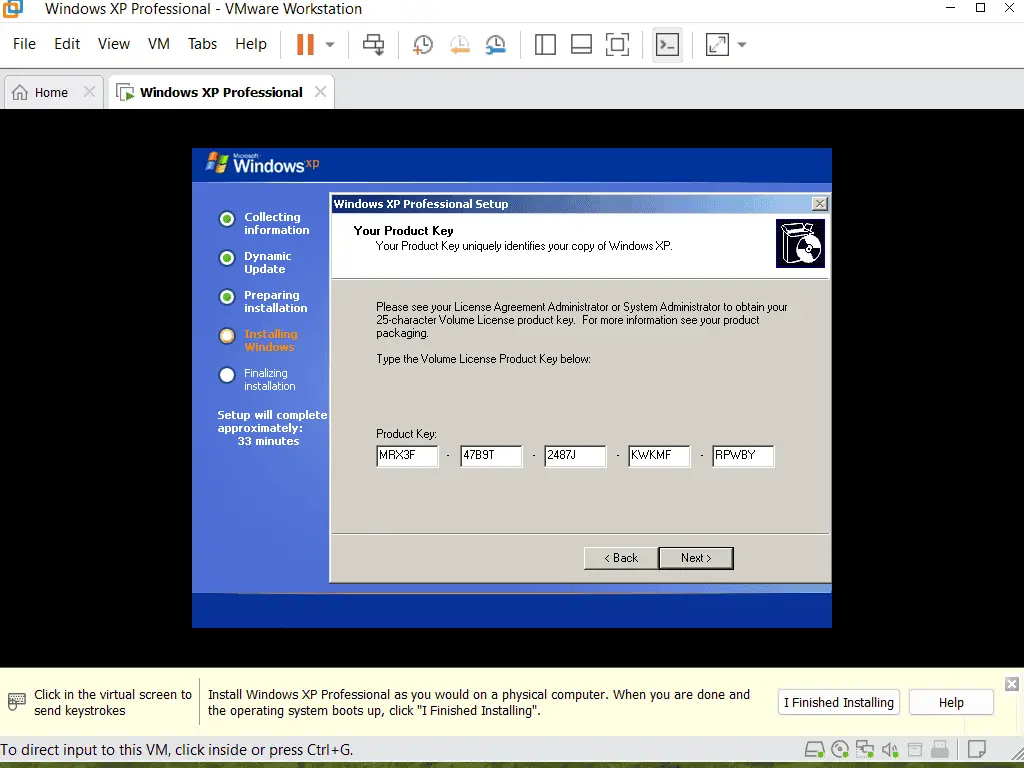
- Type in the Windows XP product key.
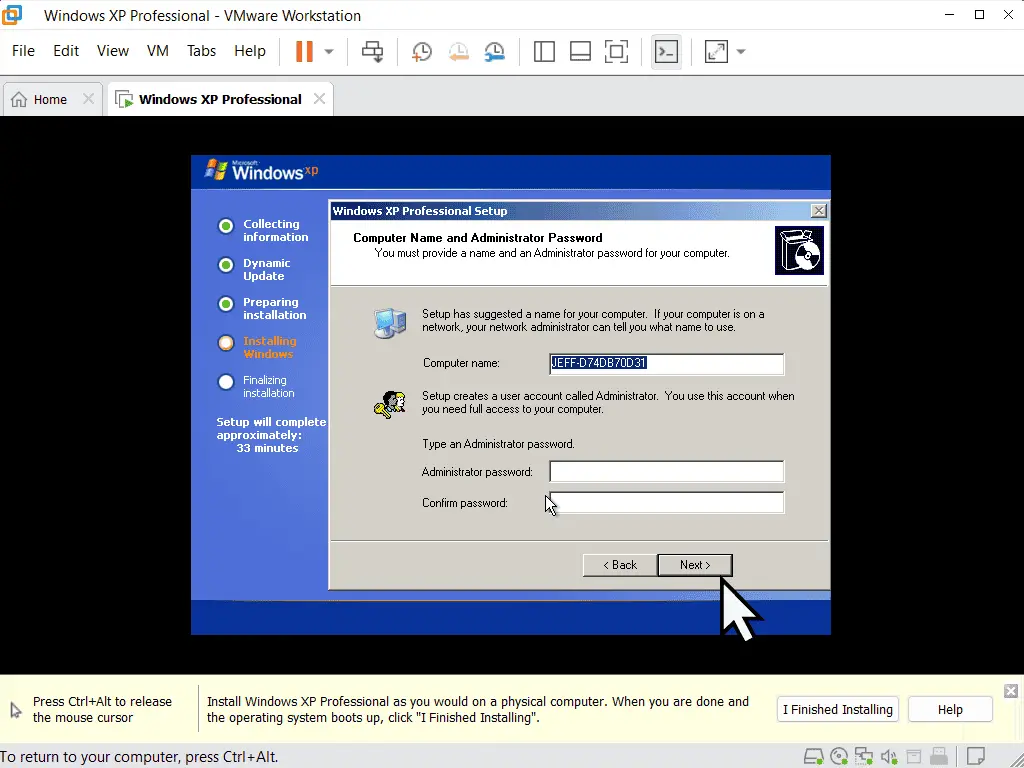
- You can set a password for the Administrator account, but I wouldn’t do that here. You can add passwords later. Just leave the box blank and click Next.
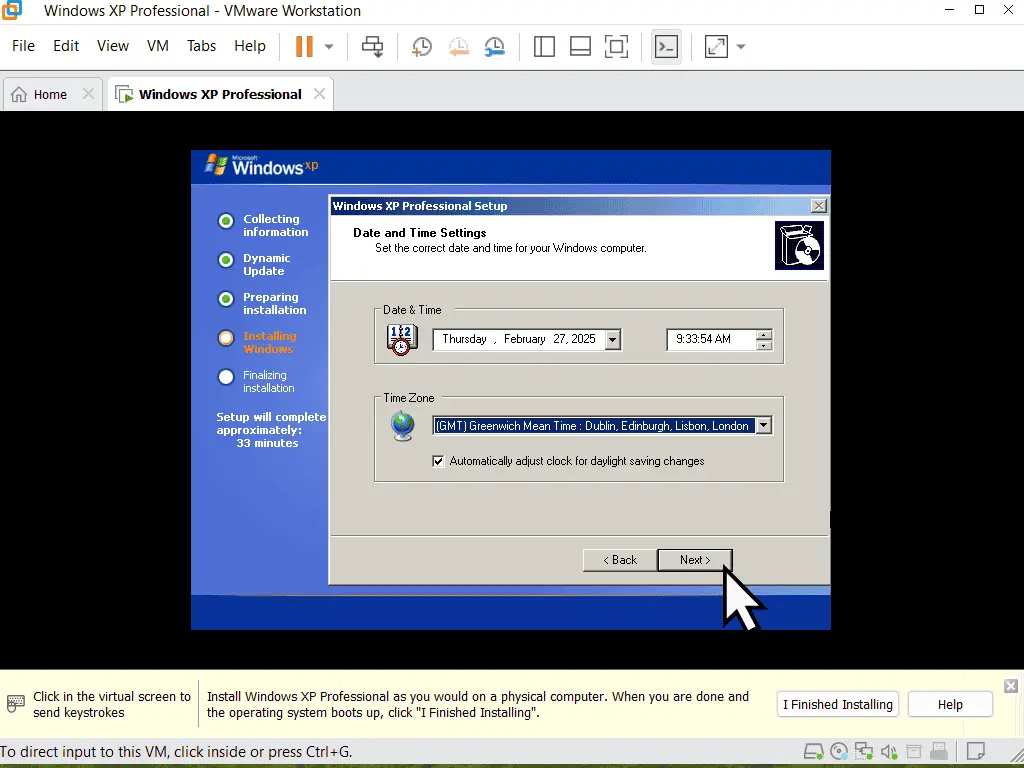
- Select your Time Zone from the drop down menu and click Next.
Network Settings.
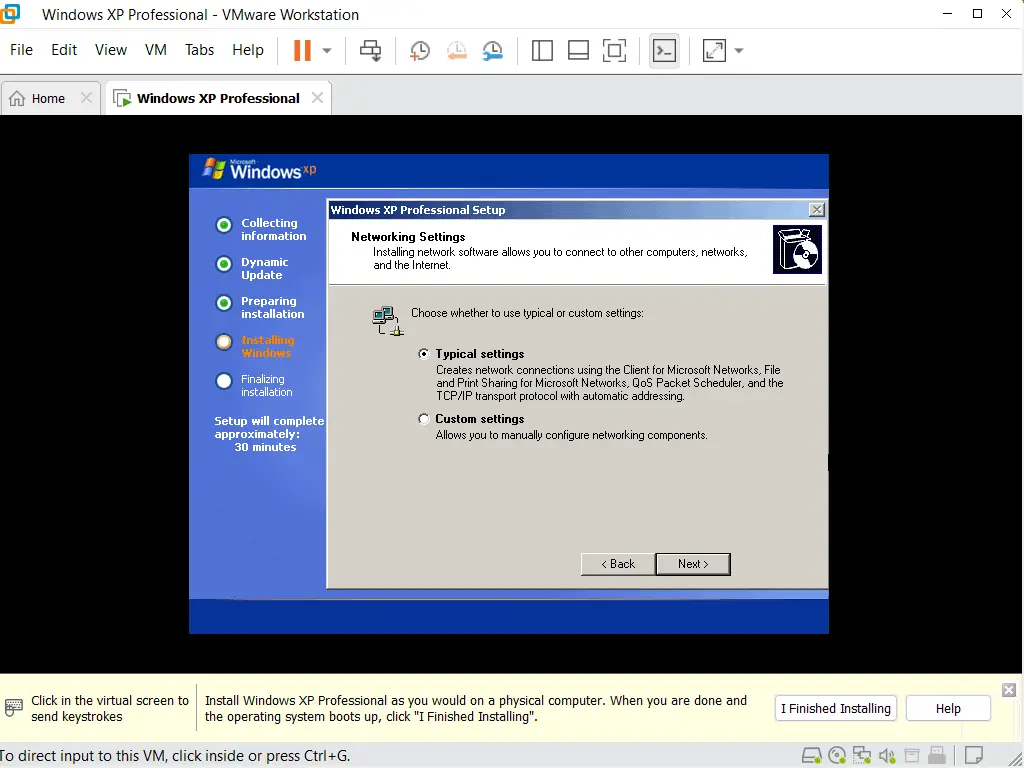
Although you’re installing Windows XP as a virtual machine, the setup program doesn’t know that. It installs as if it were installing on to a physical computer.
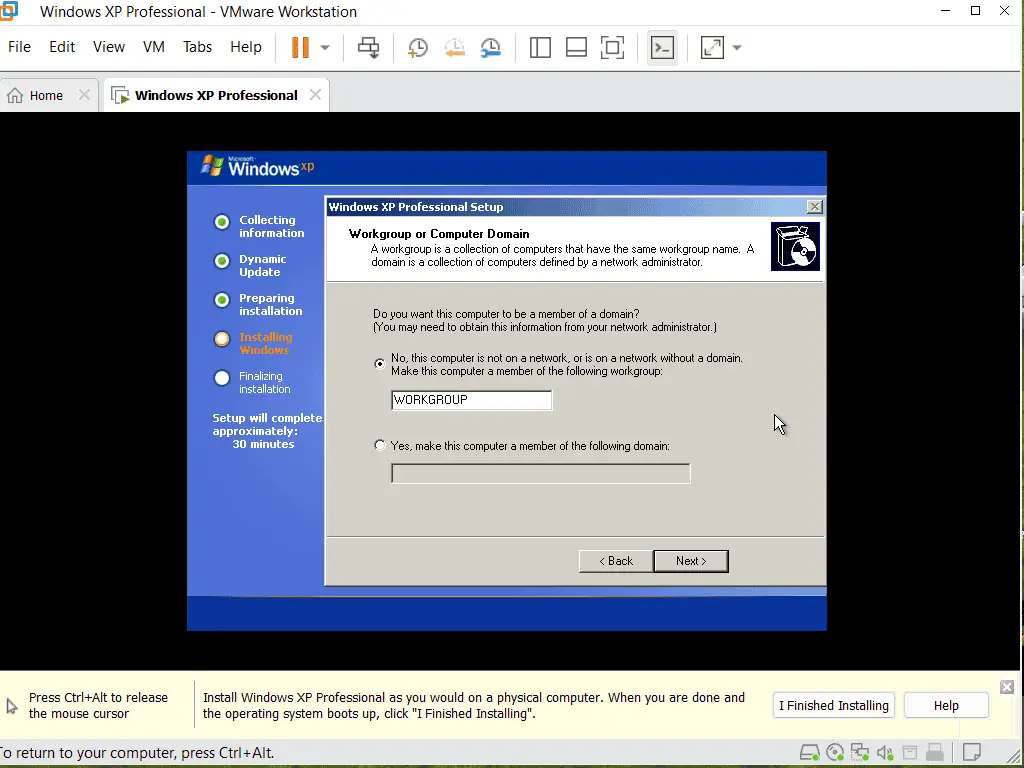
For the Network settings, select Typical Settings. Then select Workgroup and click the Next button.
Welcome To Windows XP.
After a few restarts you’re nearly there.
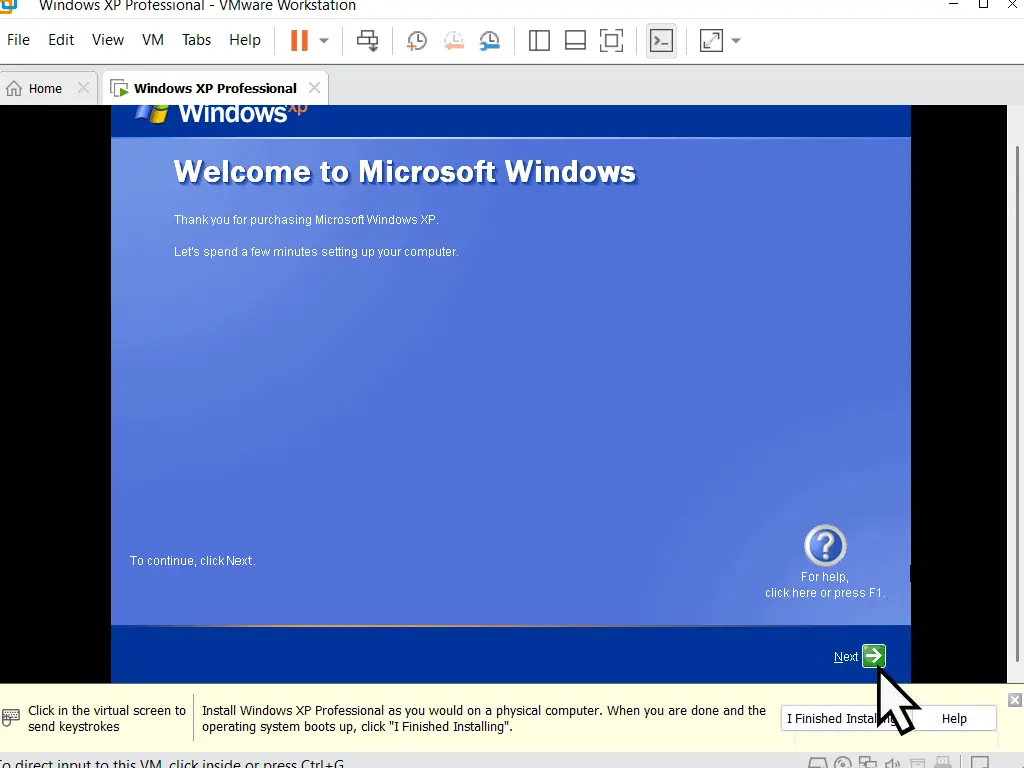
- Welcome to Microsoft Windows. Click the Next button.
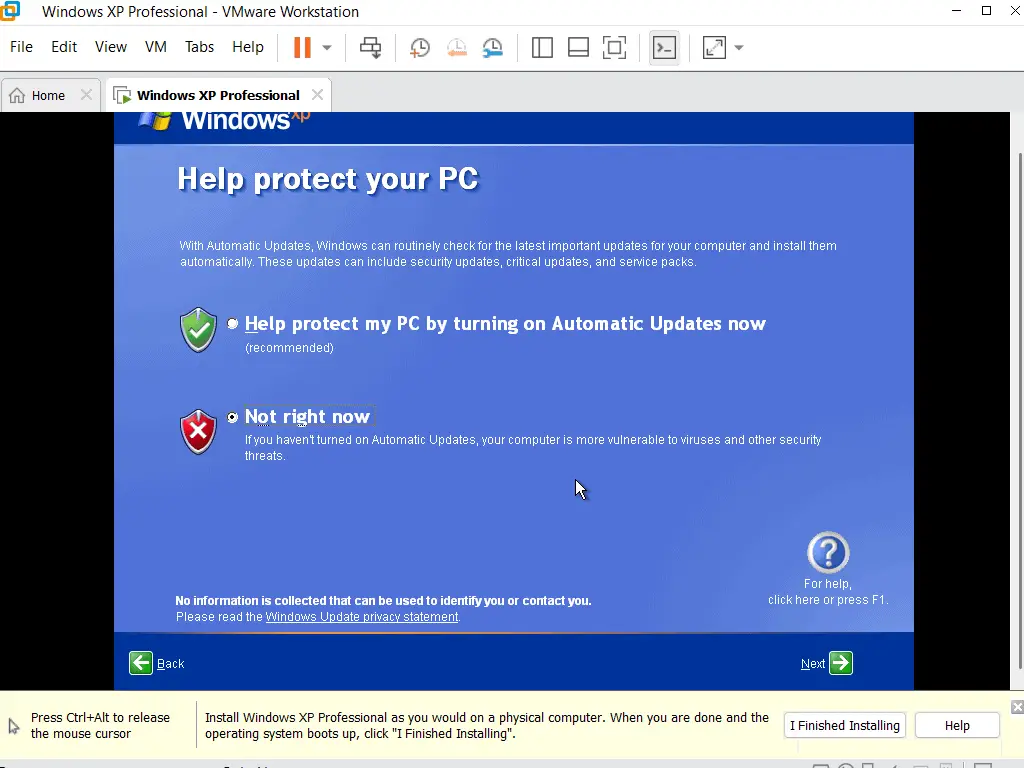
- Windows XP updates have been turned off by Microsoft so there’s no point in enabling updates. Select Not Right Now and click Next.
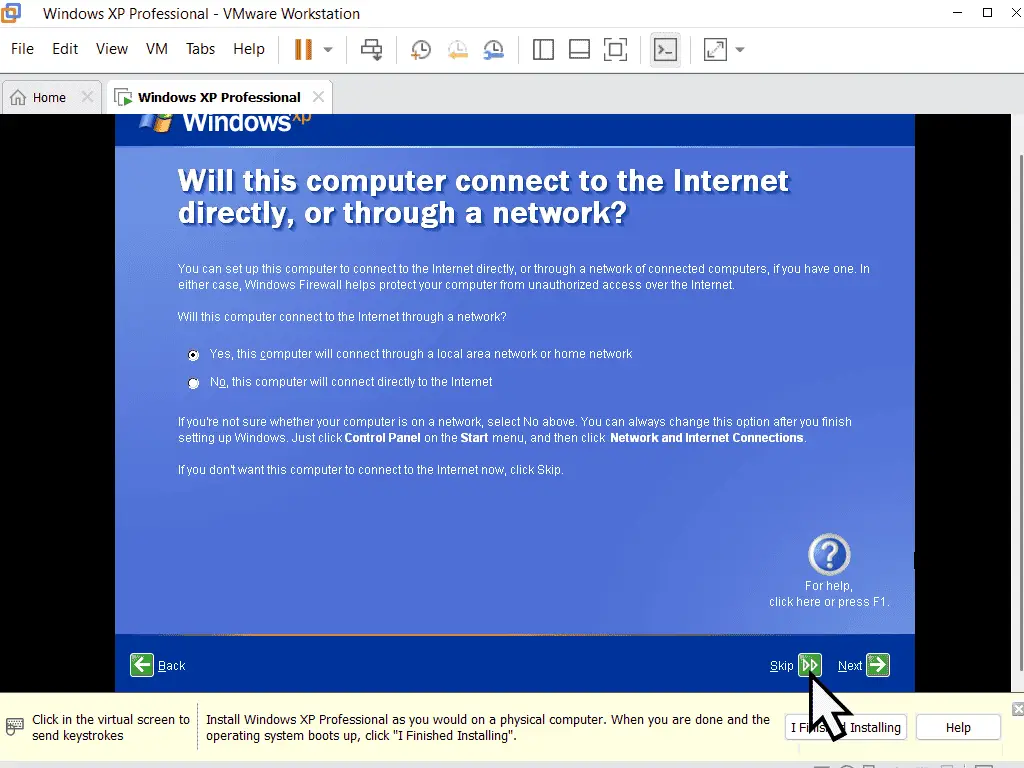
- Even though this is a virtual computer, you probably don’t want Windows XP going anywhere near the Internet. Click the Skip button.
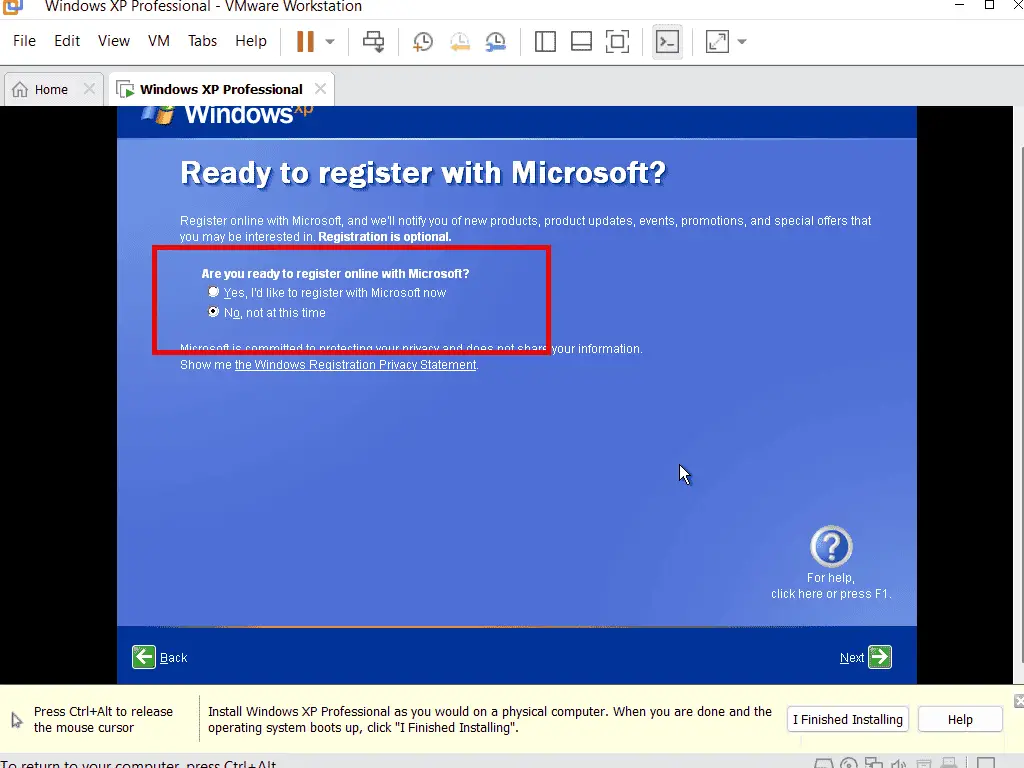
- Finally select No, Not At This Time, when asked to register with Microsoft.
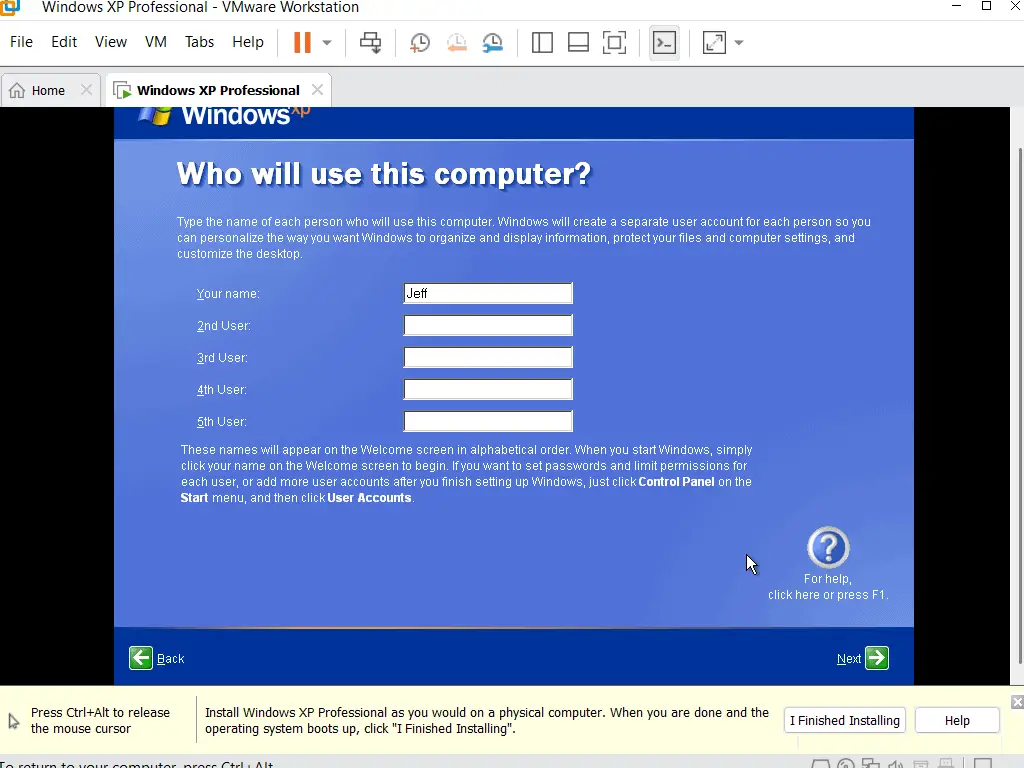
Enter A Username.
Enter a username for your account.
You can add up to 5 users here if you want to. And you can always create more user accounts once Windows XP is up and running.
This is the last step before booting into the desktop.
VMware Tools For Legacy Operating Systems.
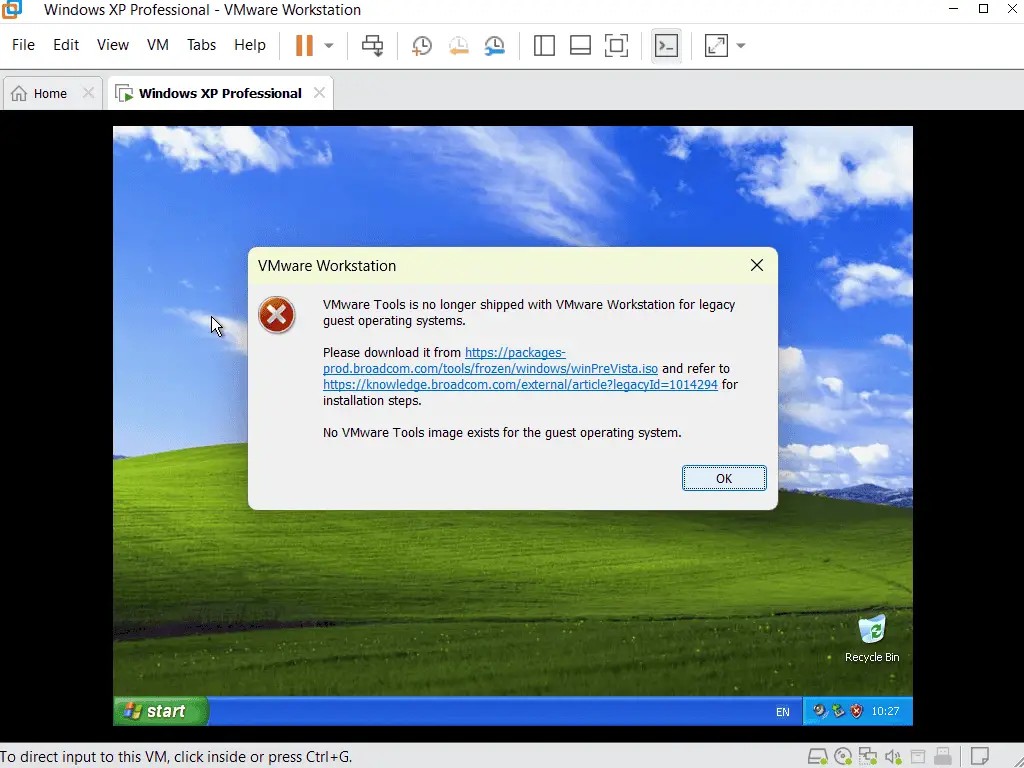
VMware Tools is basically a set of drivers for virtual machines. They need to be installed directly on to the VM in much the same way that drivers need to be installed onto physical (real) computers.
However the necessary tools are no longer supplied with the latest version of Workstation Pro. As with everything else, time moves on and they have been removed from the standard download.
But you can still download and install the VMware Tools for legacy OSes such as Windows XP.
Summary.
Running Windows XP inside a virtual machine is probably the best way to use it these days. It’ll work great for running older software, which you can install and use just as you would have on you’re old PC.
Before you start installing anything though, create a backup. I’d suggest making a complete backup to begin with, and then using snapshots before making any changes to the XP VM. It’ll save you a lot of time going forward.
Stay Informed. Stay In Touch.
Now that you’ve found me, keep in touch. I publish new articles and update older ones constantly.
Let me send you a monthly email with all the latest guides for you to see if there’s anything you’re interested in.


