
Setting up a home network in Windows 10 or Windows 11 lets you share files and folders between all your desktop PCs and laptops over your home Wi-Fi or Ethernet connection — without needing USB drives, email, or cloud storage.
Windows doesn’t make home networking as straightforward as it should be, but if you follow these 5 steps in order on each PC, you’ll have a working home network every time.
What you’ll need: Two or more Windows PCs connected to the same router (via Wi-Fi or Ethernet cable). These steps work for Windows 10 Home, Windows 10 Pro, Windows 11 Home, and Windows 11 Pro.
Table of contents
- Step 1: Find the Names of Your Computers
- Step 2: Set Your Network Profile to Private
- Step 3: Turn On Network Discovery and File Sharing
- Step 4: Share a Folder on Your Home Network
- Step 5: Connect to Another Computer on Your Home Network
- Bonus Step: Share all Your User Folders over the Network
- Troubleshooting: Home Network Not Working?
- Frequently Asked Questions
- Summary
Step 1: Find the Names of Your Computers
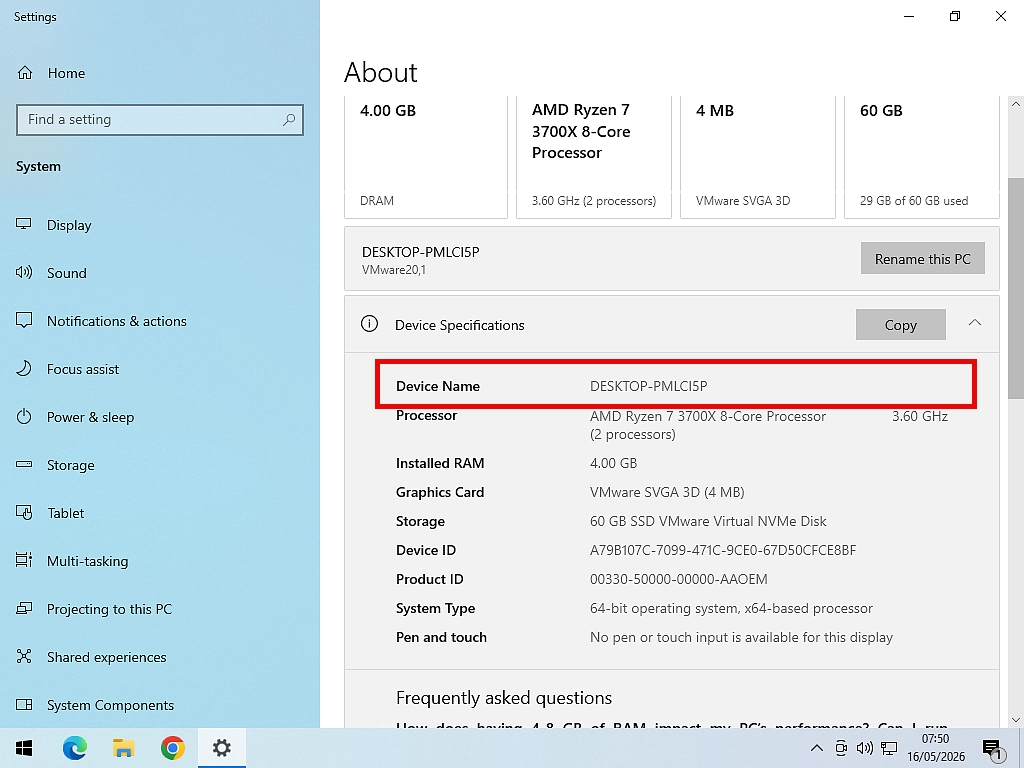
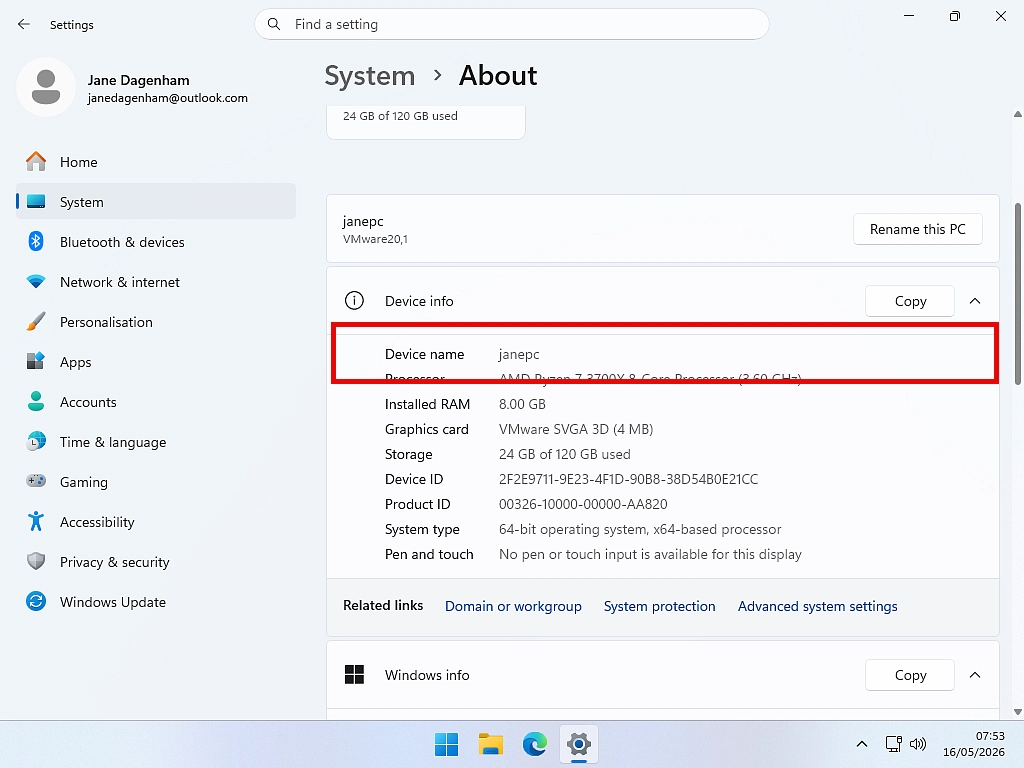
Every Windows PC has a unique device name that identifies it on a local network. Before you can connect computers together, you need to know what each one is called.
How to find your PC name in Windows 10 and Windows 11
- Click the Start button and type “view your PC name“.
- Click View your PC name (System Settings) in the results.
- Note down the Device Name — you’ll need it later.
Do this on every computer you want to add to your home network. If a device name looks like a random string of numbers and letters, you can change your computer’s name to something more memorable. Good device names are short and descriptive, for example, LivingRoomPC or JaneLaptop. This makes it much easier to identify computers when browsing your network.
If you are going to change the Device Name, do it now before setting up your network.
Step 2: Set Your Network Profile to Private
When your PC connects to a Wi-Fi or Ethernet network, Windows automatically assigns it a network profile — either Public or Private.
- Public network: Blocks file sharing and network discovery. Designed for coffee shops, airports, and other untrusted networks.
- Private network: Allows file sharing and network discovery. This is the setting you need for a home network.
Windows often defaults to Public, even at home. You need to change this to Private on every computer in your network otherwise you’ll never get them connected.
How to Change to a Private Network in Windows 10
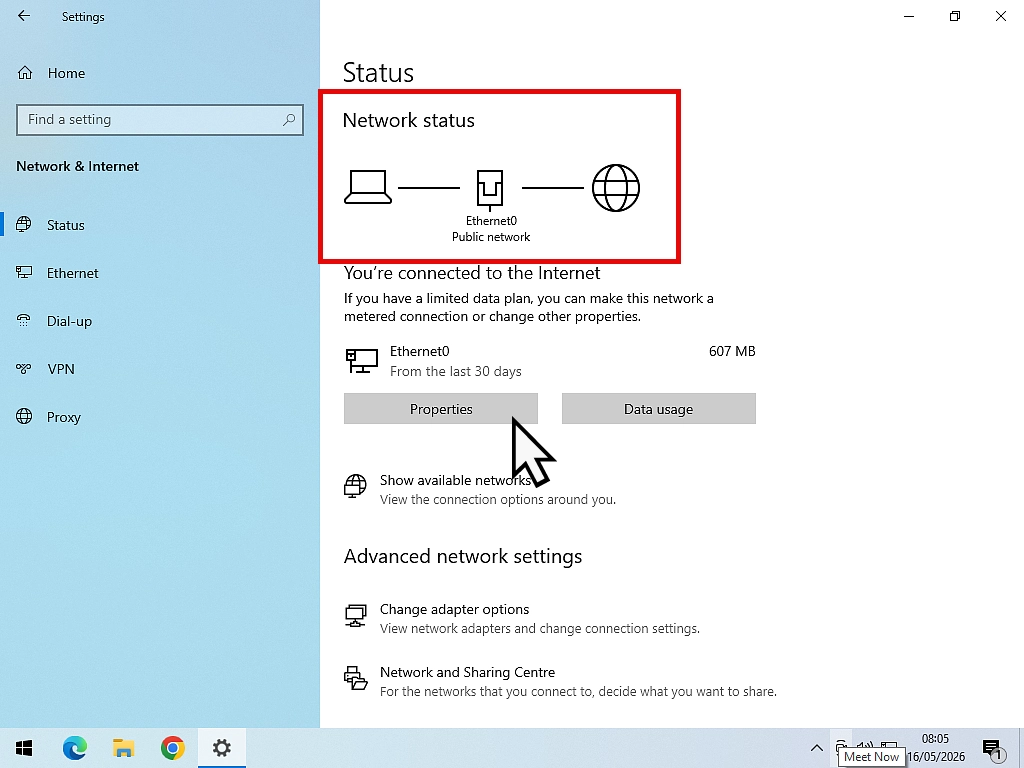
- Click Start and type “network status“, then click Network Status (System Settings)
- If it shows that your computer is on a Private network, you’re good to go.
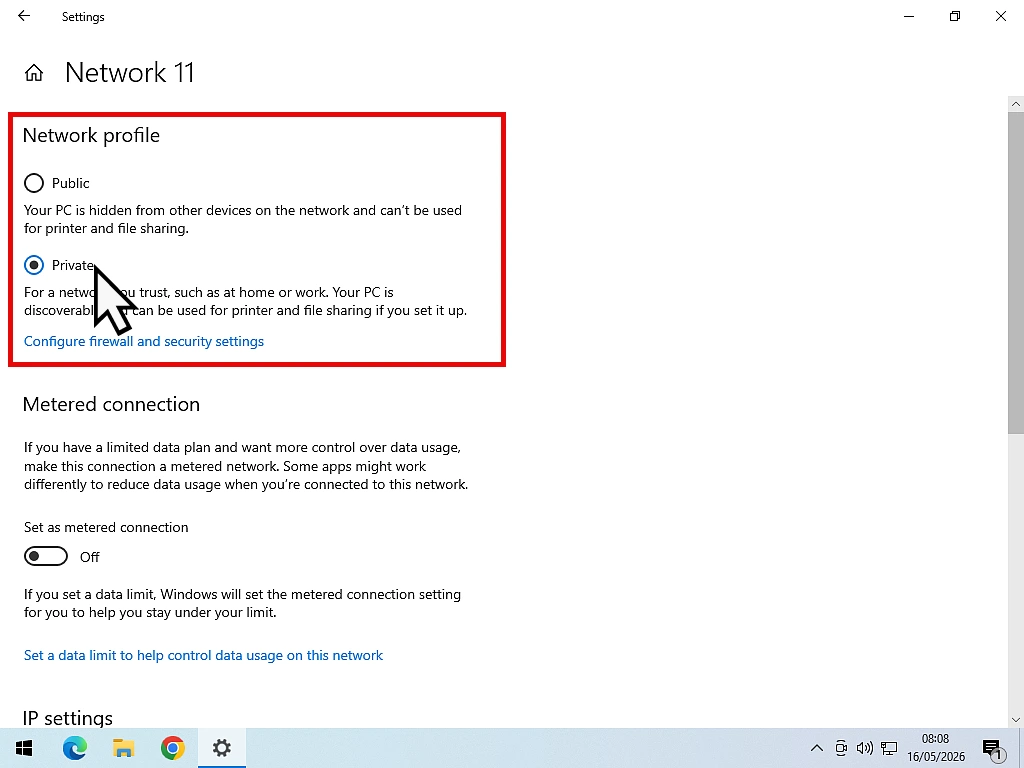
- But if it shows Public network, you need to change it, click Properties
- Under Network Profile, select Private
- Restart your PC
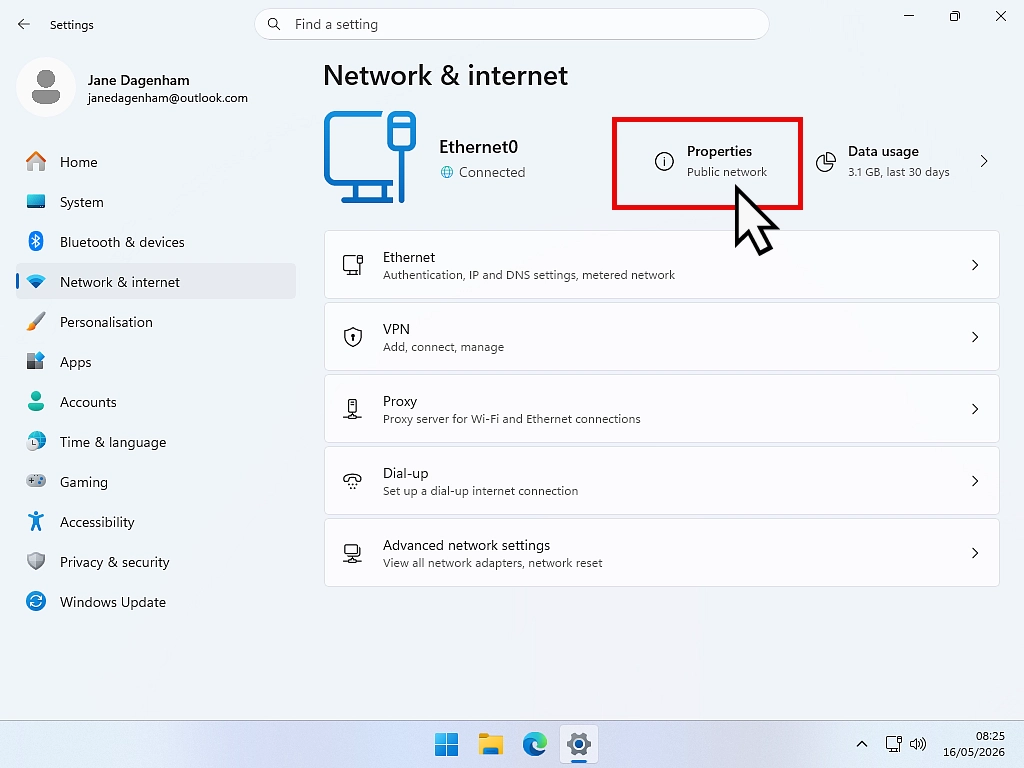
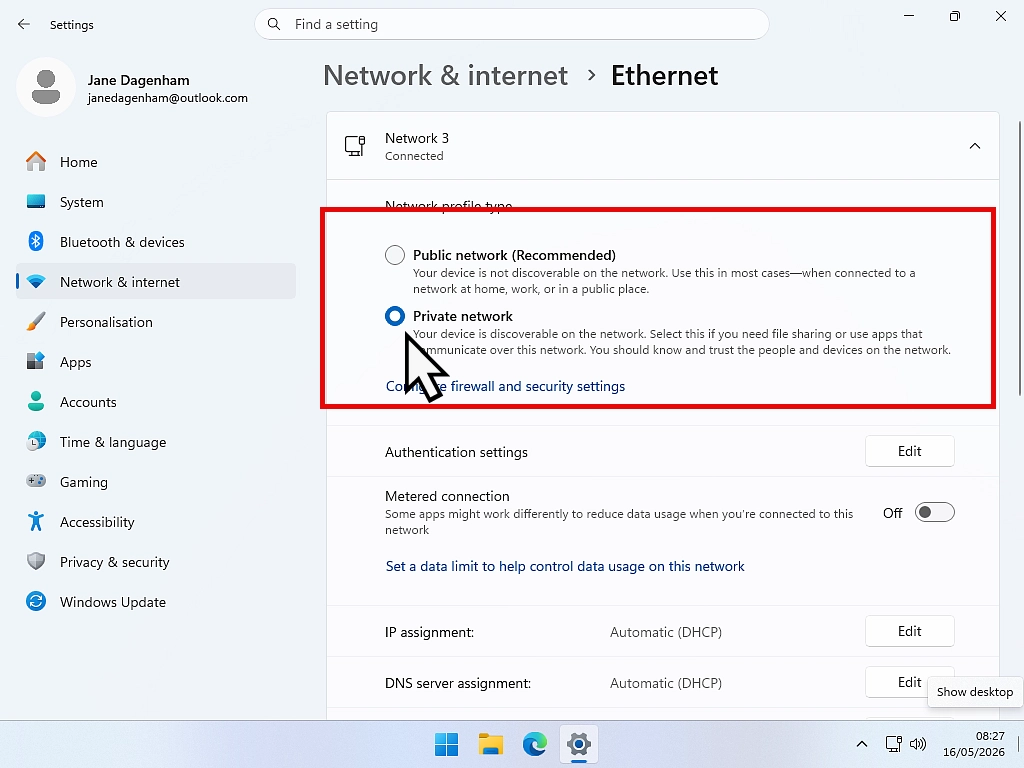
How to Change to a Private Network in Windows 11
- Click Start and open Settings
- Go to Network & Internet
- Click Properties next to your current connection
- Under Network Profile Type, select Private network
- Restart your PC
Step 3: Turn On Network Discovery and File Sharing
With your network set to Private, you now need to enable network discovery and file and printer sharing. These settings allow your PC to see (and be seen by) other computers on your home network. It’s this setting that’s the reason you have to change the network status to private, since it opens up your PC to incoming connections.
On both Windows 10 and Windows 11:
- Click Start and type “manage advanced sharing settings“.
- Click Manage Advanced Sharing Settings in the results.
- Expand the Private networks section.
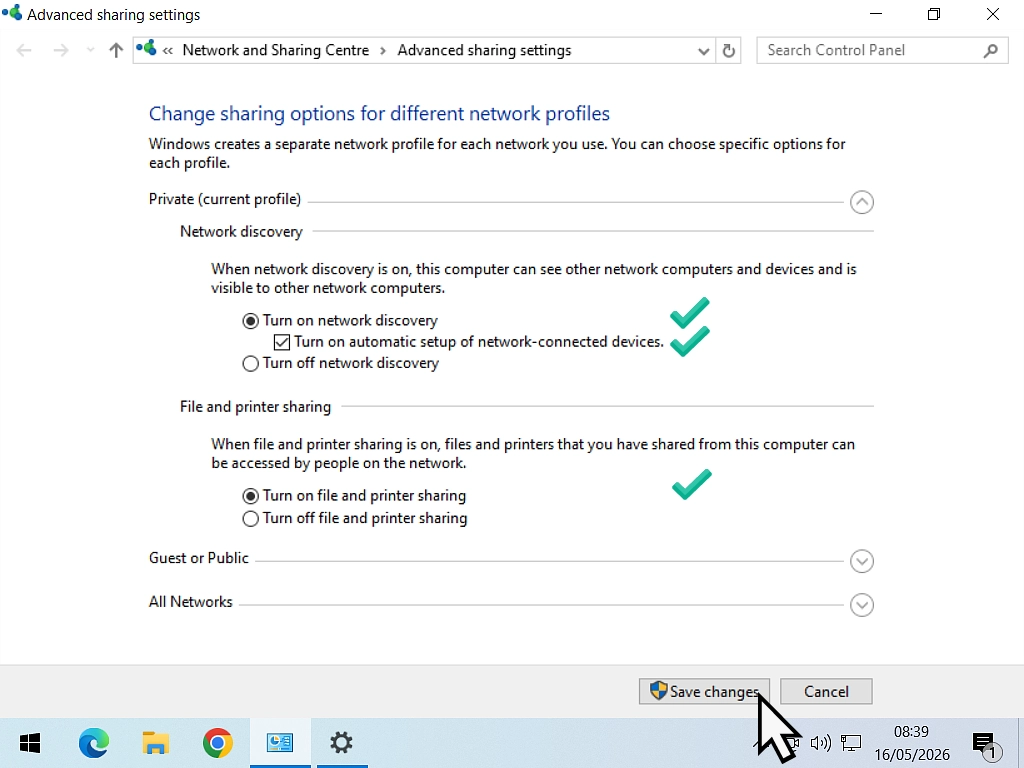
In Windows 10, enable:
- Turn on network discovery
- Turn on automatic setup of network connected devices
- Turn on file and printer sharing
- Click Save Changes and restart.
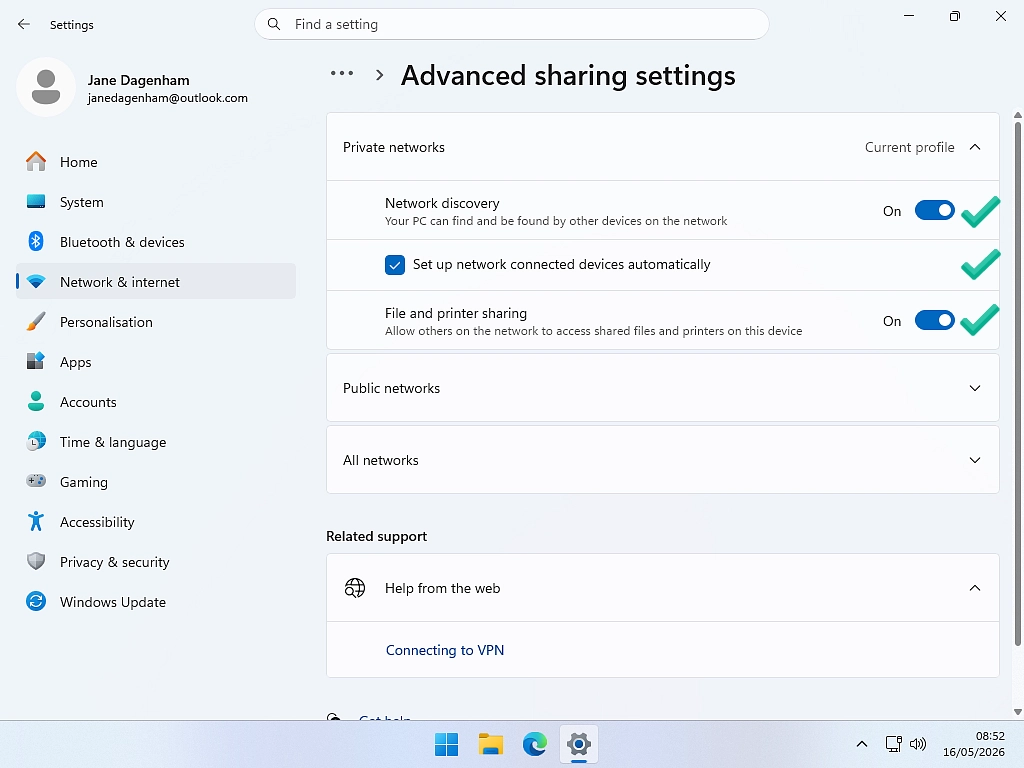
In Windows 11, turn on:
- Network discovery
- Set up network connected devices automatically
- File and printer sharing
- Restart your computer after making the changes.
Repeat on Every Computer
Repeat these steps on every computer that you want on your home network. Find the device name, check it’s on a private network and then configure your network settings.
Step 4: Share a Folder on Your Home Network
Now that your PCs can find each other, you need to specify which folders you want to share. Windows lets you share any folder on your hard drive with other users on your local network.
Note that you can share multiple folders on each PC and that they don’t have to be the same folders. For example you could share your Documents folder on one computer and your Pictures and Video folders on the other one.
How to Share a Folder Over a Home Network
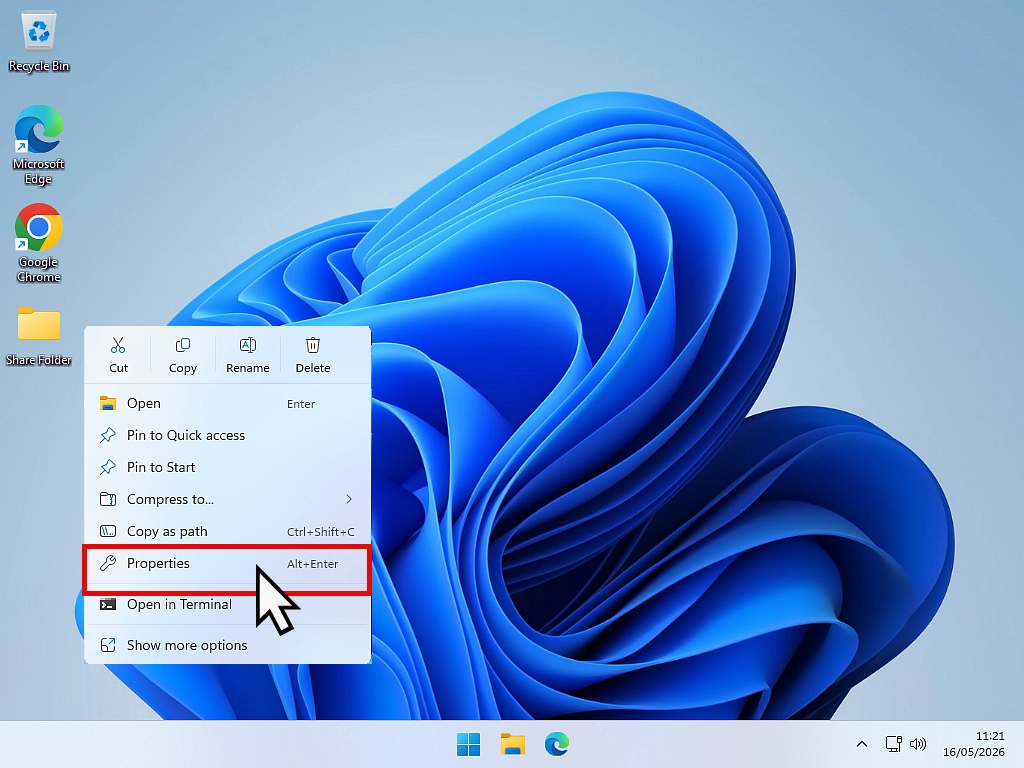
- Find the folder that you want to share across your home network. Right click it and then click Properties on the options menu.
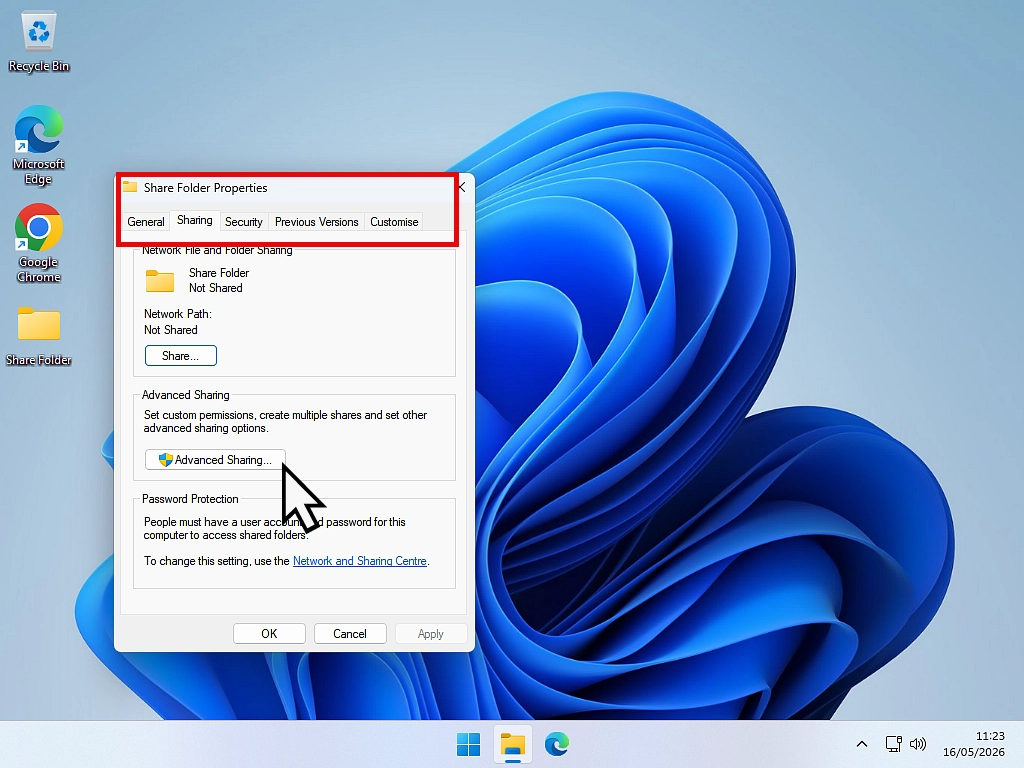
- Click the Sharing tab (at the top of the window) and then click the Advanced Sharing button.
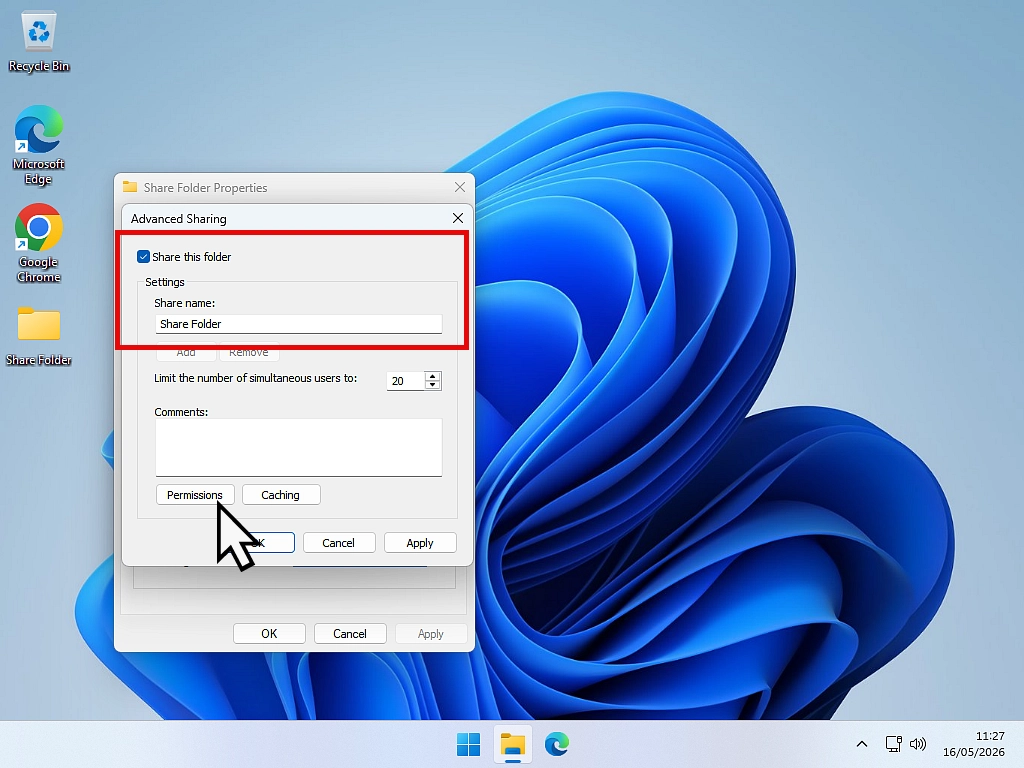
- Select “Share this folder” and then click the Permissions button.
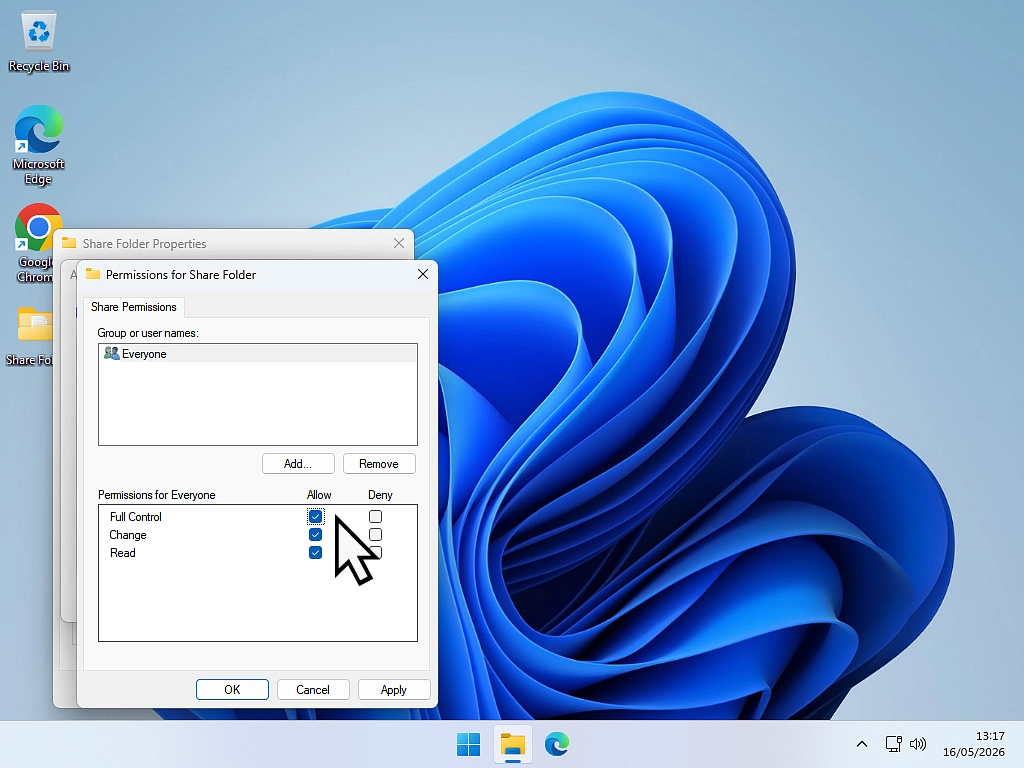
- On the permissions screen select Full Control. That grants you the permission to edit any files stored within the shared folder.
- Click Apply and OK on the open windows.
Step 5: Connect to Another Computer on Your Home Network
With everything set up, it’s time to access another computer on your network. Make sure that your computers are on and aren’t in either sleep mode or hibernation.
How to Browse Computers on Your Home Network
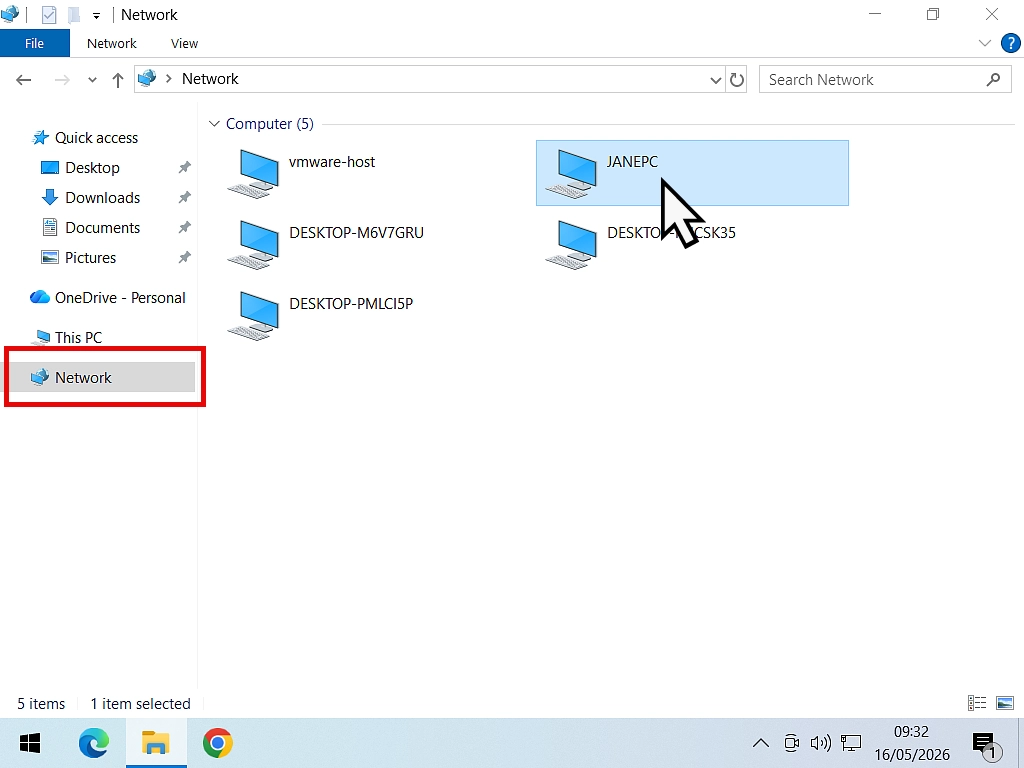
- Open File Explorer (Windows + E).
- In the left-hand navigation panel, click Network.
- You should see the other computers on your network listed by their device name.
- Double-click the computer you want to connect to.
Enter Network Credentials
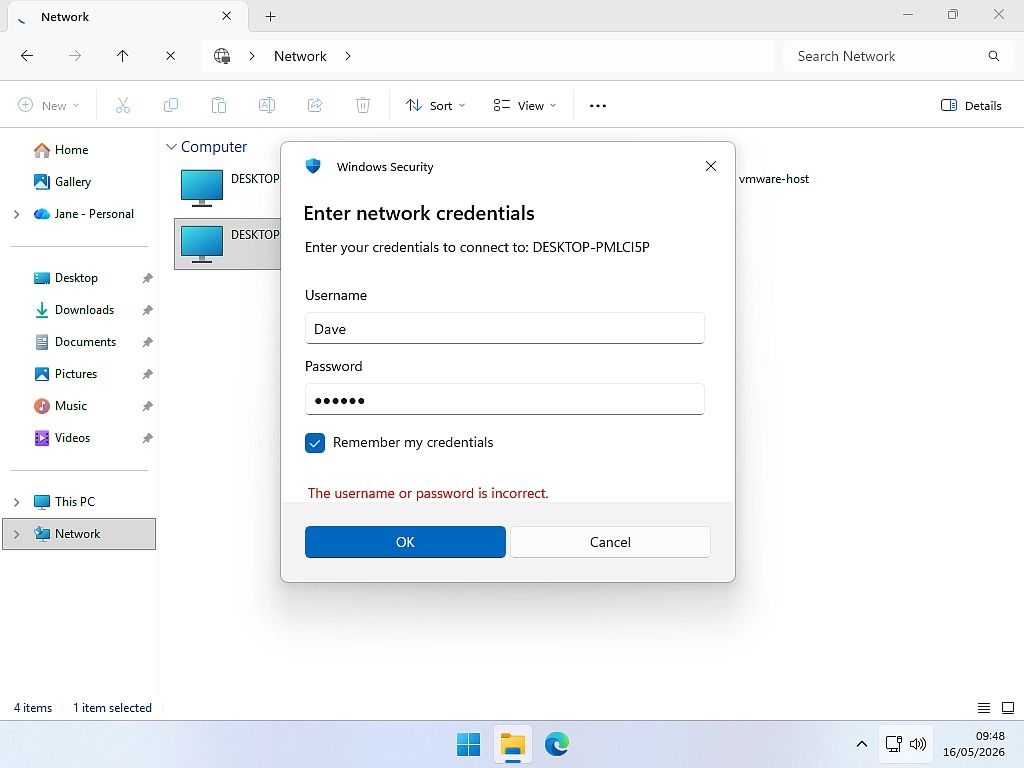
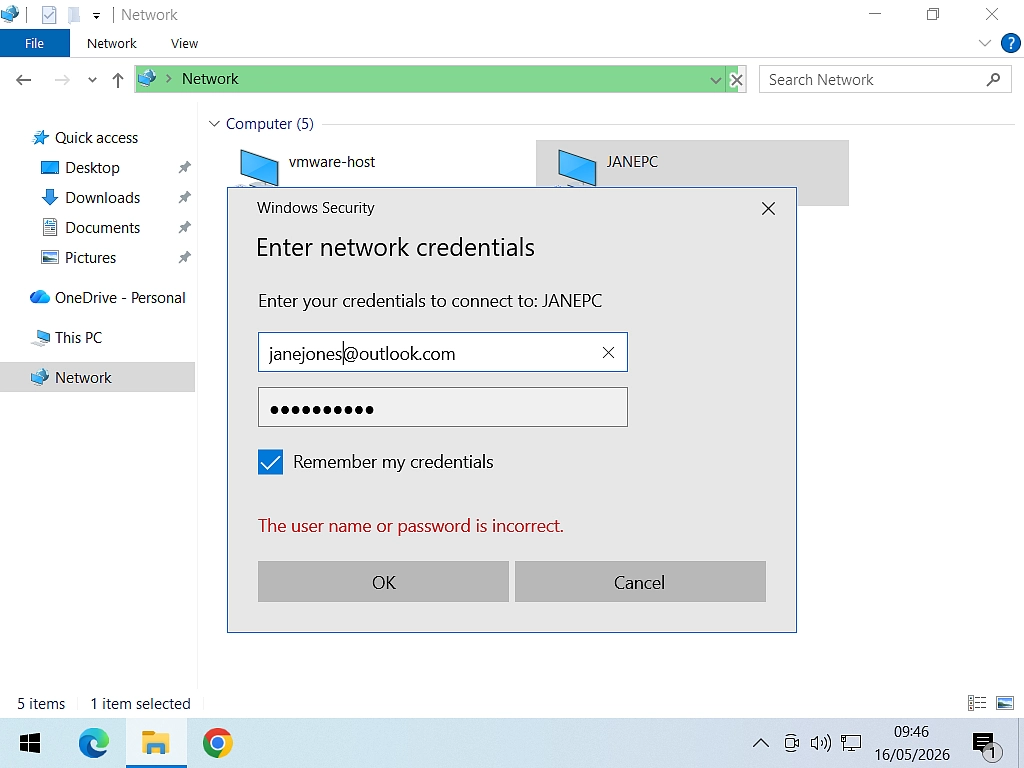
Before you’re allowed to view the networked folder, you’ll be prompted to Enter Network Credentials — this is the username and password used to sign in on the remote computer (not your current one).
This is what a lot of people get wrong. They automatically assume they need to enter the username and password for the PC they’re working on. It’s not that. It’s the credentials for the computer you’re connecting to.
Tick Remember my credentials so you don’t have to log in every time, then click OK.
Local Account and Microsoft Account Credentials
- Local account: If you have a local account on the remote computer, just enter the username and password normally used to sign in on that PC
- Microsoft account: These are different. If you have a Microsoft account on the remote PC, enter the full email address and Microsoft account password, note that if you normally log in with a PIN it won’t work here. It has to be the password.
If you’re not sure about which type of account you have read this guide Explaining The Different Windows User Accounts.
The Shared Folder
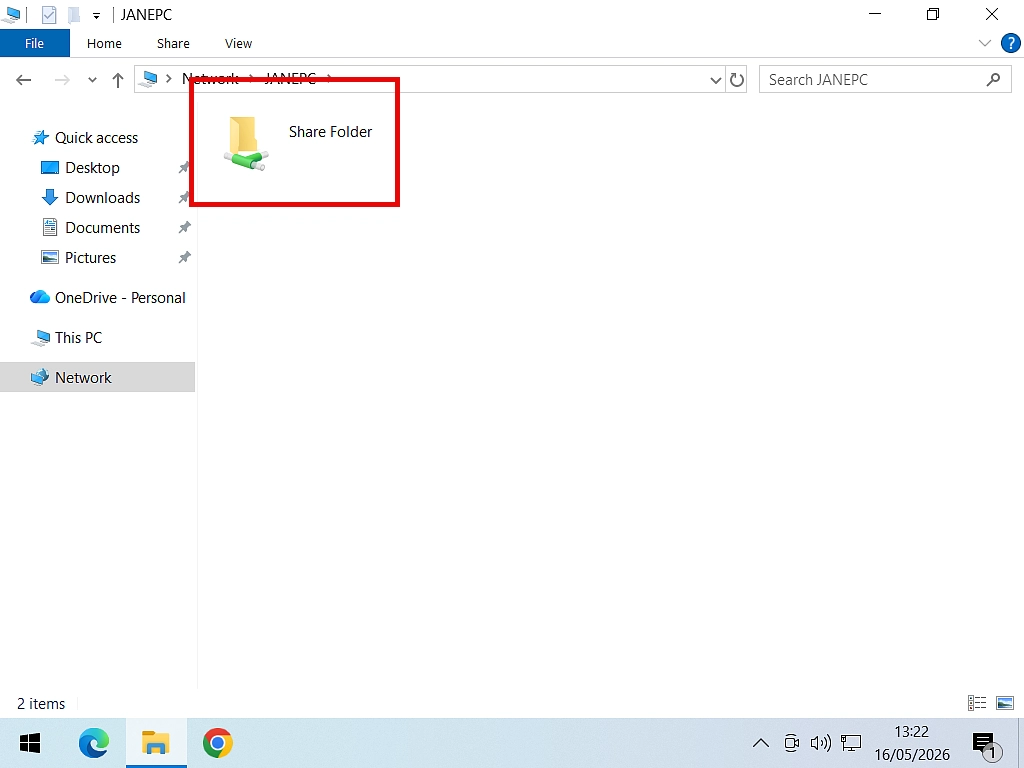
Once you’ve successfully authenticated yourself you’ll see the folder that you shared earlier.
You should have full access to its contents, meaning you can edit, copy, delete or add files to it as if it were a folder on the computer that you’re working on.
Create a Desktop Shortcut for Quick Access
Networked folders will sometimes “disappear” from File Explorer. It’s a known bug that hasn’t been fixed. So it’s a good idea to create a shortcut to the shared folder for easy access in the future.
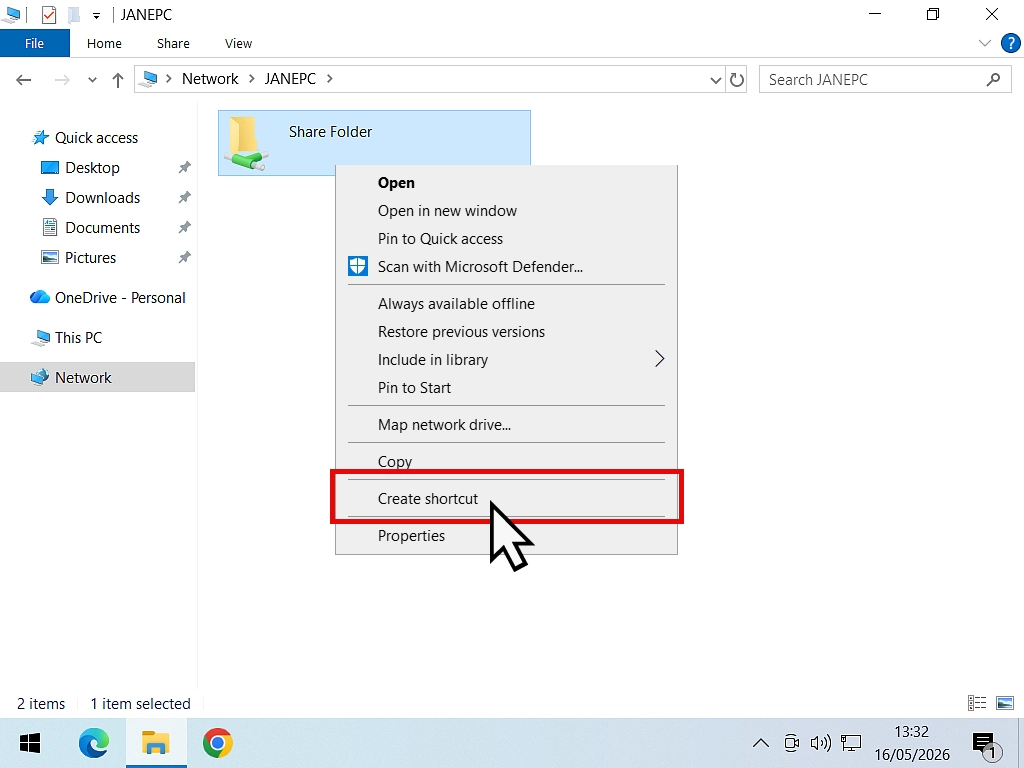
- Right-click the shared folder
- Select Create Shortcut
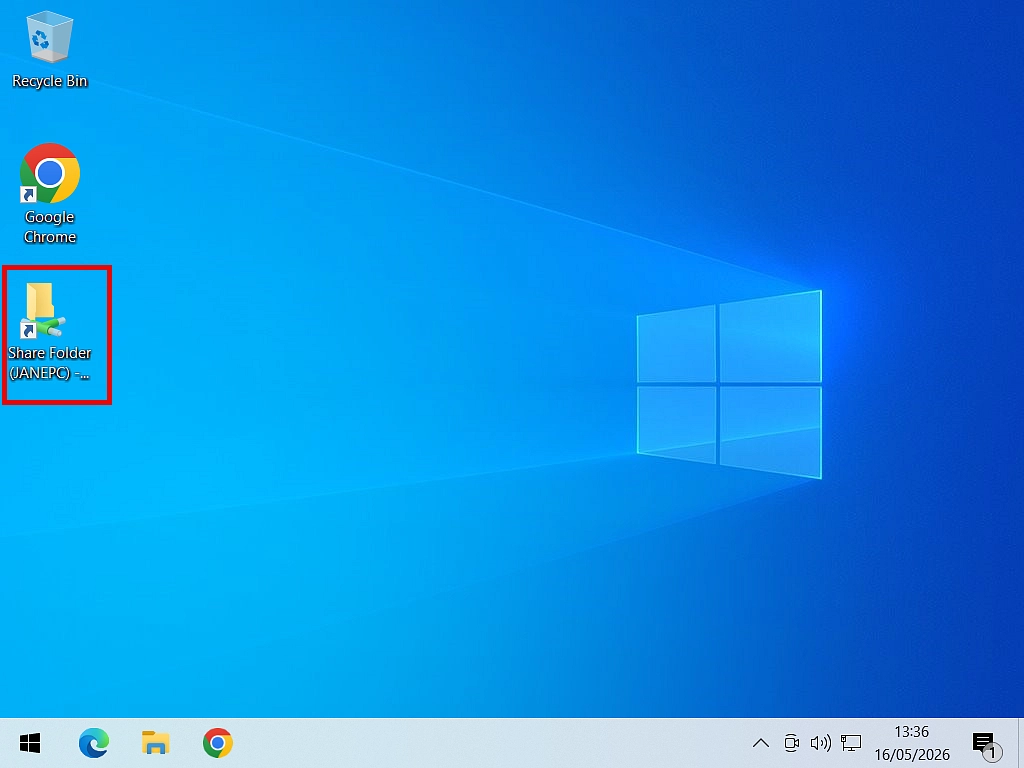
- Windows will tell you it “can’t create a shortcut here”. Click the Yes button and the shortcut will be created on your desktop.
- On your desktop you’ll see the new shortcut. You can rename it if you wish and you can also pin it to Start or Quick Access in File Explorer.
Bonus Step: Share all Your User Folders over the Network
So far we’ve looked at sharing one or two selected folders over the home network. That’s by far the safest way to do home networking. However if everyone that connects to your network (connects to your router) is trusted, then you can share all your folders.
Doing this will make your entire user account visible over your network, so please be sure that you want to do this.
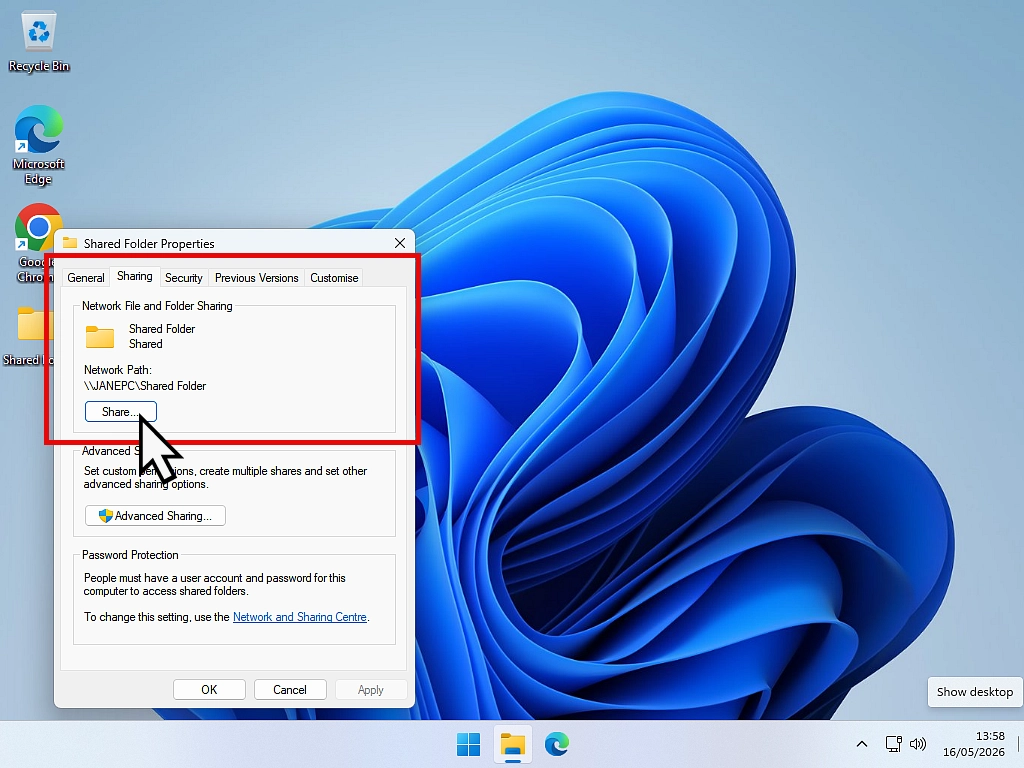
- Right-click on a folder that you’ve previously shared in the 5 steps above and click Properties.
- Click the Sharing tab.
- Under Network File and Folder Sharing, click the Share button.
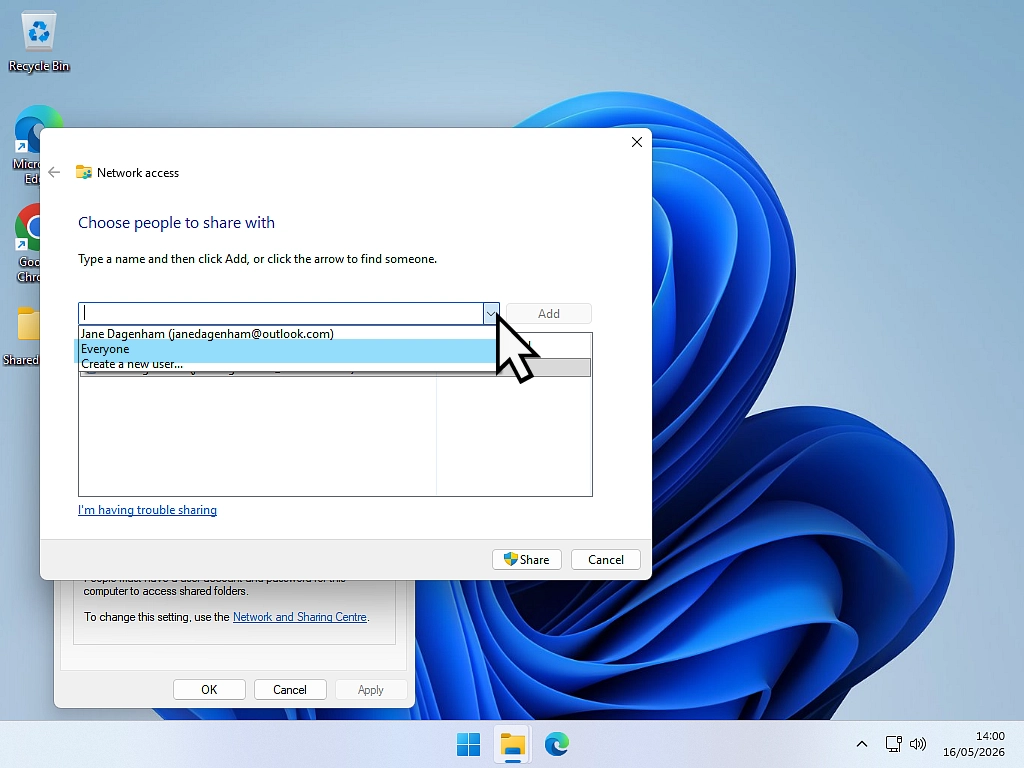
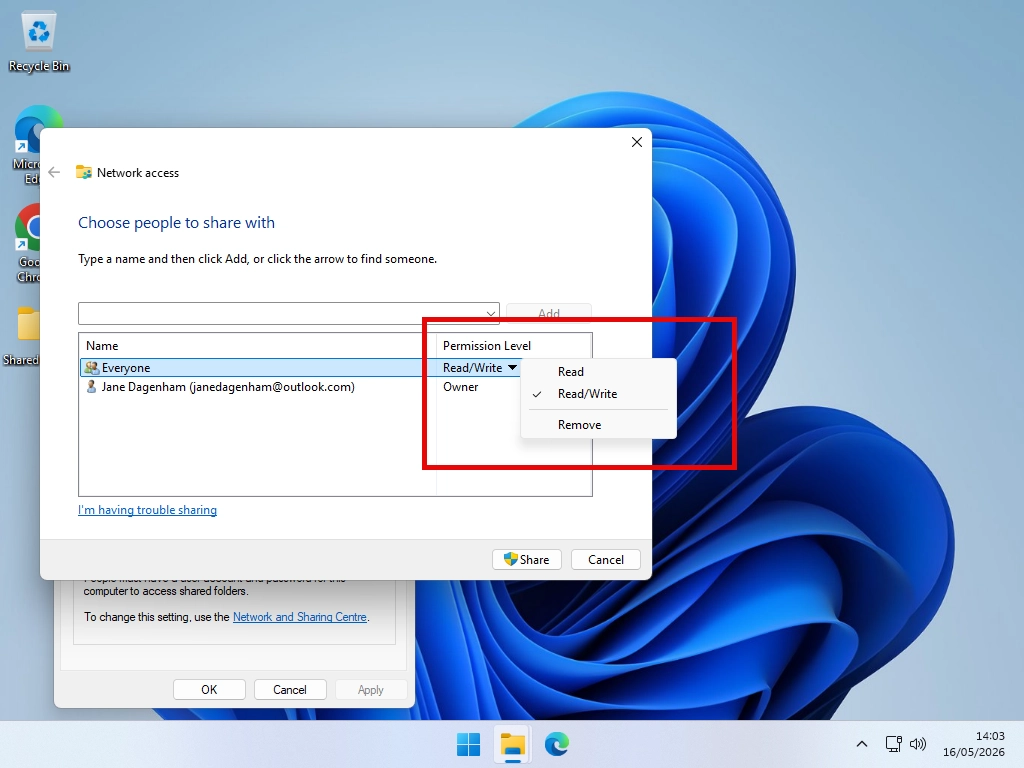
- The “Choose people to share with” window will open. Click the drop down arrowhead and select Everyone.
- Click the Add button. You must click the Add button after selecting Everyone.
- Change the Permission Level to Read/Write to allow editing of files over the network.
- Click the Share button. It might take a few moments for all the file permissions to be changed. Generally I find it’s a good idea to restart your PC when it’s finished.
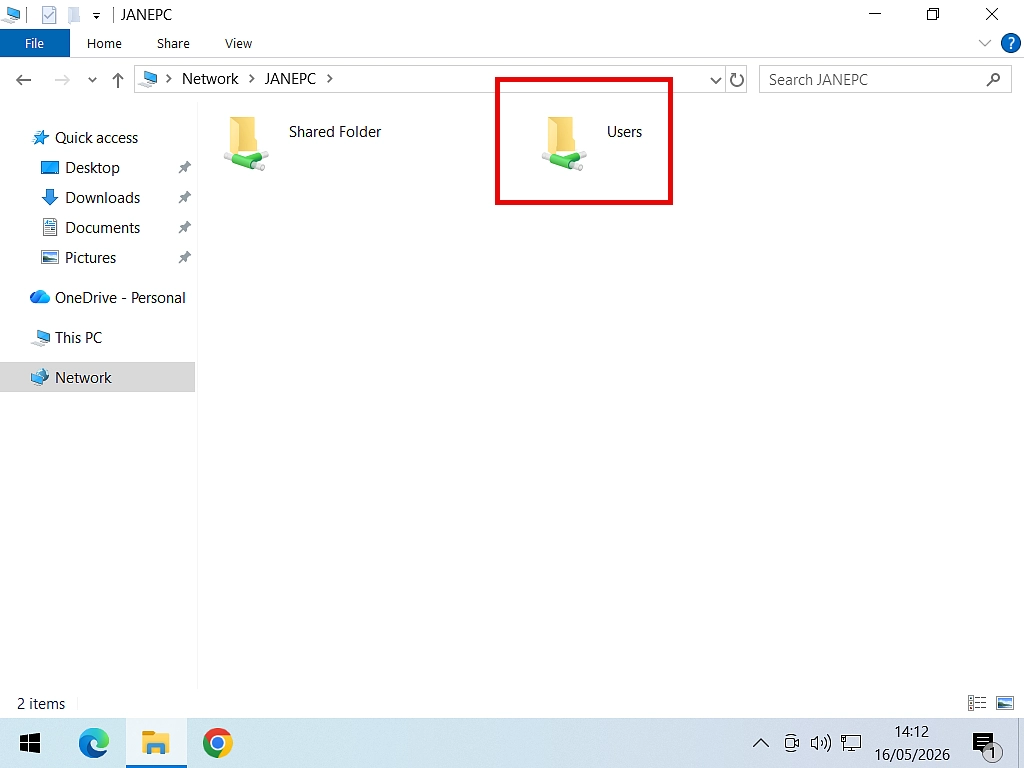
- On your other computer, open File Explorer and then Network. Click the networked computer and you’ll see the previously shared folder along with a Users folder. Double click the Users folder, then your user name and you’ll see all your folders.
Troubleshooting: Home Network Not Working?
If your computers aren’t showing up in the Network view, try these common fixes:
Computers don’t appear in the Network folder
- Make sure all PCs are on the same Wi-Fi network or connected to the same router
- Double-check that network profile is set to Private (not Public) on every PC
- Confirm network discovery and file sharing are turned on (Step 3)
- Try restarting the router as well as all PCs
“Windows cannot access [PC name]” error
- Check the network credentials — for Microsoft accounts, you must use the full email address and password, not a PIN
- Make sure the remote PC is switched on and not in sleep mode
Computers disappear from the Network list after some time
- This is a known issue with all versions of Windows. Rather than relying on the Network browser, create a shortcut immediately.
Frequently Asked Questions
Yes. In all versions of Windows 10 and the Home version of Windows 11. In step 3 of this guide, after turning on File and Printer Sharing, open the All Networks section and turn off (deselect) Password Protected Sharing.
If one of your Computers is running Windows 11 Pro, that won’t work. You’ll need to follow this guide Windows 11 Network Sharing Not Working.
Yes. All computers must be connected to the same router — either via Wi-Fi or an Ethernet cable — for home networking to work.
Yes. Windows 10 and Windows 11 computers can share files with each other using these steps.
Microsoft removed HomeGroup in Windows 10 version 1803 (April 2018). The method described in this guide — using workgroup file sharing with network discovery — is the current recommended replacement.
Yes. Once you’ve enabled “File and printer sharing” in Step 3, you can also share a printer that’s connected to one PC so other computers on the network can use it. If you’re having issues with your printer check this guide How to Clear the Print Spooler
Windows network authentication requires a full password. If you use a Microsoft account on the remote PC, you must enter the Microsoft account password — not your Windows Hello PIN.
Summary
Connecting your computers over a home network should be easier than it is, but if you follow the steps in this guide, repeating on each PC, you’ll get there. Once they’re connected you can view, move, edit and add files and folders from one PC to another. It’s brilliant.
In fact the only issue you might have is keeping your files updated across your network. For that purpose I use a free program called FreeFileSync. It will synchronise your files and folders between networked PCs.
Related Guides That You Might Find Useful
How To Setup Windows Remote Desktop
Windows Remote Desktop allows you to connect to a computer on your network as if your were sitting directly in front of it.
Google Chrome Remote Desktop
Google Chrome Remote Desktop is a free and secure tool that allows you to access and control one computer from another over the internet.
Differential vs Incremental Backups
What they are, how they differ, and which one to use on your home PC?
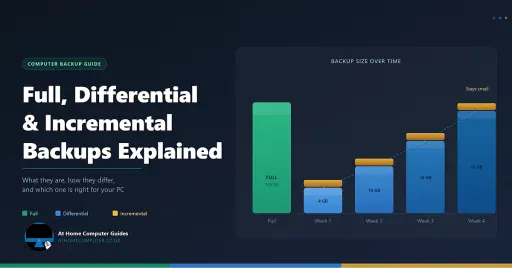
This guide explains all three backup types in plain English, so you can make the right choice for your home PC.
You can find this and other related step by step guides in – At Home PC Tech Guides