How to convert MBR and GPT hard disks.
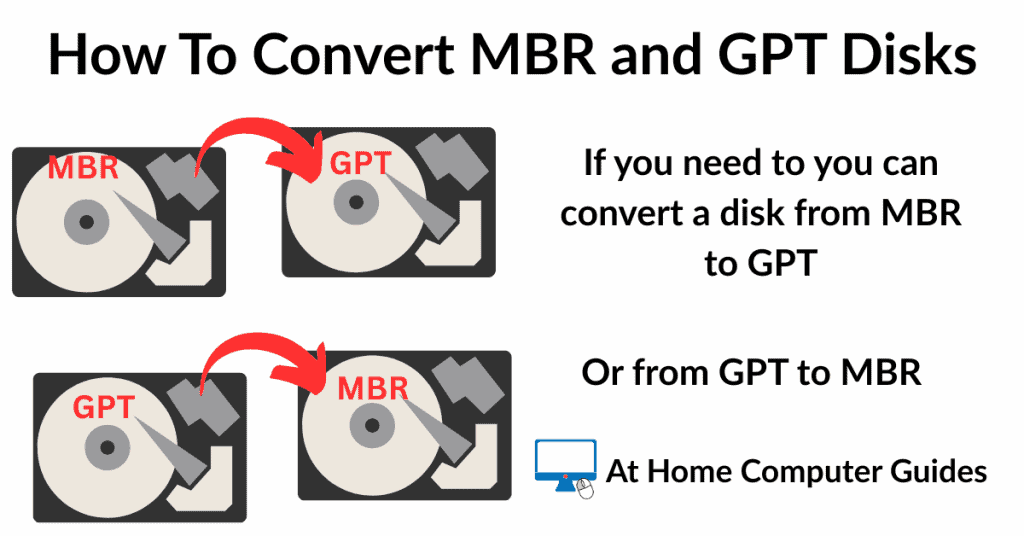
MBR (Master Boot Record) and GPT (GUID Partition Table) are two different methods for storing partitioning and boot information on a hard drive or SSD. The partition style tells your operating system how to interpret the data stored on the disk.
However there are times when you might want to change MBR to GPT or convert GPT to MBR.
Convert GPT AND MBR.
Converting MBR and GPT disks in Windows is exactly the same whichever way you want to go.
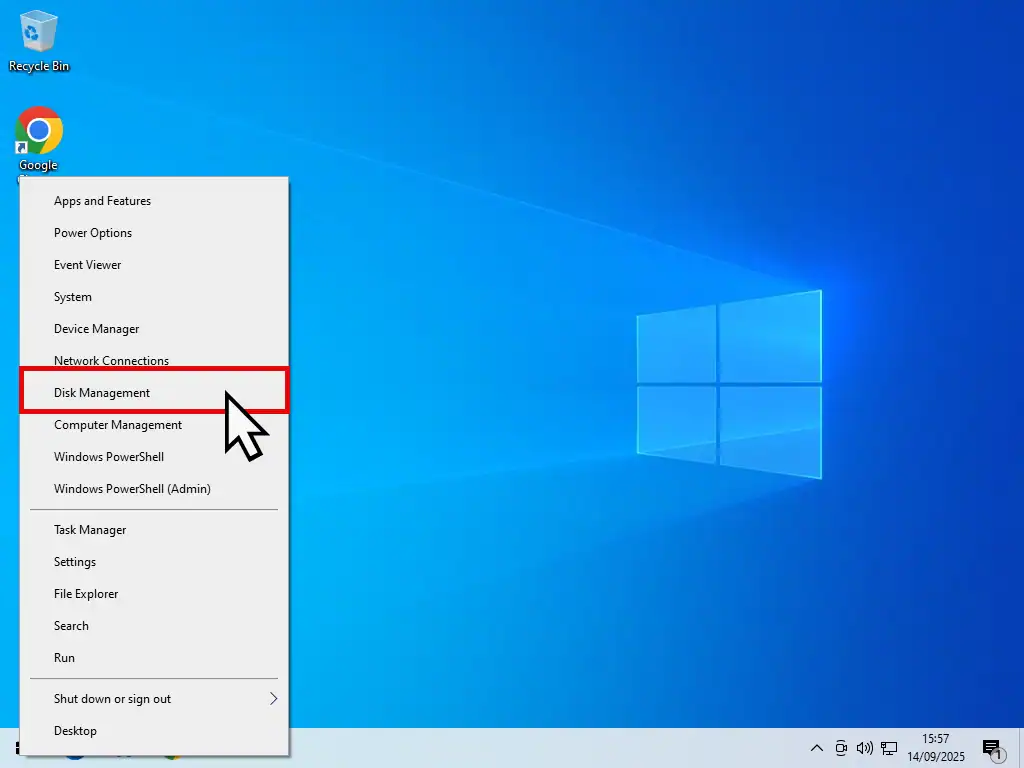
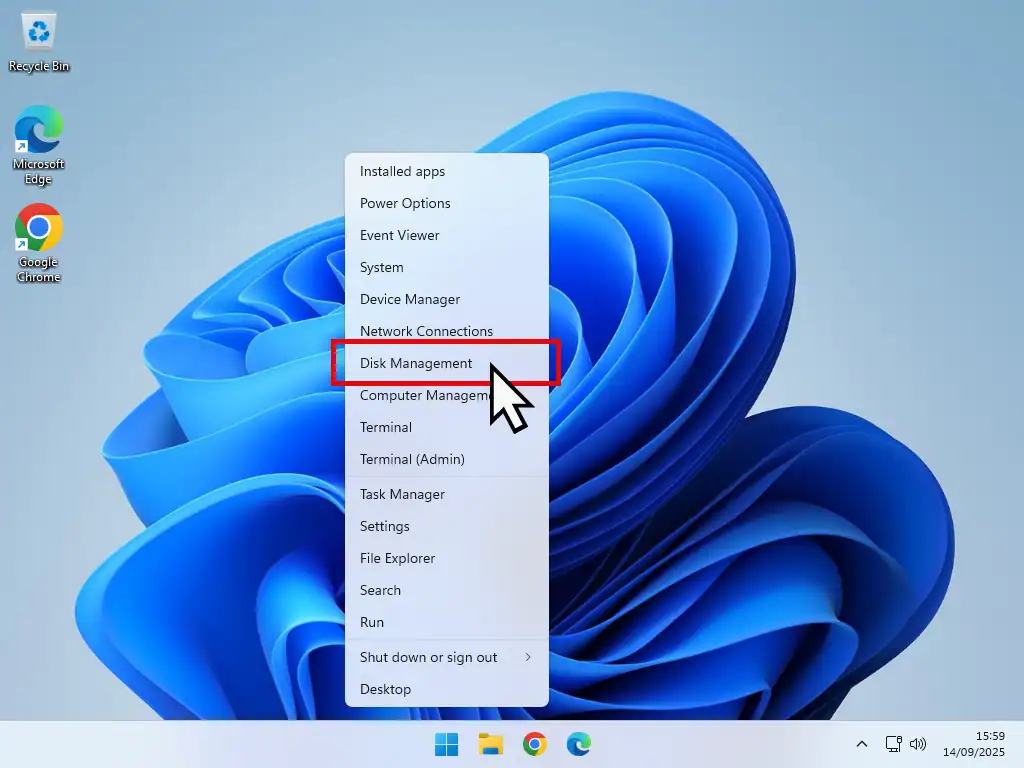
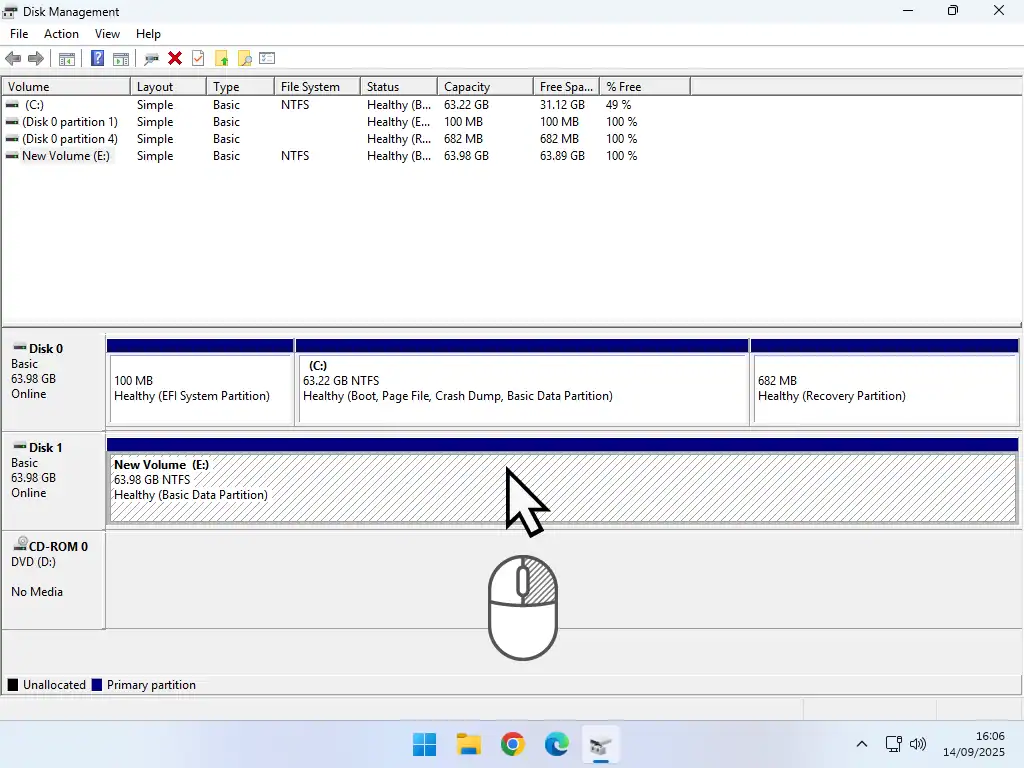
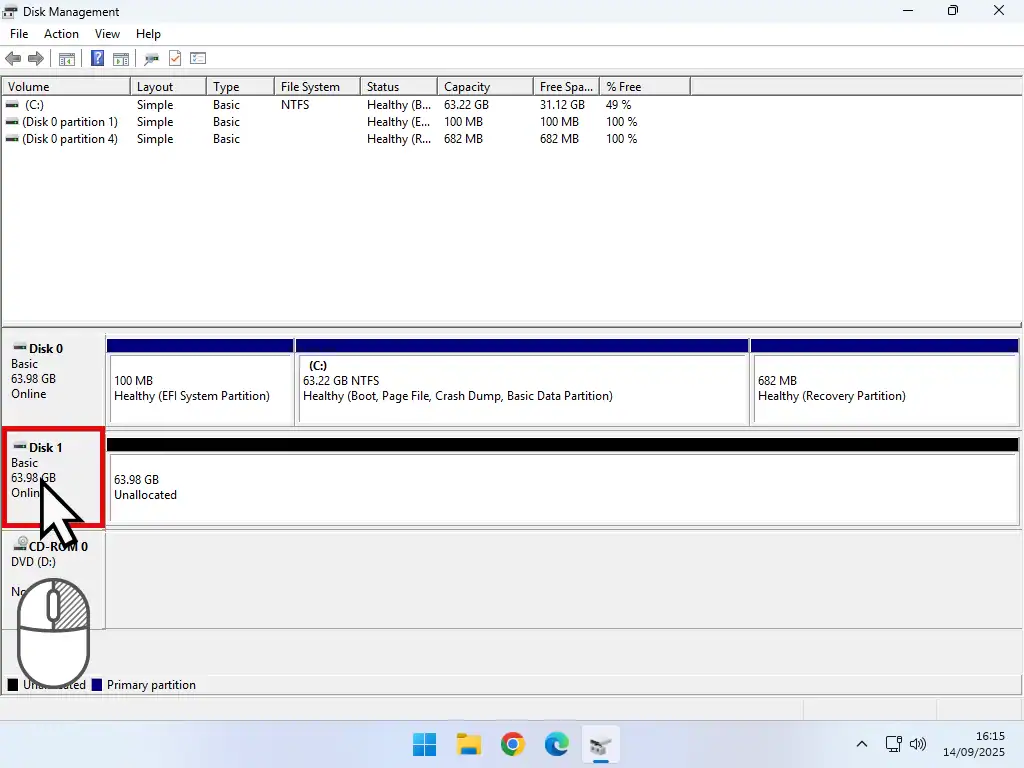
To convert a disk to either GPT or MBR, right click the Start button and then left click Disk Management.
Delete The Volumes (Partitions)
In order to change the disk style to MBR or GPT, you’ll need to delete all the partitions from it first. Deleting partitions will also delete any data stored on the disk. Make sure that you’ve backed up anything that you need before doing this.
- In Disk Management right click on the disk you want to convert.
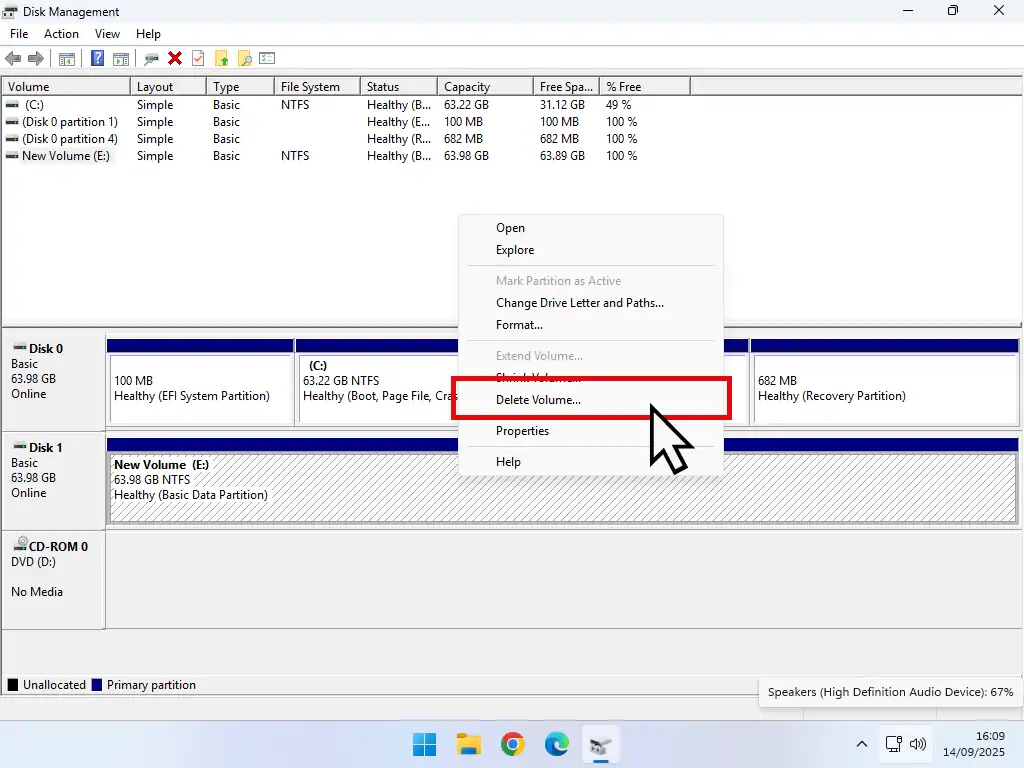
- On the menu that opens, left click Delete Volume.
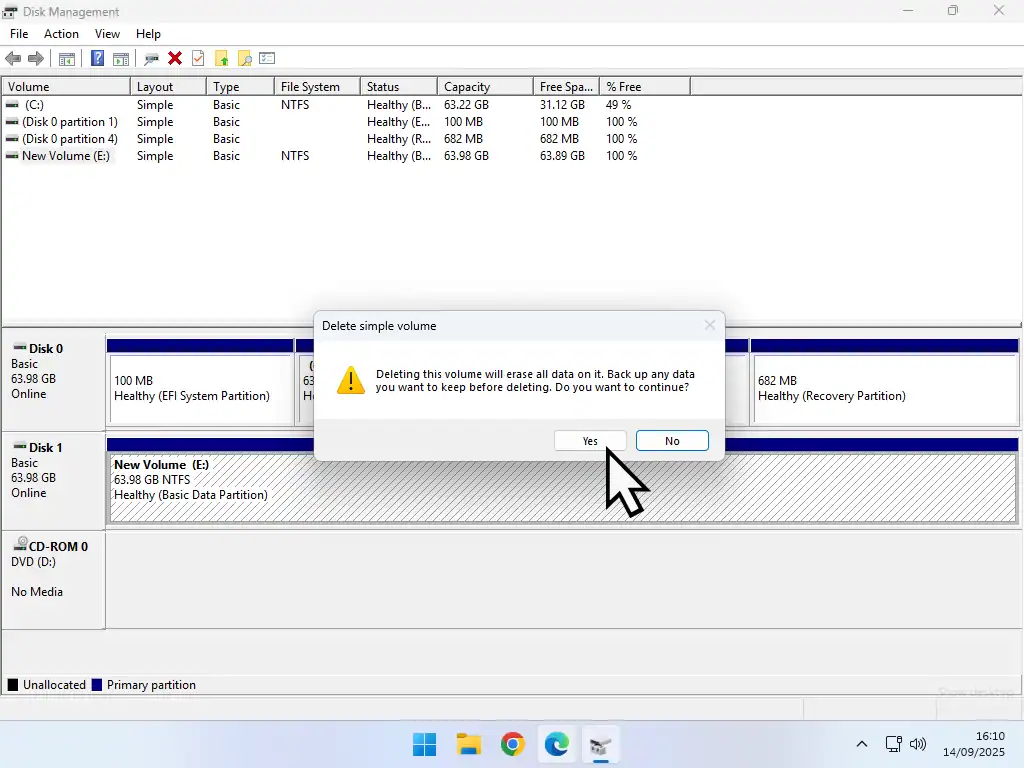
- You’ll see a warning popup that all data on the disk will be erased. Click the Yes button.
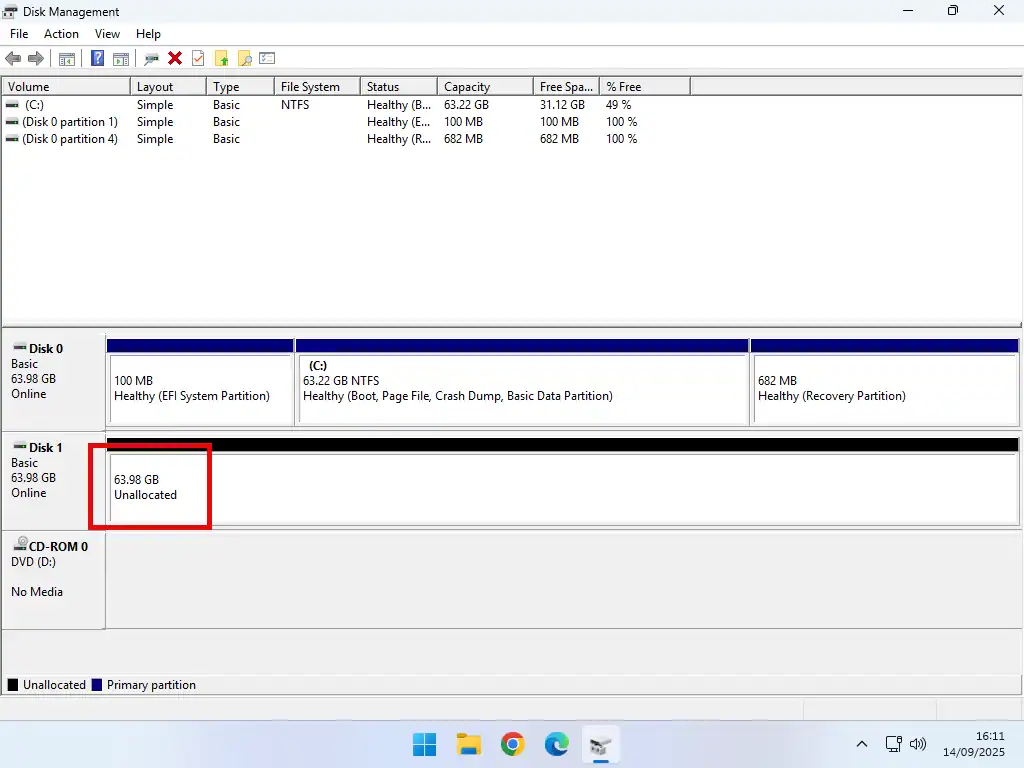
- Once that’s done you’ll have an Unallocated disk.
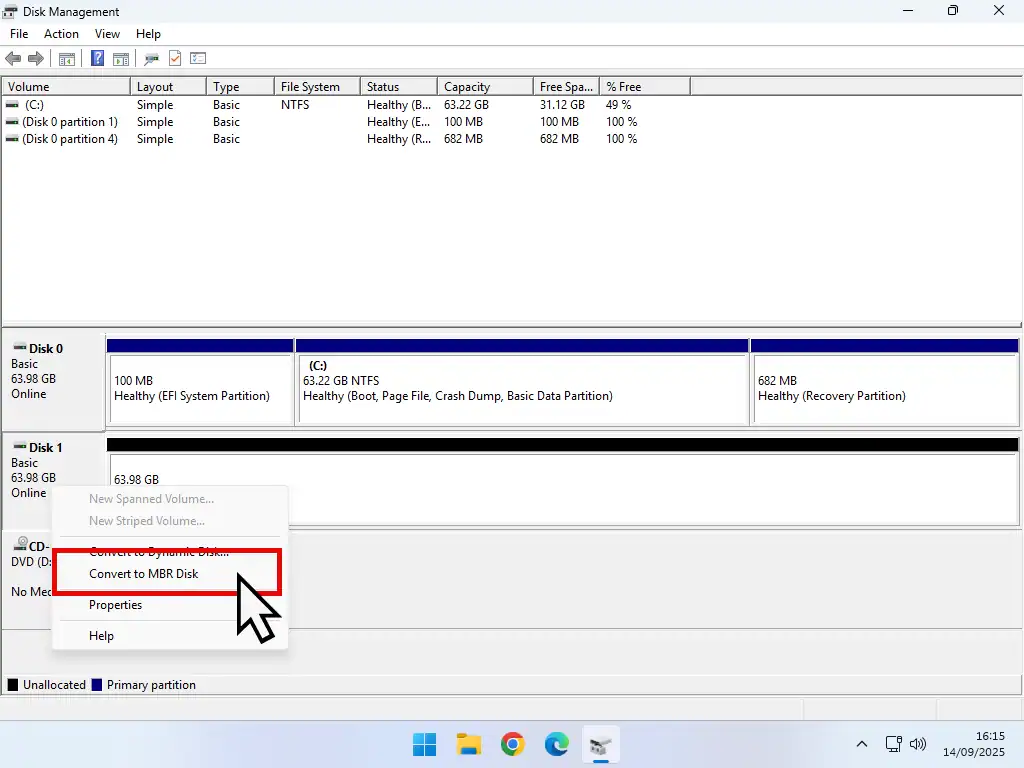
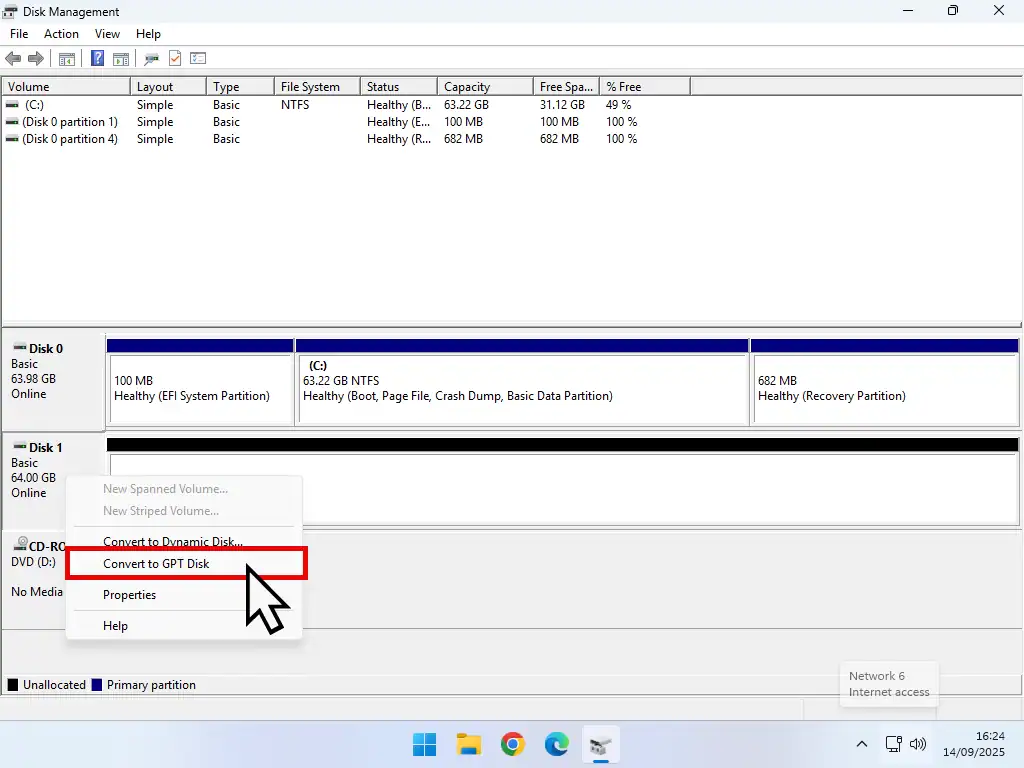
Now that all the partitions have been deleted, right click on the disk in the left hand panel.
On the menu that opens, left click either Convert to MBR Disk or Convert to GPT Disk, depending on which way you want to go.
Convert A Disk Using Diskpart
There are times when Disk Management will fail to convert your disk. If that happens you can use the command line tool Diskpart.
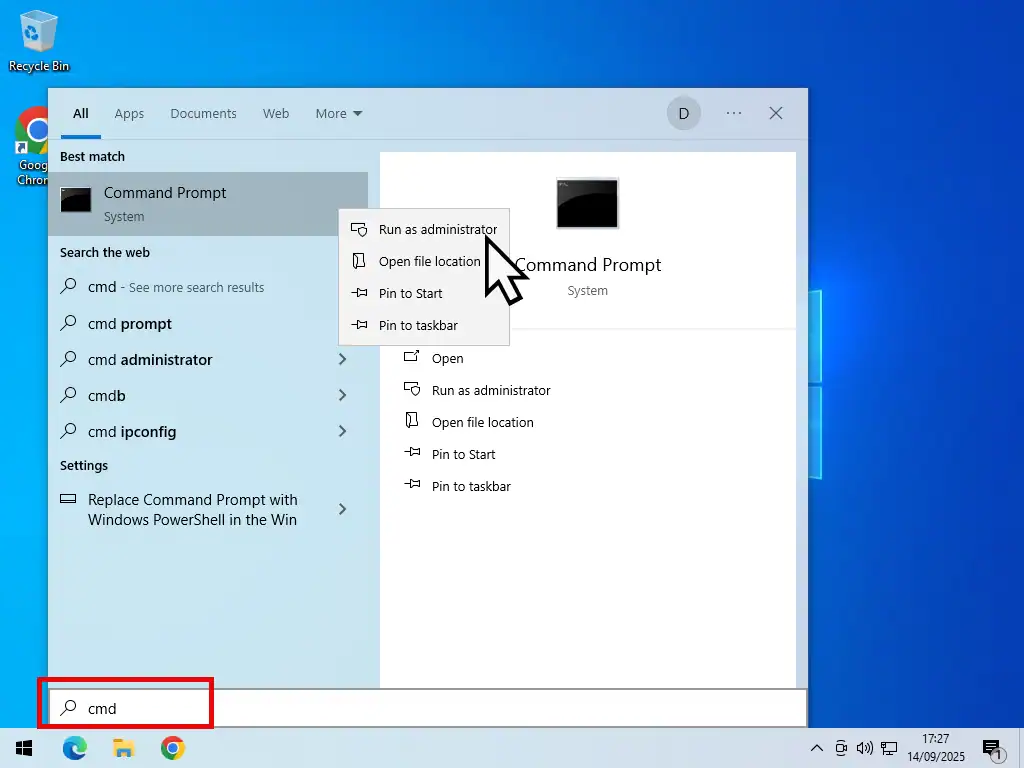
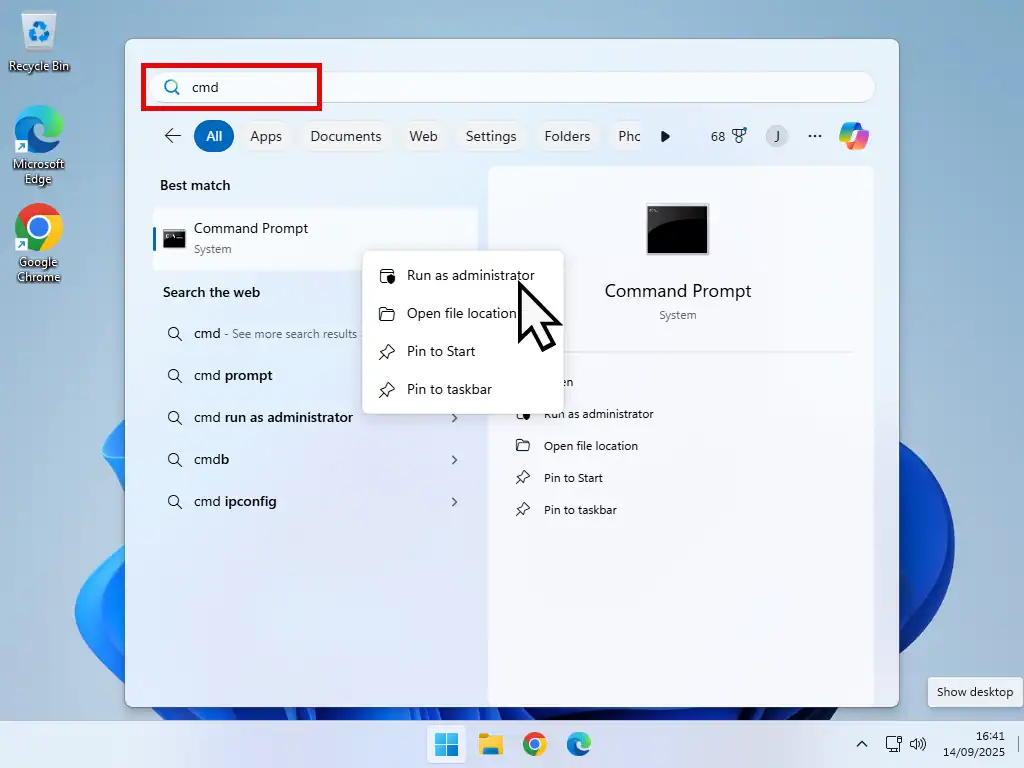
Click the Start button and the type “cmd“, right click on Command Prompt (system). On the menu, left click Run As Administrator.
Click the Yes button on the User Account Control popup.
Diskpart
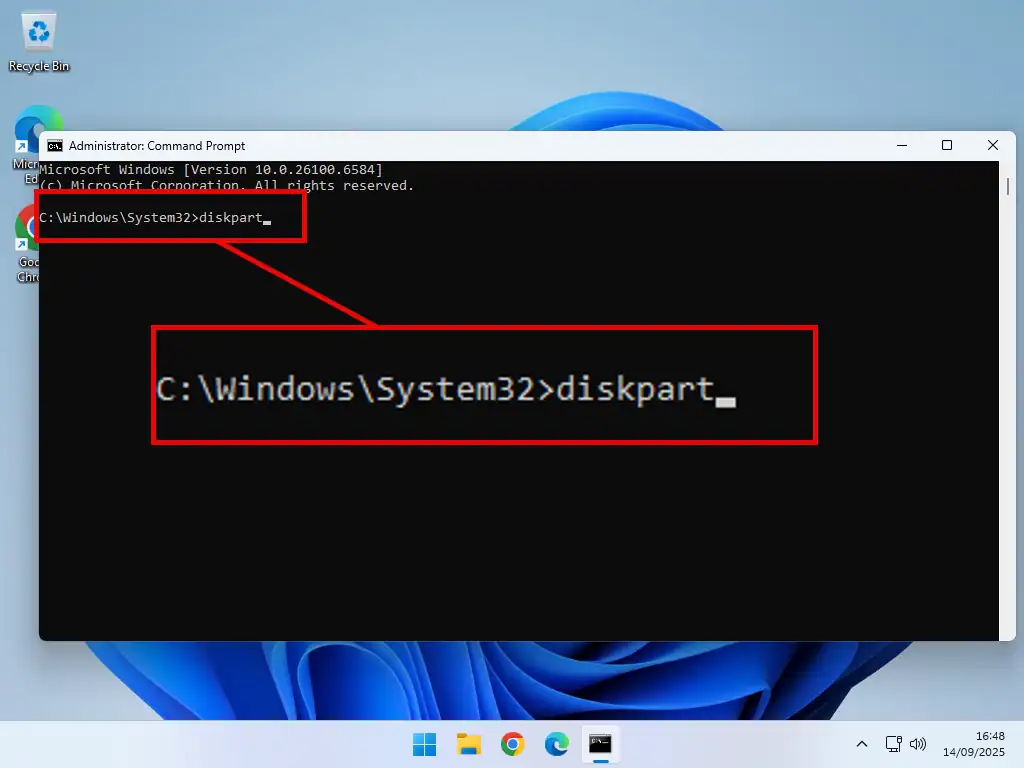
- At the command prompt, type “diskpart” and press Enter.
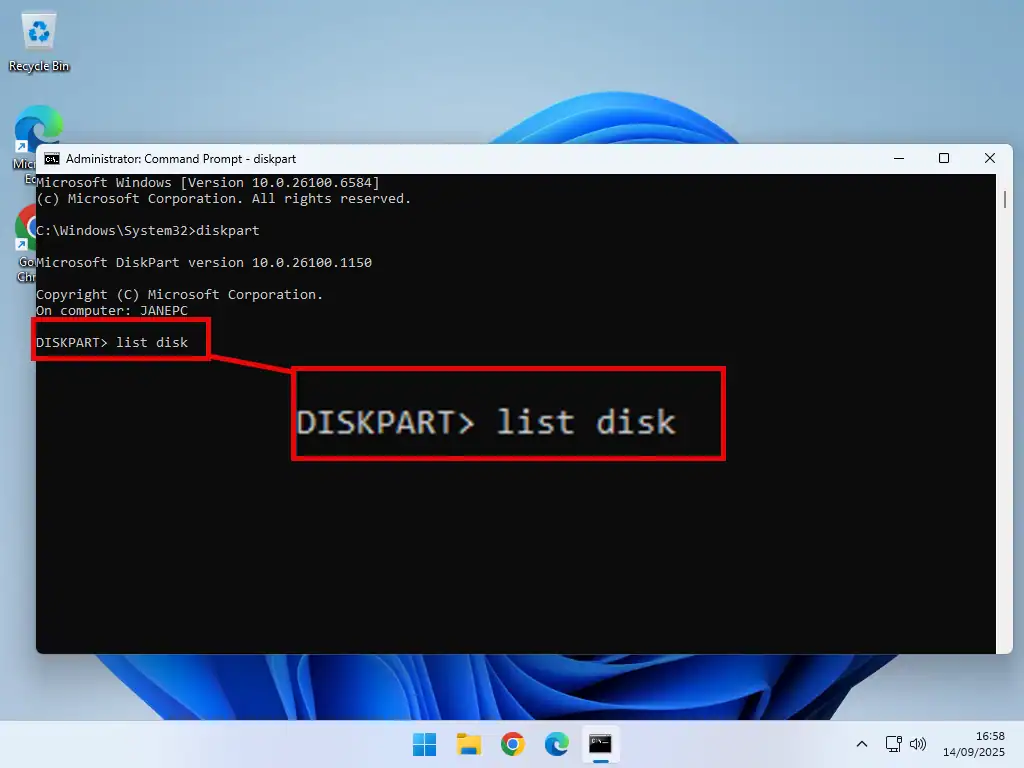
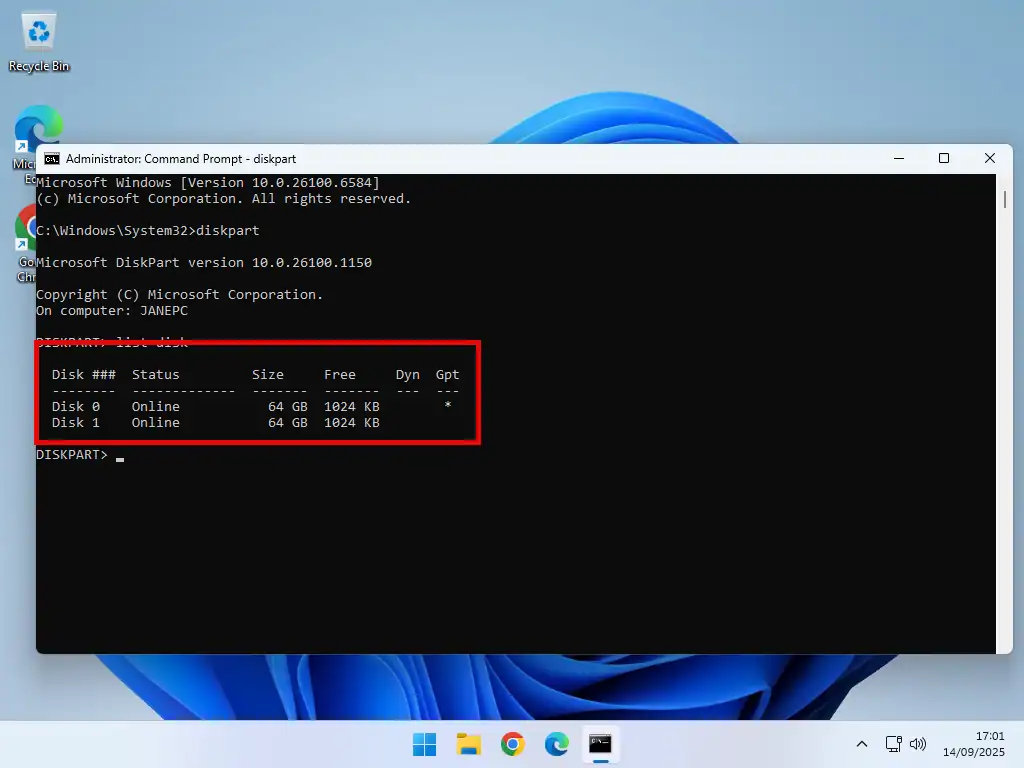
- Now type “list disk” and hit Enter to get a list of all the hard disks that Diskpart is aware of.
- You’ll see a list of the hard drives attached to your computer.
- Type “select disk” followed by the number corresponding to the disk that you want to convert. In this example it’s disk 1, so I’d type “select disk 1“
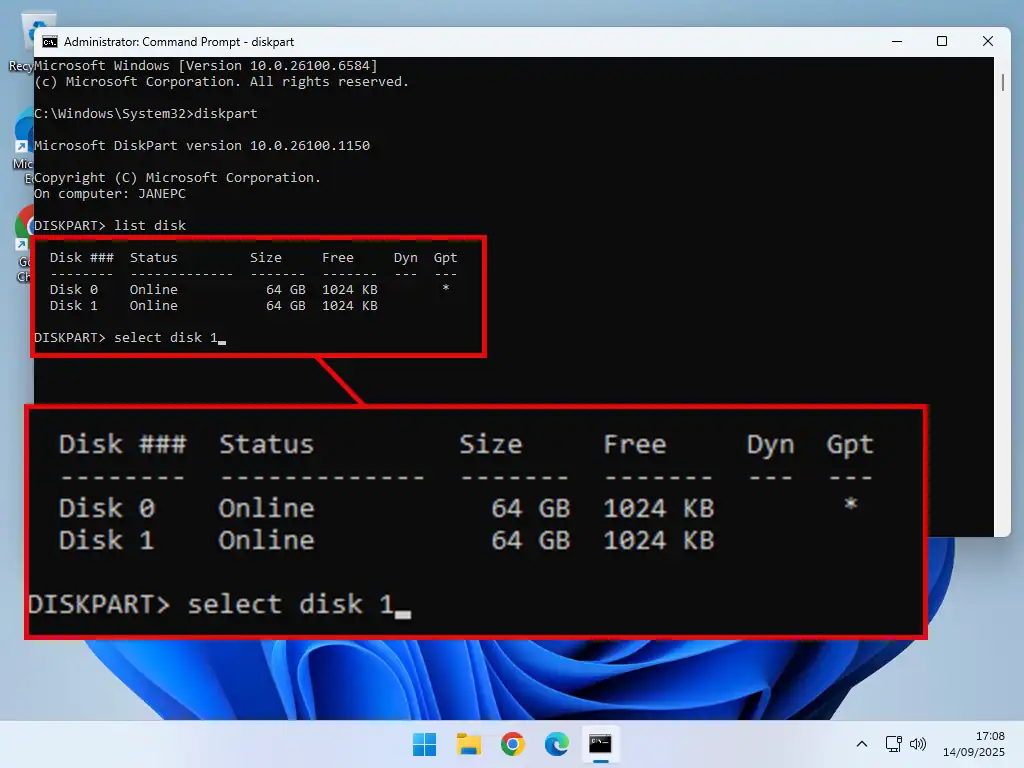
Be Sure To Select The Correct Disk
All data will be lost from the hard disk, so make absolutely sure that you’re selecting the correct disk and that there’s nothing on the disk that need.
Convert To GPT Or MBR
Diskpart can convert disks from GPT to MBR and MBR to GPT. You’ll need to delete all thepartitions on the disk first.
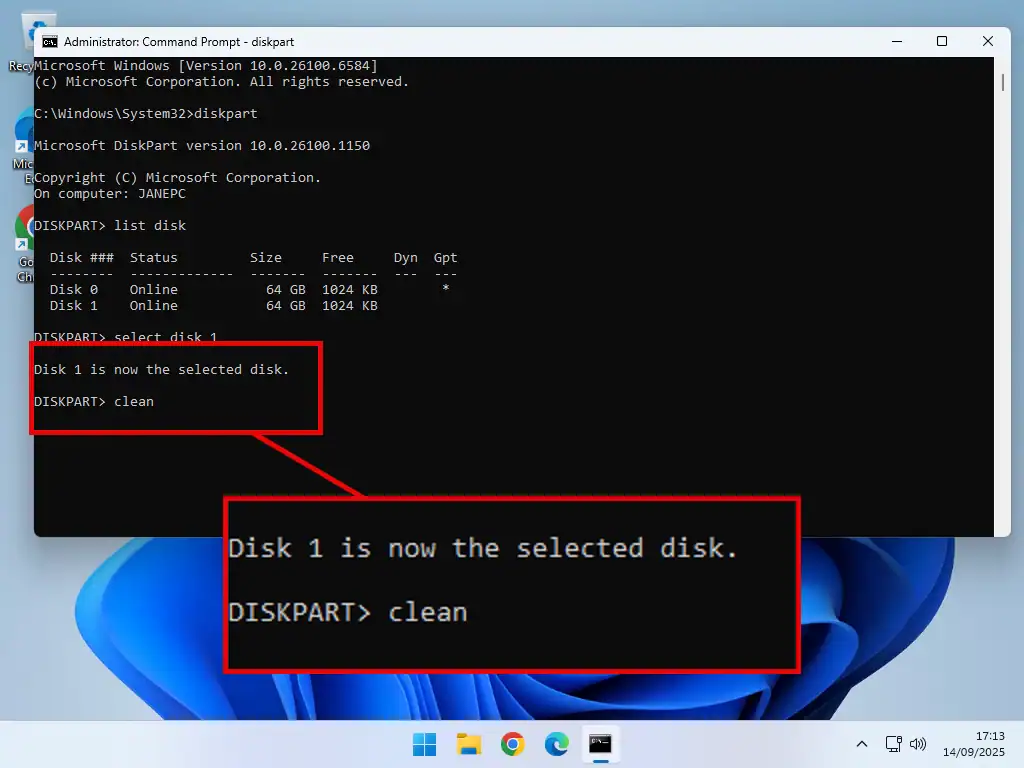
To convert your disk in Diskpart type “clean” and press Enter. Diskpart will delete all the partitions.
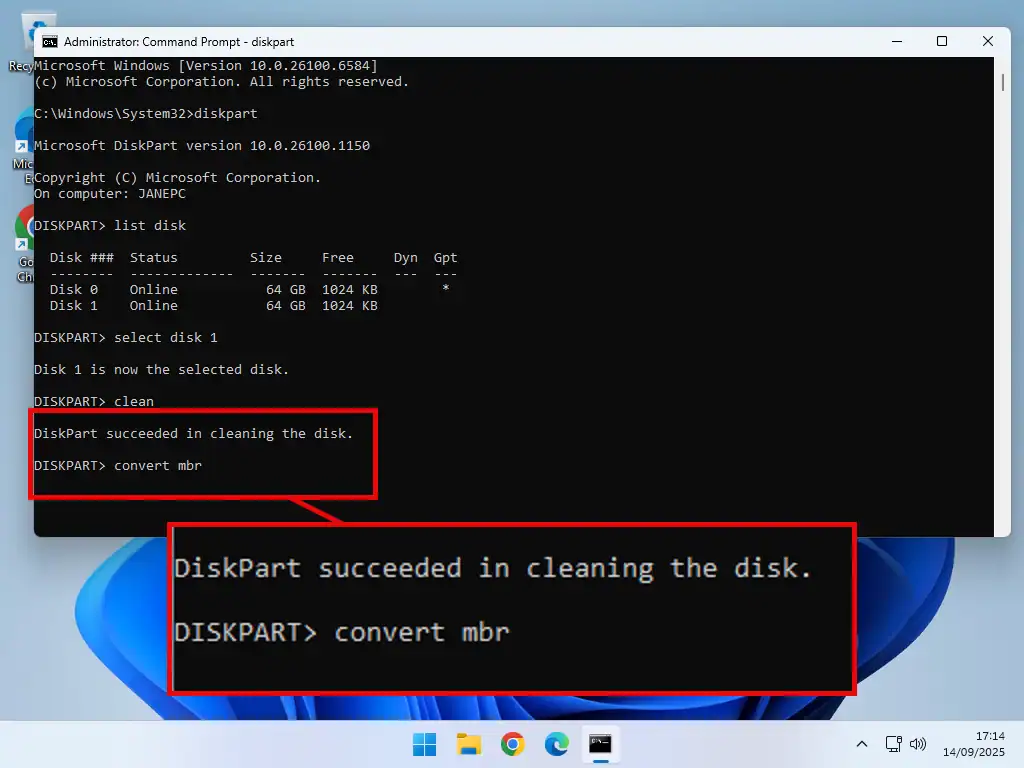
- To convert GPT to MBR – type “convert mbr”
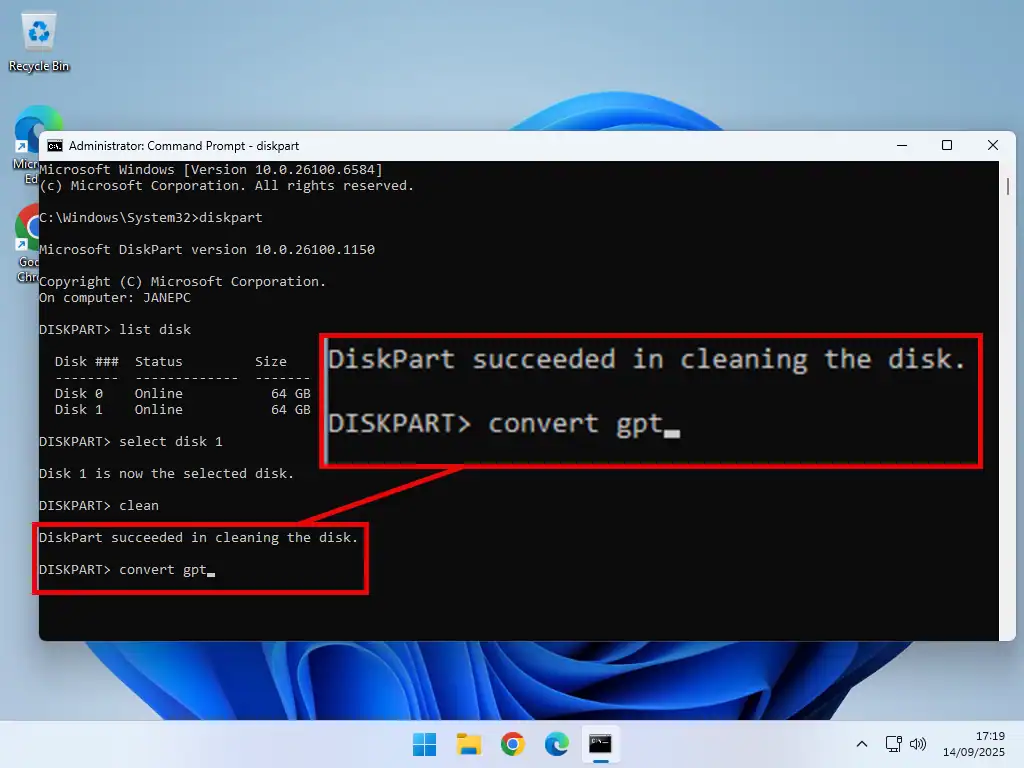
- To convert MBR to GPT – type “convert gpt”
Press Enter and your disk will be converted to whichever partition style you selected.
Convert MBR To GPT Without Data Loss
Both of the above methods of converting MBR and GPT disks work on data drives (storage disks). And provided you backup first, then you want lose any data.
However when you need to convert a system disk (the one with Windows installed on it), things are a little different. You can’t just copy and paste your OS and all its applications back on to a converted drive.
When it comes to the system drive, you really do need to convert it without any data loss at all. Everything has to stay in place throughout the conversion.
Microsoft provides a free tool that can convert MBR to GPT without data loss called, aptly, MBR2GPT.
If you want to use the MBR2GPT you should ideally use it from the recovery environment (WinPE), although it can used from within Windows itself. I’ll show you both below.
Be Careful Converting System Disks
Converting a system disk is much more risky than converting converting an empty storage drive. Before starting I’d advise you to take these 3 steps –
Use CHKDSK to make sure that both the dusk and the files system are in good order.
Run System File Checker to ensure that Windows itself doesn’t have any issues.
And finally, backup. If something goes wrong, it’ll go wrong very badly.
MBR2GPT
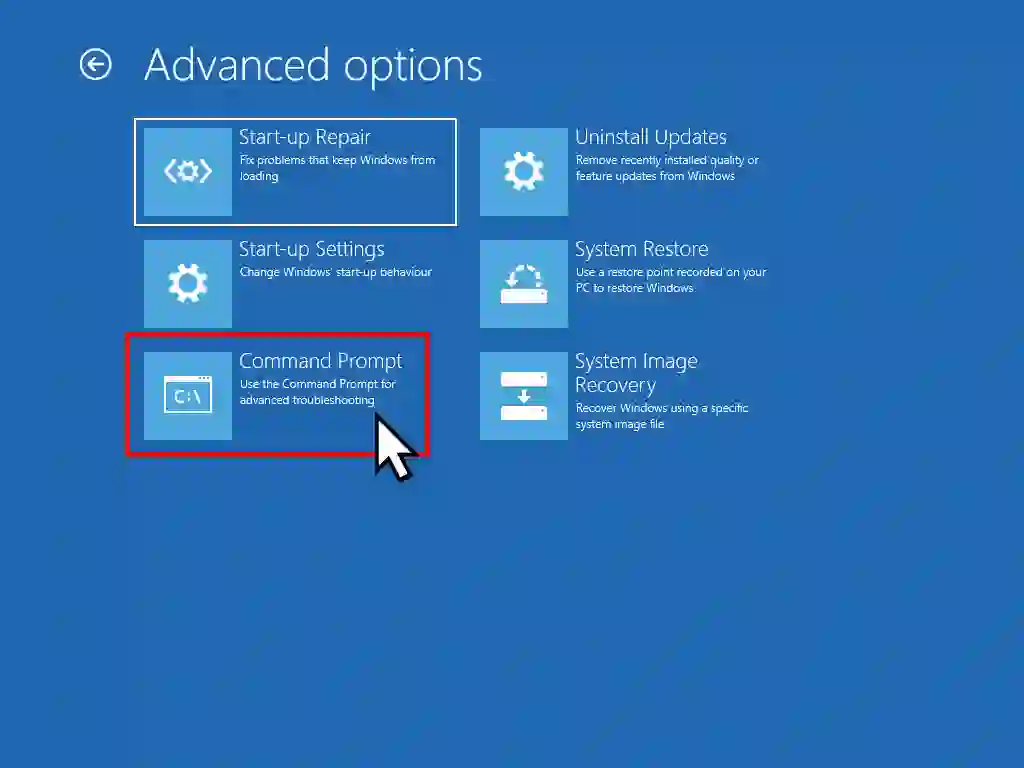
- To use the MBR2GPT tool restart your computer in the recovery mode and select Command Prompt. How To Access The Windows Recovery Environment (WinRE).
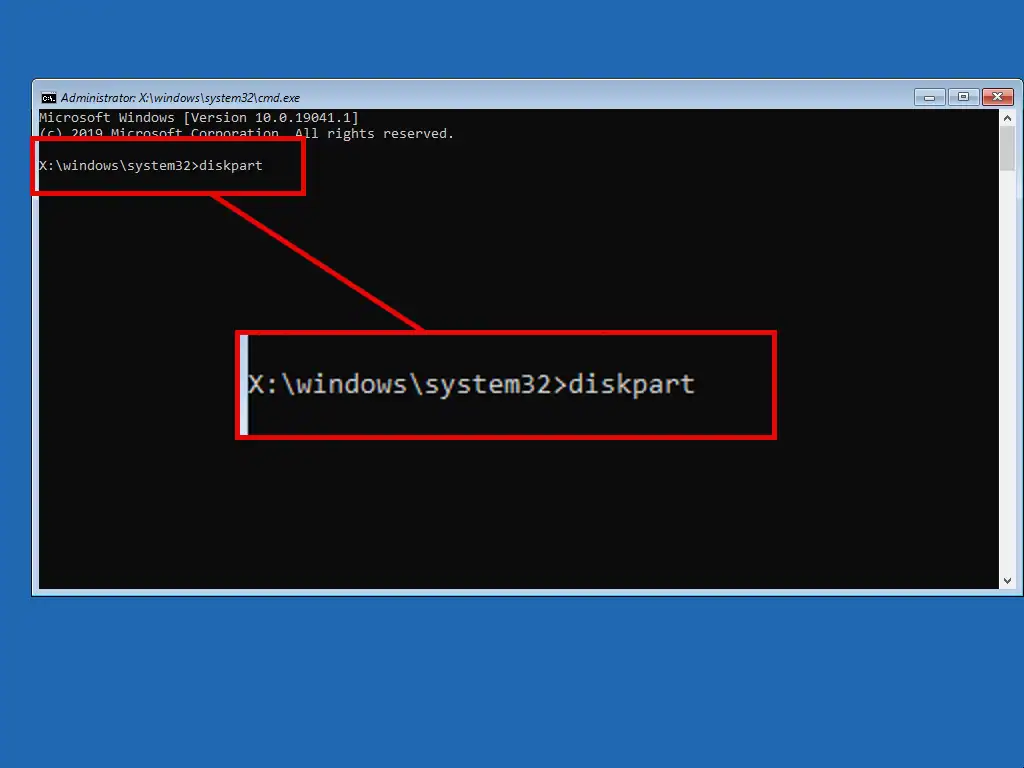
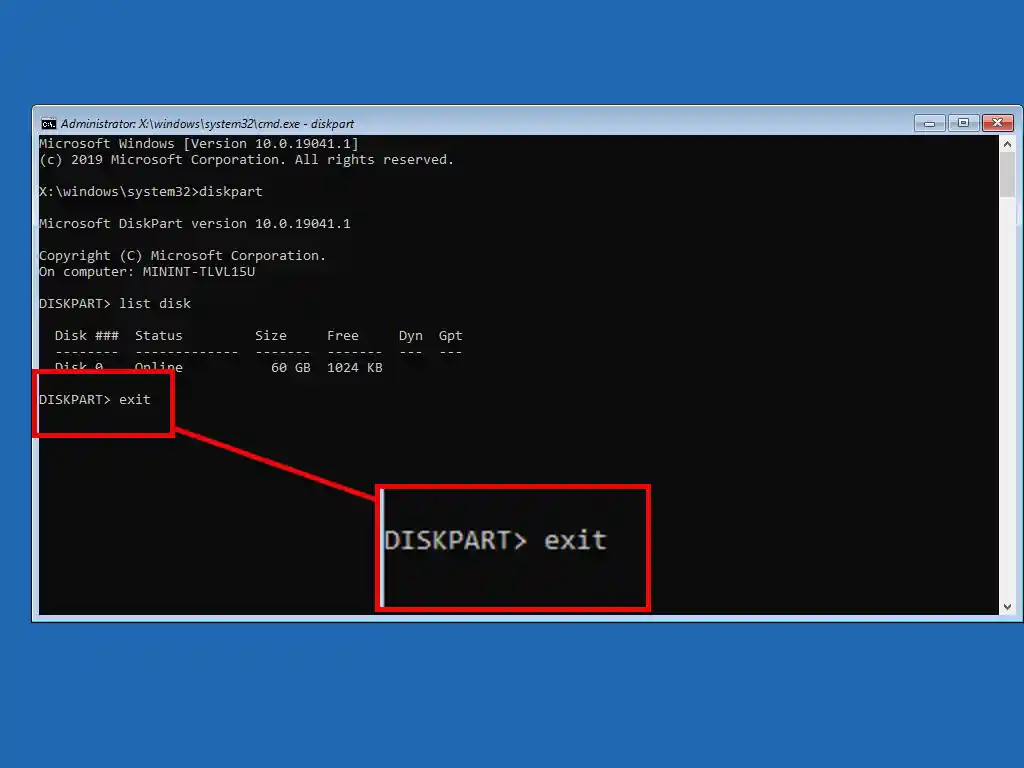
- You might need to find the disk number so use Diskpart. Type “diskpart” and press Enter.
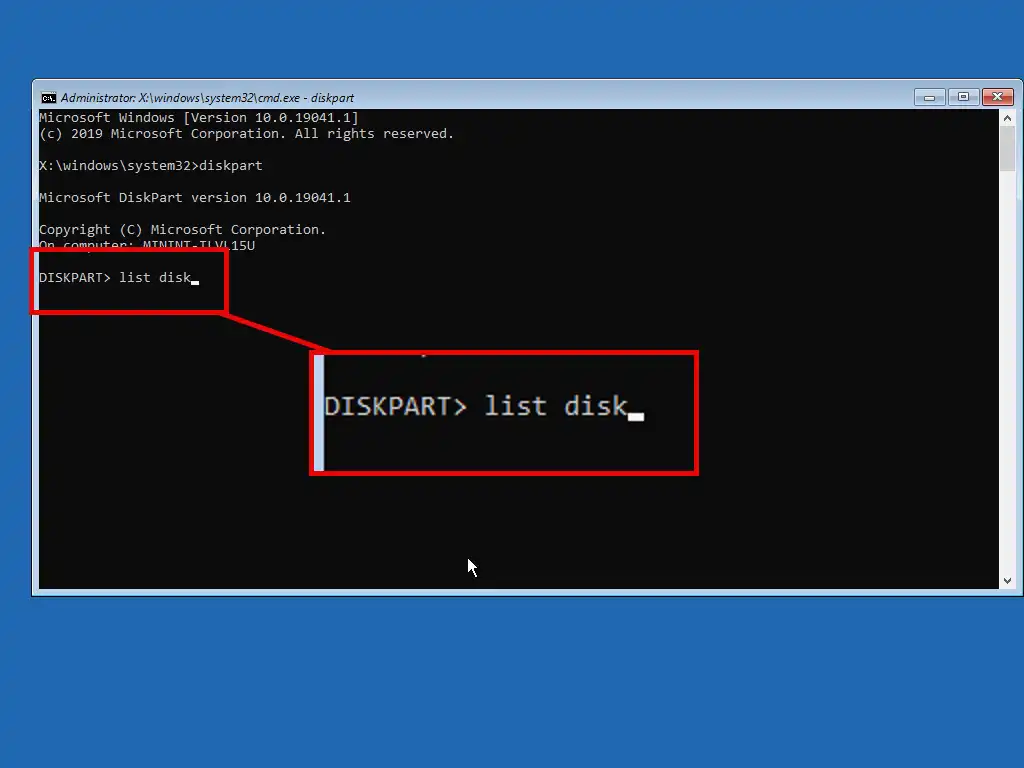
- Then type “list disk” and press Enter again.
- Make a note of your system disk number.
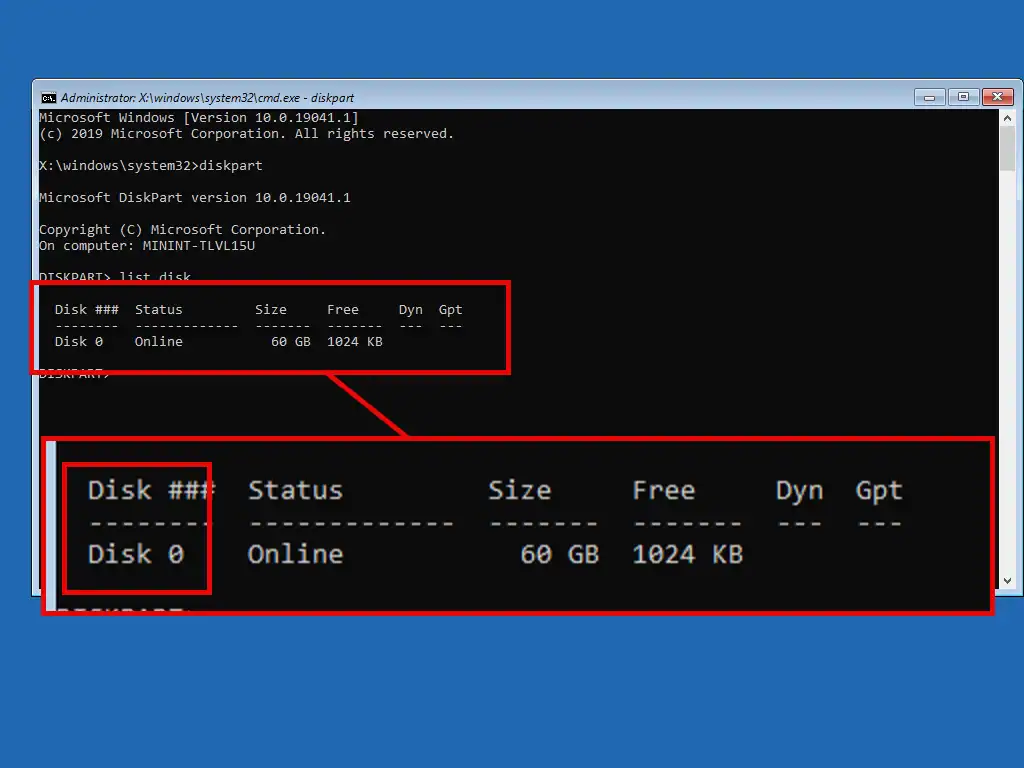
- Now that you know the disk number, you can get out of Diskpart by typing “exit” and pressing Enter.
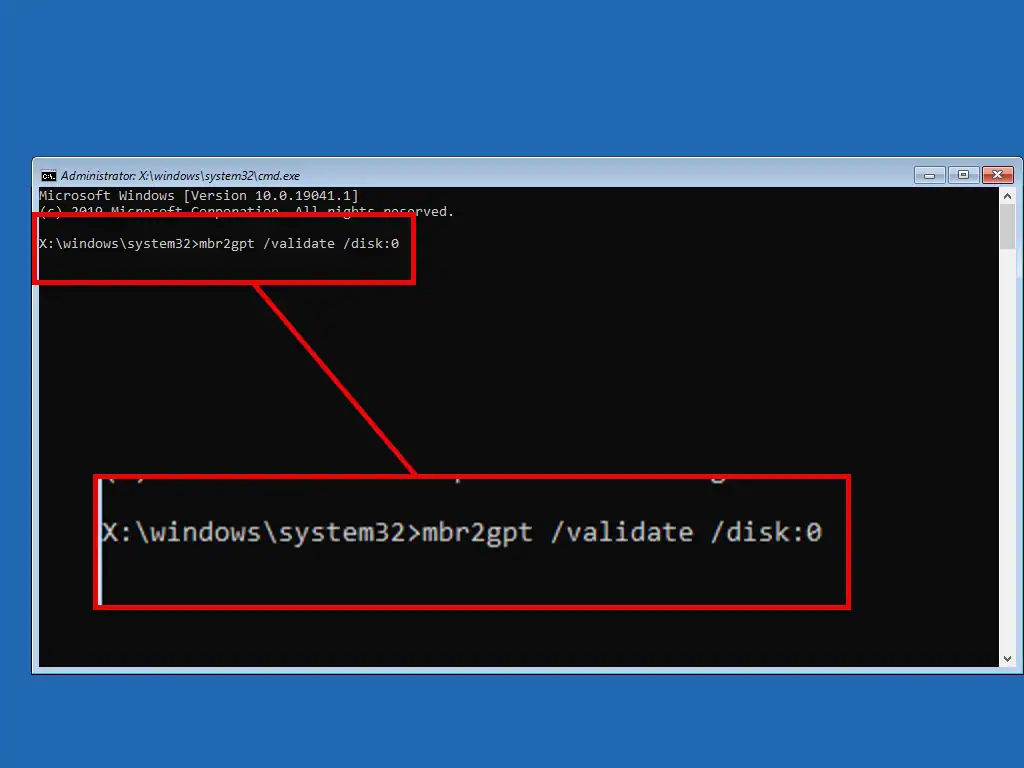
- To continue, you need to validate your disk. You can do this by entering the command “mbr2gpt /validate /disk:0”. Note that the command ends with a disk number. You’ll need to replace the 0 with the number of your specific disk. If you’ve only got one disk, then it’ll probably be 0, but if you have more than one, then be sure to enter the correct number.
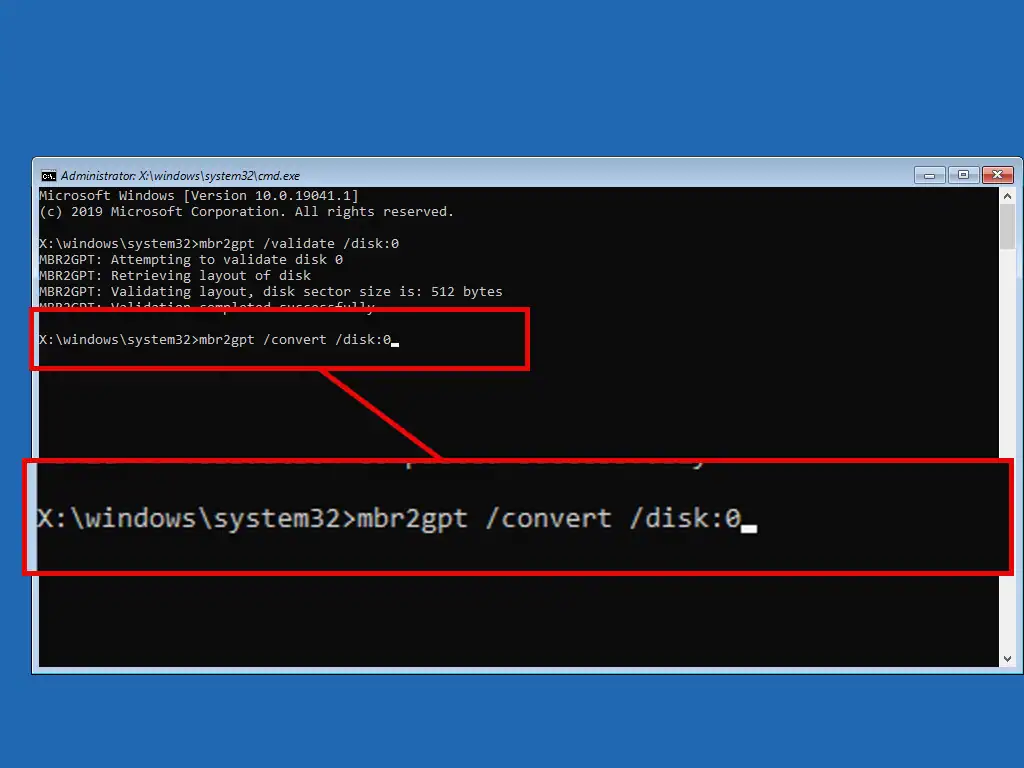
- To begin the process of converting from MBR to GPT without data loss, type this command “mbr2gpt /convert /disk:0”. Again you’ll need to substitute in your disk number if it’s different.
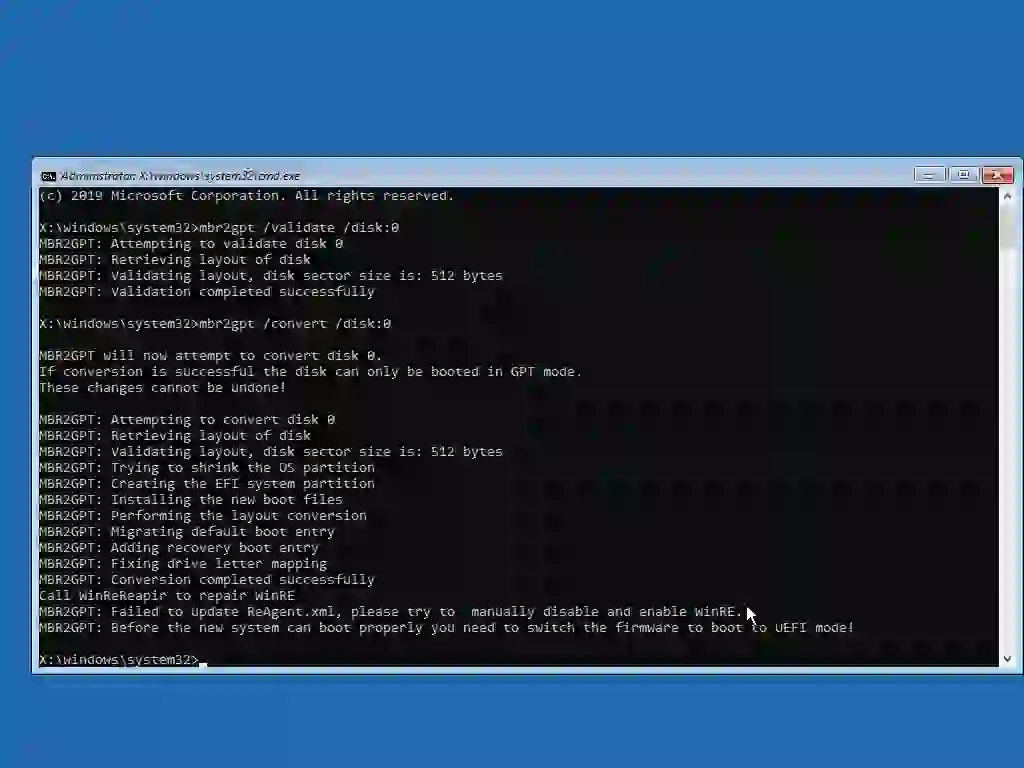
- After a short pause while the conversion happens, you should see that the conversion was successful.
Using MBR2GPT From Within Windows.
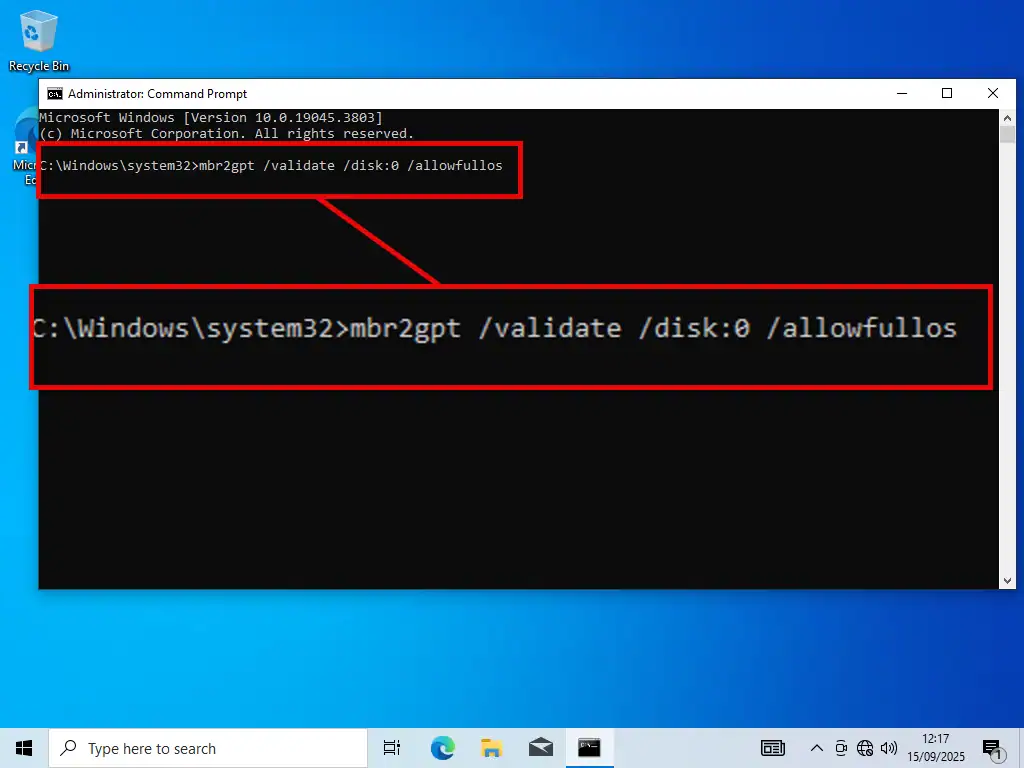
You can use MBR2GPT from within Windows rather than having to reboot into the recovery environment.
Open a Command Prompt with Administrator privileges. Then use Diskpart to find the disk number (if you’ve only got one disk then it’ll probably be disk 0).
- Then type “mbr2gpt /validate /disk:0 /allowfullos”.
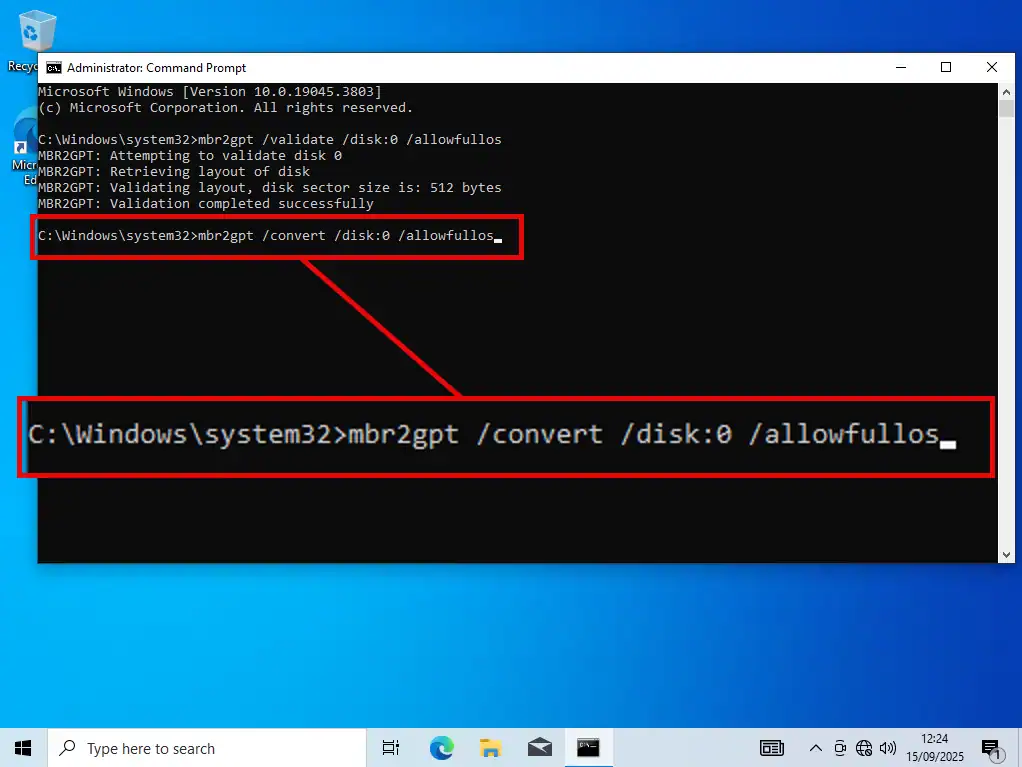
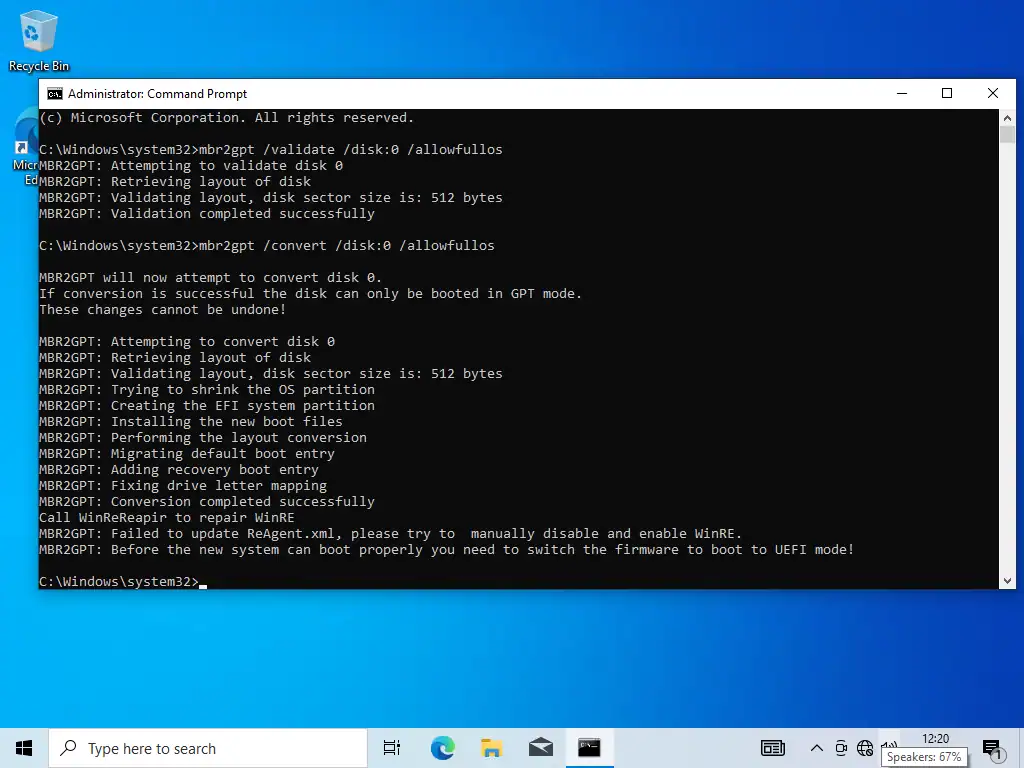
- Once that’s done, type “mbr2gpt /convert /disk:0 /allowfullos”.
- Hopefully your MBR disk will be converted to GPT. If it doesn’t, then try using the WinRE method outlined above.
Summary
Converting MBR and GPT disks is very risky. You could end up with an unbootable system and/or data loss so only do it if you really need to.
Be sure to make proper, up to date backups.
Related Posts
How To Partition A Hard Disk In Windows.
You can add partitions fairly easily in Windows.
Fix New Hard Drive Not Showing Up In File Explorer.
If you’ve recently added a new hard drive or SSD and it isn’t available in Explorer?
What Are Kilobytes, Megabytes, Gigabytes And Terabytes?
We’ve all heard the words, but what exactly are they?
Something For The Weekend
Create a Windows virtual machine. It’s free and not that difficult to do.
Virtual machines are great for experimenting with. You can try out new operating systems, you can browse the web safely and open suspicious emails. Download new software to try it out, all without risking your host (real) computer.

