
Gmail sorts your emails into tabs above your inbox: Primary, Promotions, Social, Updates and Forums. The idea is that the emails you care about land in Primary, and the rest go somewhere out of the way.
It works most of the time. But it’s also why emails seem to go missing, and why the newsletter you actually wanted keeps ending up in Promotions.
In this guide I’ll show you how to turn the category tabs off or on, add the hidden ones, keep a sender in Primary for good, and delete all your Promotions emails in one go. Plus the honest answer to whether you can make your own tab.
The Short Version
- Turn tabs off or on: click the Settings gear, then Customise next to Default under Inbox type, tick or untick, and click Save.
- Keep a sender in Primary: drag one of their emails onto the Primary tab and click Yes when Gmail asks about future emails.
- Delete all Promotions: open the Promotions tab, tick the select box, click Select all conversations in Promotions, then Delete.
Table of contents
- What Are the Category Tabs in Gmail?
- Can’t Find an Email? Check the Other Tabs
- How to Disable or Enable Gmail Category Tabs
- How to Move an Email to the Primary Tab (and Keep It There)
- How to Delete All Promotions Emails in Gmail
- Can You Create Your Own Category Tab in Gmail?
- Troubleshooting
- Frequently Asked Questions
- Summary
What Are the Category Tabs in Gmail?
There are five category tabs. Gmail decides which one each email belongs in as it arrives:
- Primary: emails from people, and anything Gmail can’t fit anywhere else. It’s the only tab you can’t turn off.
- Promotions: offers, deals, newsletters and other marketing emails.
- Social: emails from social networks such as Facebook and Instagram.
- Updates: receipts, bills, statements, delivery notices and account notifications.
- Forums: emails from online groups, discussion boards and mailing lists.
Most people see Primary, Promotions and Social. Updates and Forums are often switched off, so their emails show in Primary instead.
What About the Purchases Tab?
Since September 2025 Gmail also has a Purchases view. It isn’t one of the tabs above your inbox. You’ll find it in the menu on the left, and it collects order confirmations and delivery emails from all your tabs in one list.
Can’t Find an Email? Check the Other Tabs
When an email you’re expecting doesn’t turn up, nine times out of ten it’s sitting in Promotions or Updates. Each tab shows how many new emails it has, so glance along the row of tabs first.
If it’s not there:
- Search for it. The search box at the top searches every tab at once. Try the sender’s name or a word from the subject.
- Check Spam. Click More in the menu on the left, then Spam.
- Check All Mail. Archived emails leave your inbox and don’t appear in any tab. All Mail (under More) shows everything.
Found it in the wrong tab? The next sections show you how to stop it happening again.
How to Disable or Enable Gmail Category Tabs
You can turn any tab on or off except Primary. Turn them all off and every email lands in one inbox, the way Gmail used to be.
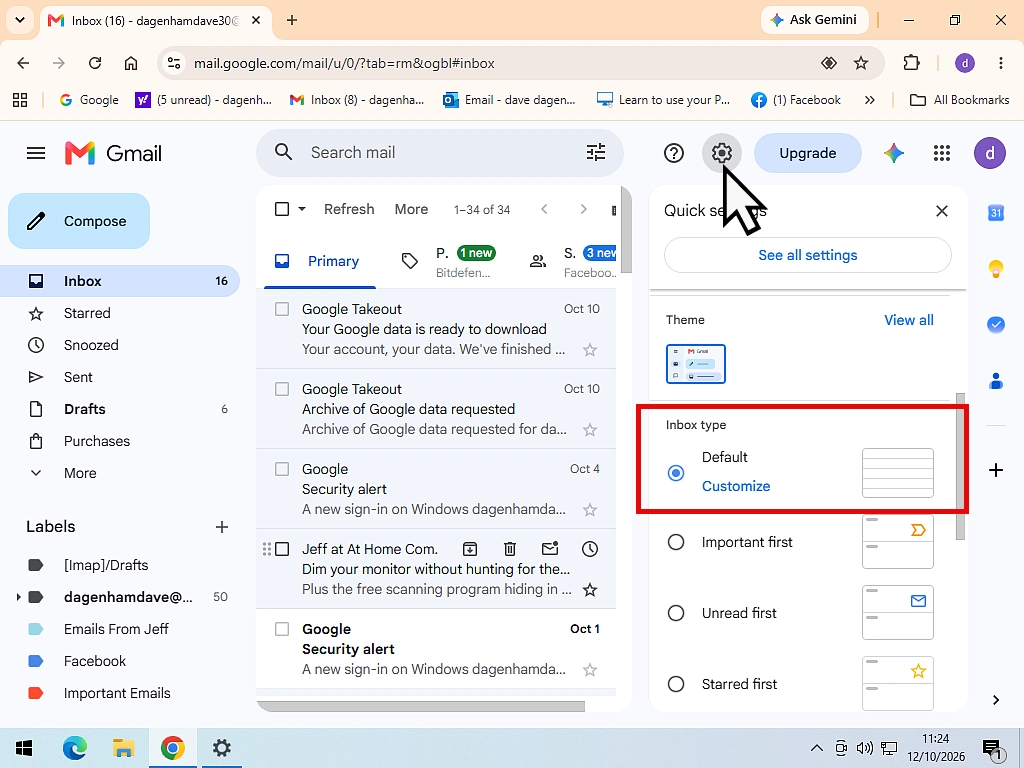
The quickest way is from the Settings gear:
- Click the Settings icon (the gear wheel) at the top right of Gmail.
- Under Inbox type, make sure Default is selected and click Customise next to it.
- Tick the tabs you want and untick the ones you don’t.
- Click Save.
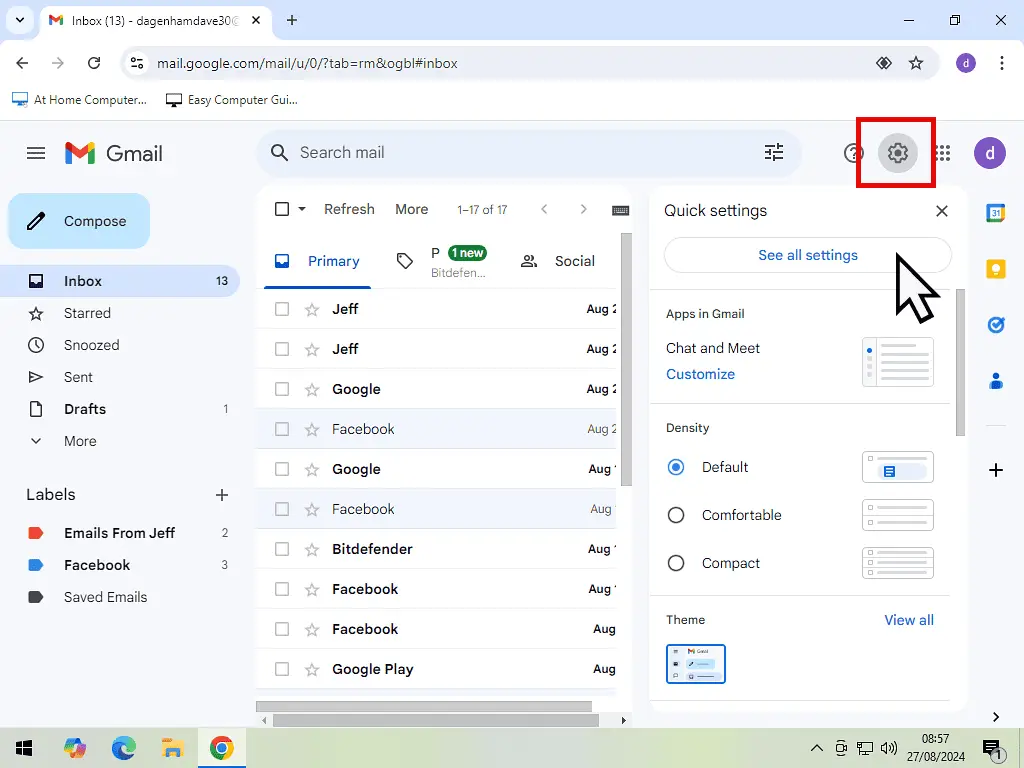
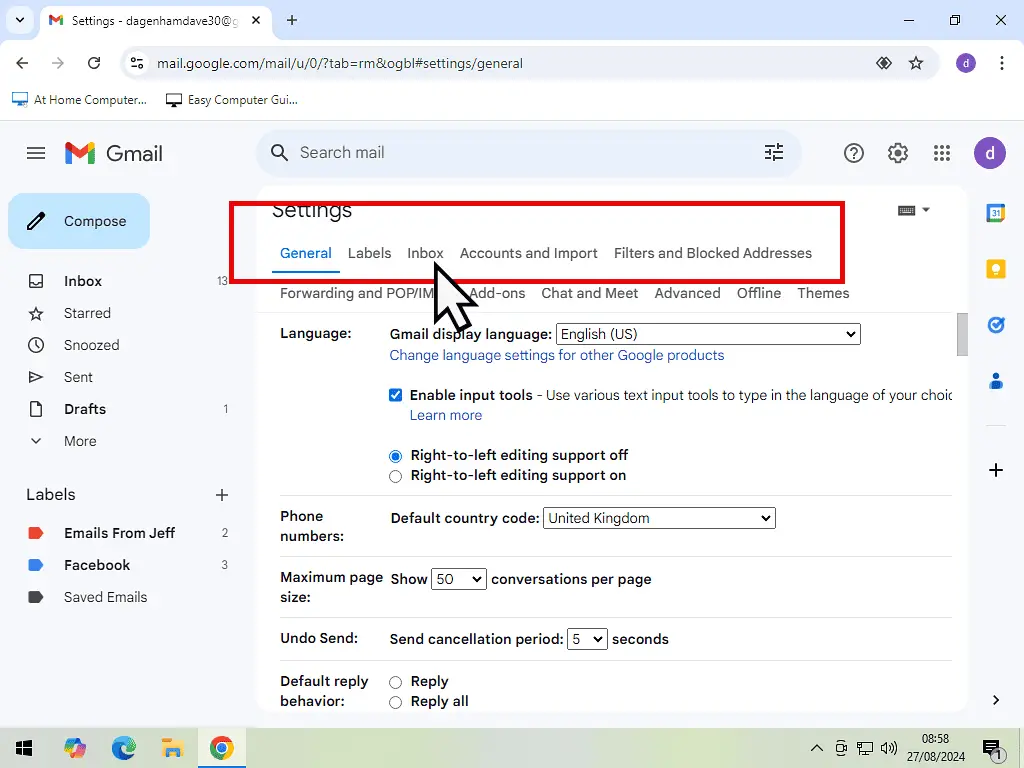
Or, the longer way: click the Settings icon, then See all settings, then the Inbox tab.
Add or Remove Gmail Categories
Right at the top of the Inbox settings you’ll see the categories. Primary is greyed out because you can’t turn it off. Tick or untick any of the others.
To add a tab, such as Updates or Forums, tick its box. To remove one, untick it. Then scroll to the bottom of the page and click Save Changes.

What Happens to Your Emails When You Turn Tabs Off?
Nothing is deleted. Emails that would have gone to a tab you’ve turned off arrive in Primary instead, so everything is in one list.
Gmail still sorts them quietly behind the scenes. So if you turn a tab back on later, its emails go straight back into it. And typing category:promotions into the search box still finds every promotional email, tab or no tab.
Turn Tabs On or Off in the Gmail App
On an Android phone or tablet:
- Tap the Menu icon (three lines) at the top left and tap Settings.
- Tap your account.
- Tap Inbox type and choose Default inbox.
- Tap Inbox categories, then tick or untick the tabs you want.
On an iPhone or iPad, tap the Menu icon, then Settings, then Inbox customisations and Inbox categories.
How to Move an Email to the Primary Tab (and Keep It There)
If Gmail puts an email in the wrong tab, move it, and tell Gmail to do the same with that sender’s emails from now on.
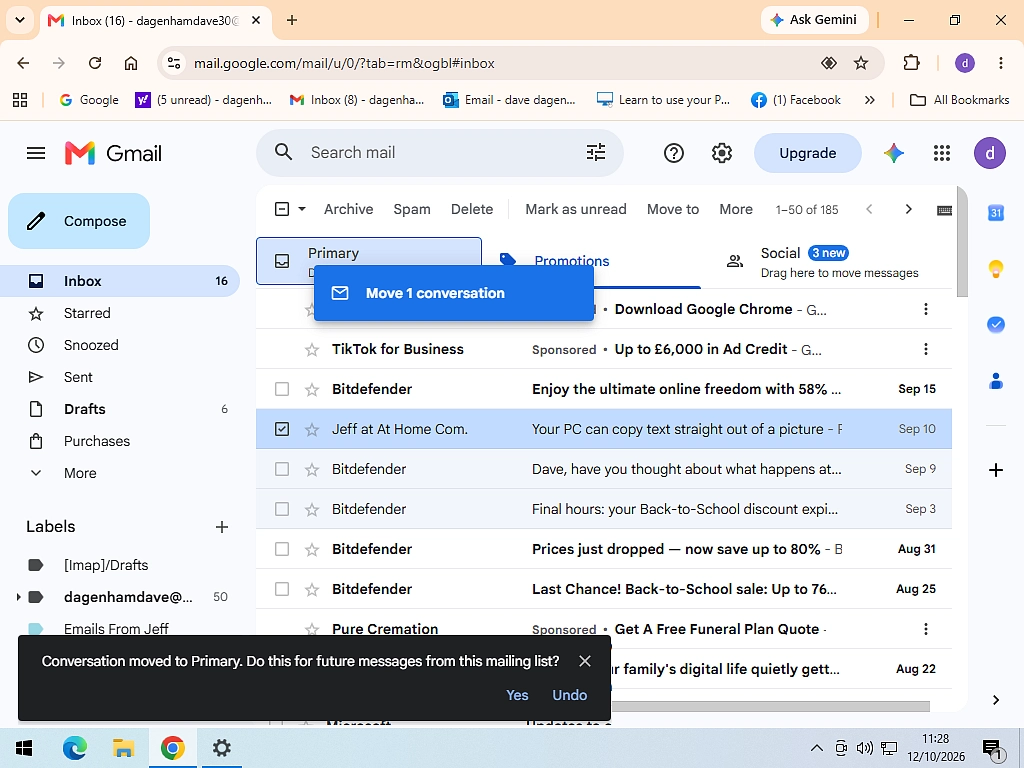
- Find the email in the wrong tab, for example Promotions.
- Drag it onto the Primary tab at the top of your inbox.
- A message appears at the bottom of the screen asking whether to do this for future messages from that sender. Click Yes.
You can also right-click the email, choose Move to tab and pick Primary.
In the Gmail app, open the email, tap the More icon (three dots) at the top right, tap Move to and choose Primary.
Use a Filter for Senders That Keep Going Back
If Gmail keeps putting someone back in Promotions, a filter settles it for good:
- Click the Show search options icon at the right-hand end of the search box.
- Type the sender’s email address in the From box and click Create filter.
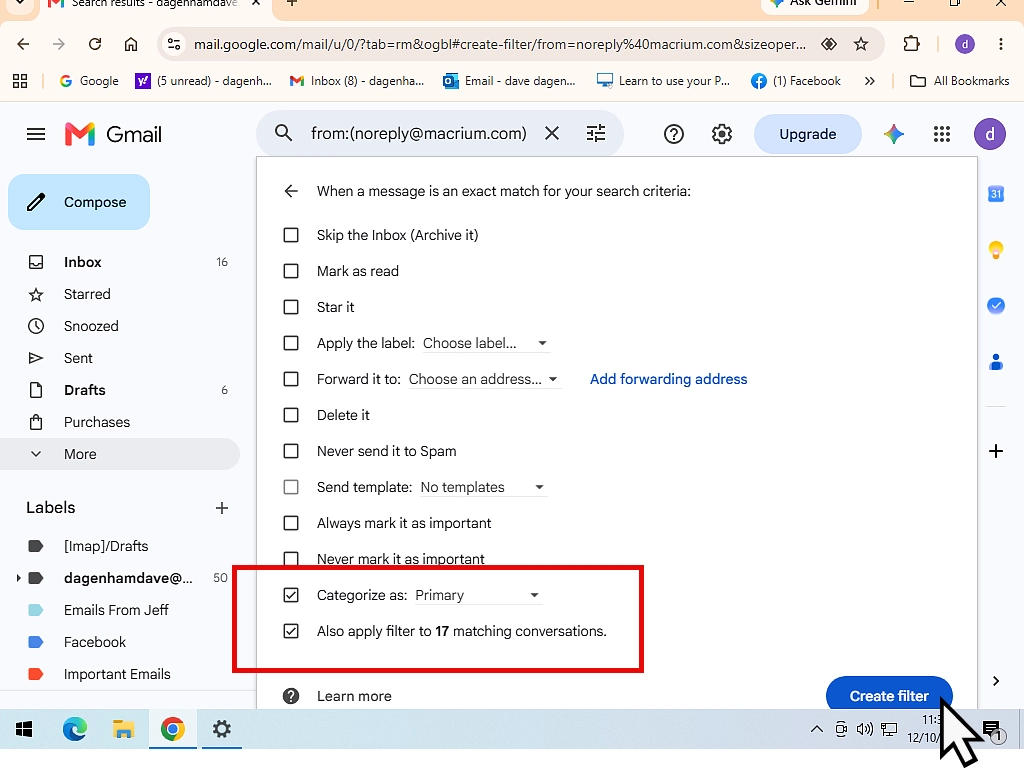
- Tick Categorise as and choose Primary.
- Tick Also apply filter to matching conversations to move their old emails too, then click Create filter.
Show Starred Emails in Primary
Starring an important email (click the star next to it) can put it in Primary as well as its own tab. Turn this on under Settings, See all settings, Inbox, by ticking Include starred in Primary.
How to Delete All Promotions Emails in Gmail
Promotions fills up fast, and it all counts towards your 15GB of free Google storage. Here’s how to clear the lot in one go on a computer:
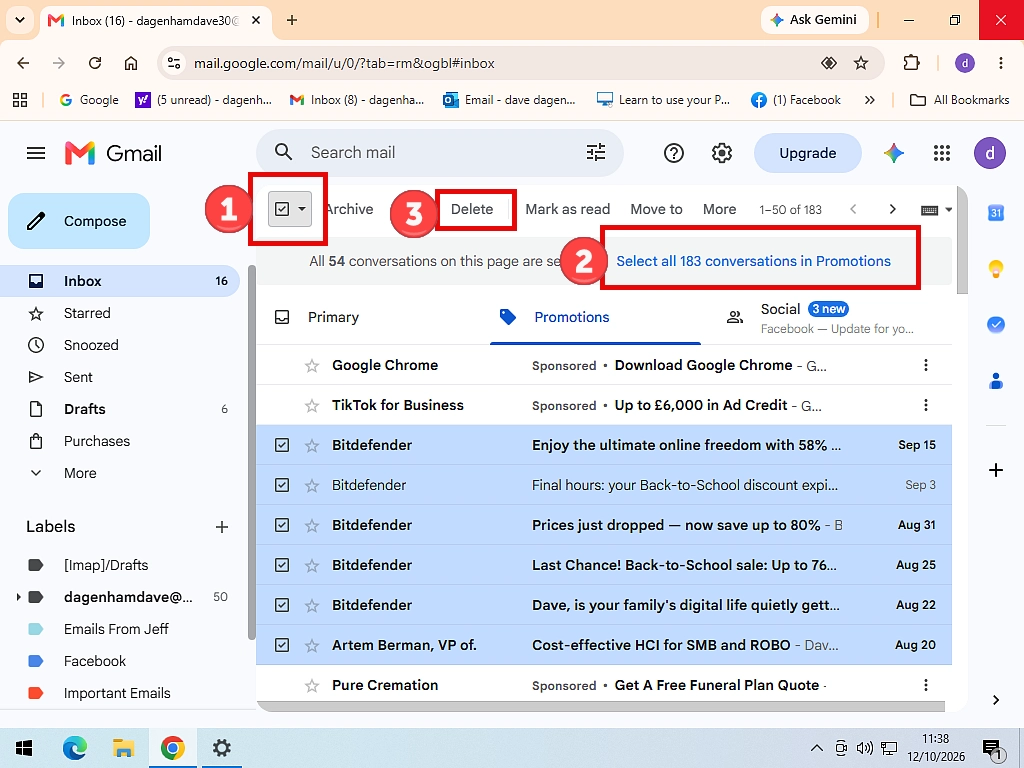
- Click the Promotions tab.
- Tick the select box at the top left, above your emails. That selects the 50 on screen.
- Click Select all conversations in Promotions, the link that appears just above the list.
- Click the Delete icon (the bin), then OK to confirm.
Note that you have to do this in the correct order. Select all conversations will only appear after you tick the Select box.
The emails go to the Bin, where Gmail deletes them for good after 30 days. Until then they still take up space, so empty the Bin if you’re short of storage.
Only Want to Clear the Old Ones?
Type category:promotions older_than:1y into the search box and press Enter. That finds promotional emails more than a year old. Select them all the same way, then delete.
On a phone it’s slower. The Android app can select up to 50 emails at a time (press and hold one email, then tap Select all). For thousands of emails, a computer is much quicker. Short of space? Gmail Storage Full? Here’s Why (and How to Fix it) has more ways to free it up.
Stop Promotions Arriving in the First Place
Turning off the Promotions tab doesn’t stop promotional emails. It just moves them into Primary, which is usually worse.
To actually get fewer, unsubscribe from the ones you don’t read, or use Gmail’s Manage subscriptions page to unsubscribe from lots at once. How to Block Emails in Gmail and Stop Spam shows you both, and how to block the ones that won’t take no for an answer.
Can You Create Your Own Category Tab in Gmail?
No. Gmail only has its five built-in tabs, and there’s no way to add a new one or rename the ones it has. Google’s own help page says so.
But there are two ways to get close.
Use a Label Instead
Labels are Gmail’s version of folders. Make one called, say, Family or Bills, and it appears in the menu on the left. Add a filter and Gmail files matching emails into it automatically. How to Create Folders in Gmail shows you how.
Use Multiple Inboxes
If you want sections on your main screen, change your inbox type to Multiple inboxes (Settings, See all settings, Inbox, Inbox type). You can then add up to five extra sections, each showing a label or the results of a search, such as everything from one person.
The catch is that Multiple inboxes replaces the category tabs. You can have one or the other, not both.
Troubleshooting
I Can’t See Any Tabs Above My Inbox
Your inbox type isn’t set to Default. Click the Settings icon and, under Inbox type, choose Default. The tabs only appear with the Default inbox type.
I Can’t Untick Primary
That’s normal. Primary is always on. To get back to a single inbox, untick all the other tabs instead.
Emails Keep Going Back to Promotions
Moving one email isn’t always enough. Set up a filter with Categorise as: Primary for that sender, as shown above. That overrides Gmail’s own sorting.
Promotions Are in a Different Order on My Phone
Gmail’s app can sort Promotions by most relevant instead of newest first. If you’d rather have the newest at the top, look for the sort option at the top of the Promotions tab and switch it to most recent.
Frequently Asked Questions
Q: How do I get rid of the tabs in Gmail?
A: Click the Settings gear, click Customise next to Default under Inbox type, untick every tab except Primary and click Save. All your emails then arrive in one inbox.
Q: What happens to my emails if I turn off Gmail categories?
A: Nothing is deleted. Emails that would have gone to the tabs you turned off land in Primary instead. Turn a tab back on and its emails go back into it.
Q: Can I create a new category in Gmail?
A: No. Gmail only has Primary, Promotions, Social, Updates and Forums. The nearest alternatives are labels, which act like folders, or the Multiple inboxes inbox type.
Q: How do I move emails from Promotions to Primary?
A: Drag the email onto the Primary tab, then click Yes when Gmail asks whether to do the same for future emails from that sender. For senders that keep going back, create a filter with Categorise as: Primary.
Q: How do I delete all promotions in Gmail?
A: Open the Promotions tab on a computer, tick the select box, click Select all conversations in Promotions, then click the bin. Empty the Bin afterwards if you need the storage space back.
Q: Does turning off the Promotions tab stop promotional emails?
A: No. It only moves them into Primary. To get fewer, unsubscribe from the ones you don’t want or use Manage subscriptions.
Q: Where is the Purchases tab in Gmail?
A: It’s not a tab above your inbox. Purchases is in the menu on the left, and it gathers order and delivery emails from all your tabs.
Q: Why do my emails go to Promotions?
A: Gmail decides from the sender and the content of the email. Anything that looks like marketing usually ends up there. Move the ones you want to Primary and Gmail learns.
Summary
Gmail’s category tabs are there to keep the clutter out of your way, and you’re in charge of them. Turn off the ones you don’t want, add Updates or Forums if you’d rather have them separate, and move any sender who’s in the wrong place.
If an email ever goes missing, check the other tabs first. And when Promotions gets out of hand, you can clear the whole tab in four clicks.
Related Posts
How to Block Emails in Gmail and Stop Spam
How to Create Folders in Gmail
How to Delete All Gmail Emails
Gmail is Switching Off Gmailify and Check Email From Other Accounts
Nothing has been switched off yet but if you have emails from different services, such as Yahoo, Outlook etc, sent to your Gmail account, you need to check this.
You can find this and other related step by step guides in – At Home Computer Gmail Guides
Written by Jeff Porter. I’ve been fixing Windows PCs since 2010 and I’m CompTIA Network+ certified. More about me