Gmail doesn’t actually use folders in the traditional computer sense. Instead it uses what are known as Labels.
You can use labels in much the same way as you’d use folders. I.e. you can store (or organise) your emails into them.
In this guide, I’ll show you how to create folders (labels) and also how to get Gmail to automatically filter your emails according to simple rules that you’ll set.
How To Create A Folder In Gmail.
There are various ways to create folders (labels) in Gmail.
But the easiest method is to simply right click on an email.
On the menu that opens, hover your mouse pointer over the Label As option.
On the second menu, click Create New.

Name The Folder (Label).
The New Label window will open. In the top box, type a name for your label (folder). Anything that makes sense to you. Then click the Create button.
Alternatively, you can “Nest” labels (folders) underneath a “Parent” label. A nested label is much like a subfolder.


Your new Label (folder) will appear in the left hand side panel of Gmail.
And the email you clicked on will also display the label.

If You Can’t See Your Labels (Folders).
Sometimes you won’t be able to see your labels. If that’s the case, scroll down the left hand panel.
The labels (folders) section is at the bottom of the panel.
Add A Colour To Your Labels (Folders) In Gmail.
To really make your labels (folders) stand out, you can colour code them.
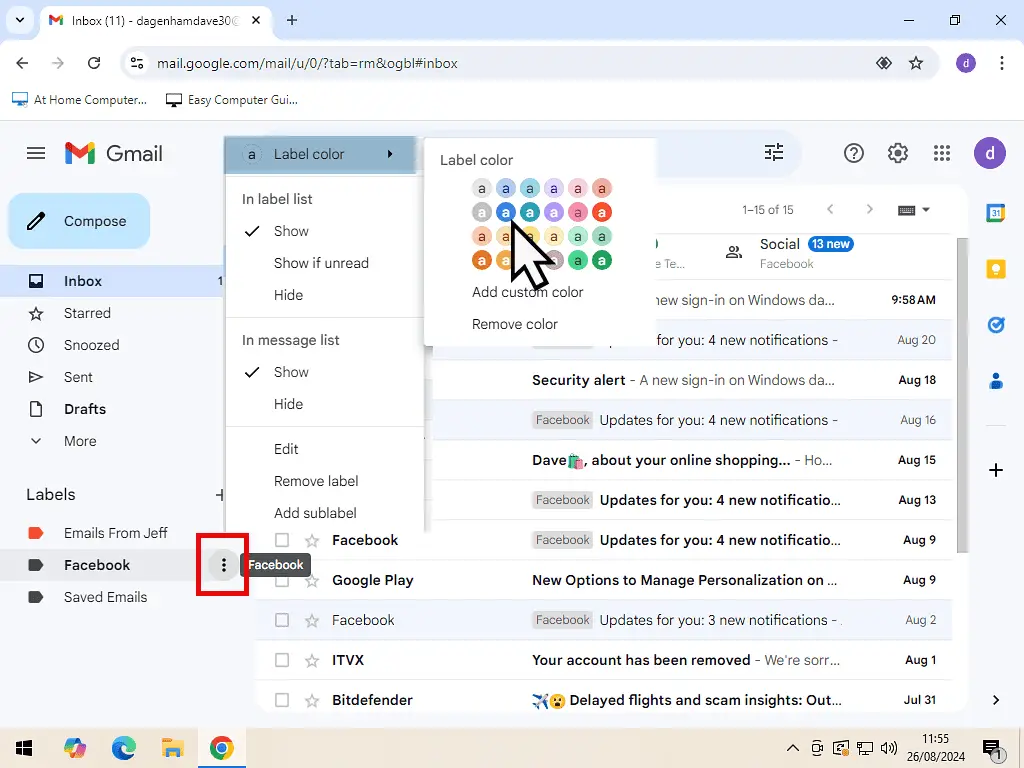
Hover your mouse pointer over the label in the left hand panel and you’ll see three vertical dots appear. Click on the 3 dots to open a menu.
Move your pointer onto Label Colour and then select the colour your want to use.

Moving Emails Into Gmail Folders (Labels).
Strictly speaking, labels in Gmail aren’t folders, but you can use them like folders. I.e. you can store your emails inside them.
To move an email from your Inbox into a folder (label), just drag and drop it onto the relevant label.

Move To Folder.
Another method of moving emails from your Inbox to a folder (label) in Gmail is to use the Move To command.
Select the email that you want to move by clicking in the Select box to the left of the message. You can select several emails at once.
Then click the Move To option on the toolbar. On the menu that opens, click on the folder (label) that you want the emails to be moved into.


Have Gmail Automatically Label Your Emails.
Adding labels manually to your emails isn’t difficult but is a bit tedious. However, you can have Gmail automatically label emails for you by setting up a simple filter.
Using a filter, you’ll tell Gmail what to look for and then what it should do when it finds an email that matches that filter.
To make Gmail automatically label emails, click the Settings icon (the gear wheel).
And then click See All Settings.

Creating A Filter In Gmail.
On the Gmail settings page, click on the Filters and Blocked Addresses tab.
Then click Create A New Filter.


You can setup a filter that’ll sort emails and apply labels to them according to sender, recipient, subject, size, and whether they have attachments.
You can also automatically apply labels to emails that do or do not include specific words.
In this example I’ll filter my my emails by the sender’s email address.
When you’ve chosen your filter method, click the Create Filter button.

Next you need to select what should happen to filtered emails.
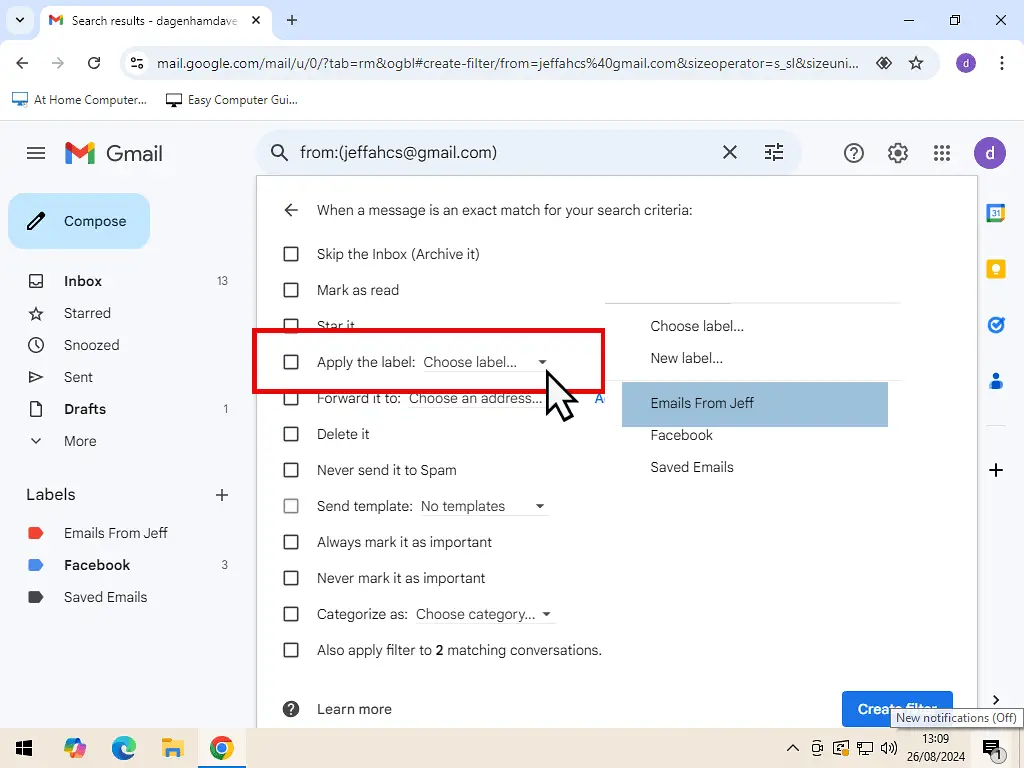
To have Gmail automatically sort your emails into folders and add a label, click the downward facing arrowhead beside the “Apply the label” option.
On the menu that appears, select the label (folder) that you want to use.
Note that the filter will only be applied to “new” emails. If you want it to be applied to exsiting emails, then select “Also apply filter to matching conversations”.
Finally click the Create Filter button in the lower right hand corner.

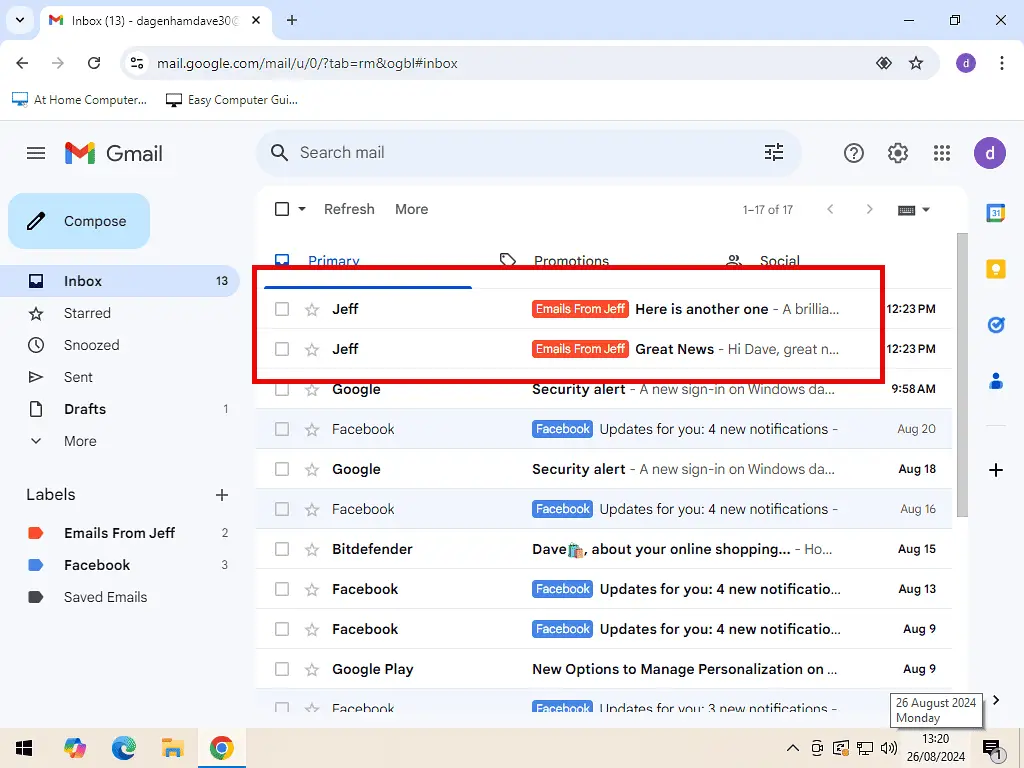
You may need to refresh your Inbox for the filters to take effect.
And sometimes (especially if you’ve got a lot of emails) it might take a few minutes for the labels to appear.
Summary.
Organising your emails into folders, or labels, makes it much easier to find them again at a later date. It’s very similar to sorting your files into folders on your computer.
By using filters, you can also get Gmail to do some of the heavy lifting, although you might have to experiment with different filter terms. For instance, some folks will have several email addresses, so you’d need to create filters for each address.
Even so, having your messages marked in your Inbox with brightly coloured labels makes them stand out from the crowd.
Stay Informed. Stay In Touch.
Now that you’ve found me, keep in touch. I publish new articles and update older ones constantly.
Let me send you a monthly email with all the latest guides for you to see if there’s anything you’re interested in.


